background image

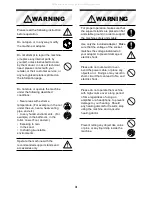
WARNING

Should any of the following situations 

result, please stop operation and 

remove the adapter from the socket, 

and consult with your retailer, the 

nearest customer service, or any of 

the recognized retailers listed on the 

information page:

•  The adapter or the power cable is 

damaged.

•  An object, or liquid has slipped into 

the interior of the machine.

•  The machine has been exposed in 

rain, or has got wet.

•  The machine is not operating or is 

operating with noticeable problems.

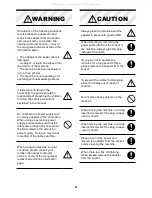
If there were children in the 

household, the adults should be 

responsible of ateaching the children 

to follow the safety precautions 

explained in the manual.

Do not share the power supply with 

too many adapters at the same time.  

When using an extension power 

supply, please make sure that the 

total power usage does not exceed 

the limit stated on the extension 

power supply.  Doing so may result 

in melting of the cables and fire.

When using the machine in other 

countries, please consult your 

retailer, the nearest customer 

service, or any of the recognized 

retailers listed on the information 

page.

CAUTION

Always place the machine and the 

adapter in areas with good airflow.

When inserting or removing the 

power cable into/from the socket or 

the machine, always grab the plug 

instead of the cable.

If you plan not to operate the 

machine for a long period of time, 

please remove the adapter from the 

socket. 

To prevent the cables from tangling, 

place the cables out of reach of 

children.

Do not place heavy objects on the 

machine.

When moving the machine, or during 

insertion/removal of the plug, always 

use dry hands.

When moving the machine, or during 

insertion/removal of the plug, always 

use dry hands.

Please turn off the power and 

remove the adapter from the socket 

before cleaning the machine.

When there is a risk of lightning 

strike, please remove the adapter 

from the socket.

4

All manuals and user guides at all-guides.com

Содержание DD BETA

Страница 1: ...ELECTRONIC DRUM SET USER MANUAL All manuals and user guides at all guides com a l l g u i d e s c o m...

Страница 2: ...cal injury and even death Please operate the machine according to instructions Object damage refers to any harm or adverse effects to household furniture pets and etc About Signs This sign indicates a...

Страница 3: ...Operate the machine with the recommended support stands and accessories only WARNING For proper operation make sure that the support stands are placed on flat and stable ground in order to support the...

Страница 4: ...Doing so may result in melting of the cables and fire When using the machine in other countries please consult your retailer the nearest customer service or any of the recognized retailers listed on...

Страница 5: ...ions alcohol or any other kinds of solvents to prevent the machine from deforming or discoloring Additional Precautions During operation please handle with care to prevent any damage Do not hit or pre...

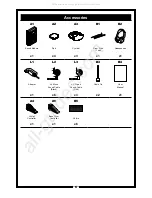
Страница 6: ...adphones x1 x4 x3 x1 x1 L1 L2 L3 B3 B4 Adapter L L Mono Sound Cable Black L L Streao Sound Cable Red Cable Tie User Manual x1 x6 x3 x2 x1 A4 A5 B5 Hi Hat Controller Bass Drum Controller Velcro x1 x1 x...

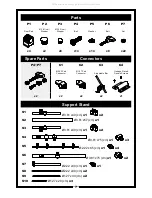
Страница 7: ...P5 P6 P7 Floor Pad 3 81 cm Stopper 2 22 cm Stopper Bolt Washer Bolt Nut x4 x2 x8 x14 x14 x8 x22 Support Stand S1 3 81 x40 cm x1 x2 S2 3 81 x57 cm x1 S3 3 81 x40 cm x1 x2 S4 3 81 x75 cm x1 x3 S5 2 22...

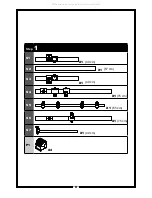
Страница 8: ...8 Step 1 S1 X1 S2 X1 S3 X1 S4 X1 S5 X1 S6 X1 S7 X1 P1 X4 40 cm 57 cm 40 cm 75 cm 65 cm 75 cm 40 cm All manuals and user guides at all guides com...

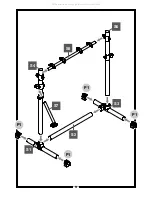
Страница 9: ...9 S5 S6 S1 S2 S4 S7 S3 P1 P1 P1 P1 All manuals and user guides at all guides com...

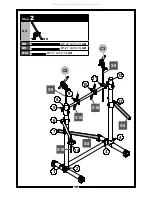
Страница 10: ...10 5 6 7 14 2 1 3 4 13 12 11 10 9 8 Step 2 C3 X2 S8 2 22 x40 cm x2 S9 1 27 x40 cm x2 S10 1 27 x20 cm x3 C3 C3 S8 S8 S9 S10 S10 S10 S9 All manuals and user guides at all guides com...

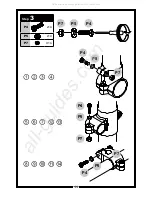
Страница 11: ...11 Step 3 P4 x14 P5 x14 P7 X14 P4 P4 P4 P5 P5 P5 P4 P5 P7 P7 P7 P7 All manuals and user guides at all guides com a l l g u i d e s c o m...

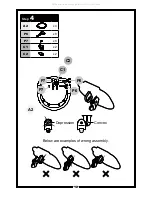
Страница 12: ...12 Step 4 A2 x4 P6 x8 P7 x8 C1 x2 C2 x2 Depression Convex Below are examples of wrong assembly P6 P6 C1 C2 P7 P7 A2 All manuals and user guides at all guides com...

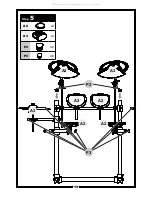
Страница 13: ...13 Step 5 A2 x4 A3 x3 P2 X2 P3 X8 A3 A3 A3 A2 A2 A2 A2 P3 P2 All manuals and user guides at all guides com...

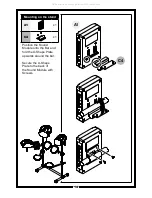
Страница 14: ...d A1 x1 C4 x1 Position the Sound Module onto the Bar and fold the U Shape Plate upwards around the bar Secure the U Shape Plate to the back of the Sound Module with Screws A1 C4 All manuals and user g...

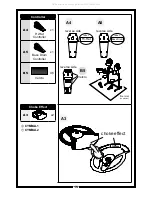
Страница 15: ...reverse side Bass Drum label A5 B5 reverse side Velcro floor mat no provide A3 choke effect Controller A4 Hi Hat Controller x1 A5 Bass Drum Controller x1 B5 Velcro X6 Choke Effect A3 x2 CYMBAL1 CYMBA...

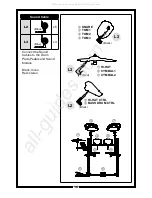
Страница 16: ...L1 CYMBAL2 Black HI HAT CTRL BASS DRUM CTRL Sound Cable L2 Black x6 L3 Blue x3 Connect the Sound Cables to the Drum Pads Pedals and Sound Module Black mono Red stereo L2 L2 L3 All manuals and user gui...

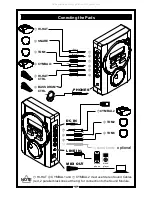
Страница 17: ...lines at the tip for connection to the Sound Module NOTE Conecting the Pads TOM2 TOM3 CYMBAL2 DC IN LINE IN MIDI OUT HI HAT CTRL BASS DRUM CTRL HI HAT SNARE TOM1 CYMBAL1 PHONES Red Black mobile phone...

Страница 18: ...layer a mobile phone other instruments or another sound source The sound is directed to PHONES MIDI OUT 5 pin DIN For transmitting MIDI data About MIDI MIDI Musical Instrument Digitable Interface is a...

Страница 19: ...picture of the Sound Module above displays Selection of ROCK Style When the Sound Module is turned on the setting will default to ROCK Style Available Drum Styles ROCK JAZZ METAL BLUES POWER TECHNO MA...

Страница 20: ...ction of Sound Set 1 When the Sound Module is turned on the setting will default to Sound Set 1 Sound Set Press this button to Toggle Reverb On or Off The function of Reverb is to simulate the compone...

Страница 21: ...button to Select the Metronome s Beat Count The picture of the Sound Module above displays Selection of Beat Count 3 4 When the Sound Module is turned on and Switched to Metronome the setting will de...

Страница 22: ...ealistic velocity sensor Effect Reverb Metronome 30 250 BPM 3 kinds of beats Wiring Terminal LINE IN 3 5 Stereo PHONES 3 5 Stereo MIDI OUT 5 pin DIN DC IN AC adaptor Connectors Hi Hat Snare Tom1 Tom2...

Страница 23: ...NA COWBELL POWER 1 HI HAT SNARE TOM1 TOM2 TOM3 CRASH1 CRASH2 BASS 2 HI HAT SNARE TOM1 TOM2 TOM3 CRASH1 RIDE BELL BASS 3 HI HAT SNARE TOM1 TOM2 SIDE STICK CRASH1 RIDE CYMBAL BASS 4 HI HAT SNARE TOM1 TO...

Страница 24: ...For more information please visit our website www ddrum com All manuals and user guides at all guides com...

Отзывы: