background image

CARE and MAINTENANCE

If the rear top burners are used extensively on high it is
possible for the vertical stainless steel panel of the low back
or high shelf to discolor from the burner heat. This discol-
oration can be removed by using Revere Ware Stainless
Steel Cleaner.

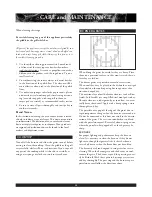
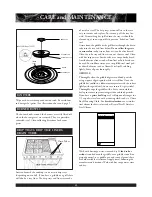
If in the event the oven door comes off track, or becomes
misaligned, realignment can be achieved by following this
simple procedure: Open the door and hold it all the way
open. Close the hinge latches. 

(see illustration)

Once both

hinges are locked, gently lift the door up and partially out
until the door is evenly aligned. Evenly slide the door back
into place and check to assure the hinges rest in the center
of each door hinge roller. With the oven door fully open,
unlock hinge latches and the door is ready to close again.

Be sure the oven and door are cool before you start to clean
them. They are porcelain enamel. It is acid resistant, but
not acid proof. Therefore, acid foods, such as vinegar,
rhubarb, alcohol, citric juices or milk, should be wiped and
not allowed to bake on.

Try 

mild cleaners

, such as: Bon-Ami, ammonia or ammo-

nia and water or Soft Scrub. Apply the powders on a damp
sponge or cloth. Rub lightly. Rinse thoroughly and dry. If

food has burned onto the oven and is difficult to remove,
soak the spots with a cloth saturated with household
ammonia. Allow it to soak for an hour or two, with the
door closed. The food soil should be easy to remove with a
damp soapy cloth or mild abrasive. 

A solution of 3 tablespoons ammonia in a 1/2 cup of water
may be placed in a warm (not hot) oven over night. This
loosens the spills and hardened residue so they are easily
wiped up with a clean damp sponge or cloth.

For 

stubborn stains

a soap filled steel wool pad can be

used. The 

occasional use

of abrasive cleaners is okay, if

used too often or vigorously they can eventually harm the
enamel. Dampen the pad, rub the surface lightly, rinse
thoroughly and dry.


Do Not use Oven Cleaners (such as Easy Off®

or Dow®) on the oven interiors or rack slide assem-
blies / rack supports

.

Commercial oven cleaners are cor-

rosive to the thermostat bulb and heating elements. Do
not spray or wipe this type cleaner onto the oven thermo-
stat bulb or heating elements. 

If some cleaner gets onto the

bulb or broiler burner, wipe it off immediately with a clean
damp cloth

.

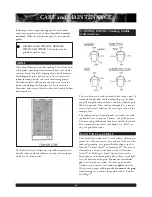
All of the oven racks and 12” rack supports are chrome
plated steel. 

*The roller assisted rack supports in the main

oven are stainless steel.

To remove the 12” Oven rack sup-

ports, first remove the oven racks, then grasp the rack sup-
ports and pull up and out. To replace the rack supports,
put the top in first.  *

See page 22 for removal of the self

cleaning Oven Roller Assisted Rack Support Assemblies.


Do Not immerse the self cleaning Rack Slide Assemblies

or wash in a dishwasher.  Use a damp sponge, cloth, or
steel wool with a mild detergent to clean.   

Chrome cleaners

, such as Soft Scrub, Cameo or Bar

Keepers Friend can be applied with a damp sponge follow-
ing package directions. Rinse and dry. 

Powdered cleaners

such as Bon-Ami or Comet are applied with a damp
sponge or cloth, rubbed lightly, rinsed and dried. For hard
to remove food soil use a dampened soap filled steel wool
pad, rinsed and dried. 

Harsh Cleaners

which are commer-

cial oven cleaners, such as Easy Off or Dow can be used on
the racks, but are not recommended for use on the self
cleaning oven rack slide assemblies or oven interiors.
Additionally, some commercial oven 

OVEN RACKS and RACK SLIDES

OVEN and DOOR INTERIOR

27

Содержание 30 inch

Страница 1: ...uture reference Shown here is your warranty serial number Have it available in the event your product needs service CERTIFIED DESIGN A MERICAN A S SO CIATIO N G S A PROFESSIONAL 48 36 30 DUAL FUEL RANGE MODELS CARE USE MANUAL ...

Страница 2: ...iddle Use 13 14 Oven Use 15 23 Oven Baking 15 18 Oven Broiling 18 19 12 Oven Proofing 21 27 24 Oven Self Cleaning 21 23 Care and Maintenance 24 28 Cooktop Care 24 25 Griddle Care 25 26 Grill Control Knob Care 26 Oven Oven Door Installation 27 Oven Racks Rack Slides 27 Oven Light Bulb Replacement 28 In Case of Power Failure 28 Leveling the Grates 28 Warranty Information 29 PROPANE GAS INSTALLATION ...

Страница 3: ... do if You Smell Gas This appliance has been factory assembled for natur al gas It should be correctly adjusted by a qualified service technician or installer for the type of gas that is used Do not repair or replace any part of this appliance unless it is specifically recommended in this manual All other servicing should be referred to a qualified technician Never open door broil with children ne...

Страница 4: ...R or THE BACK TRIM The drip tray handles directly above the oven door may be hot if the oven has been operated with the door open or if something has prevented the door from sealing Always use caution when pulling out the drip trays when the oven has been on or is currently on The drip trays get hot when the oven is on Do not remove drip trays until they are cool Never leave the cooktop unattended...

Страница 5: ...oven is hot do not let the pot holders contact the hot interior of the oven Use care when opening the oven door let hot air or steam escape before removing or replacing foods Do not rub damage move or remove the door gas ket It is essential for a good seal during baking Clean the ventilator hood and filters above the range or cooktop frequently so grease from cook ing vapors does not accumulate on...

Страница 6: ...PARTS IDENTIFICATION 5 EXTERIOR PARTS IDENTIFICATION RD 484GG SHOWN SEE PAGE 6 FOR PART LIST ...

Страница 7: ...en and 24 Oven there are two bulbs top one is Main Thermostat lower one is Auto reset PARTS IDENTIFICATION DCS RD 484GG DCS RD 486GL DCS RD 486GD DCS RD 366 DCS RD 364GL DCS RD 364GD OVEN ON HEATING DOOR LOCKED HEATING DCS RD 304 b 12 Proofing Oven 17 Drip Pans 18 Oven Light Switch a 27 Oven b 12 Proofing Oven 19 Oven Door Gasket 20 Drain Tubes 21 Griddle Flue Cover Vent 22 27 Oven Control Knob 23...

Страница 8: ...ottom as in the floors of a building To insert the oven racks A Hold the rack with the back safety rail in the up posi tion and towards the rear of the oven Slip it into the oven so the rack slides are between the rack and the rack guides B As you slide the rack into the oven tip the front of the rack up slightly so that the safety stops on the back of the rack clear the rack slides The safety sto...

Страница 9: ...mance When standing in front of the range the locating pin on the burner base and corresponding slot in the port ring is located at approximately the 3 o clock position See the fol lowing illustration at top of next column Your new professional cooktop has exceptionally low simmer ing capabilities The center simmer cap serves as a heat dif fuser to spread out the heat to avoid having a center hots...

Страница 10: ...low tips An improper air gas mixture may cause either a burner flutter or a yellow tipped flame A technician should adjust the flame During initial use foreign particles in the gas line or dust in or in the air around the appliance may cause an orange flame This will disappear with use The correct height of the flame mainly depends on the size of the bottom of the cooking utensil the material of t...

Страница 11: ...BE RUNNING FROM THE GRILL OR THE GRIDDLE INTO THE DRIP TRAY LINERS For best results we recommend using Professional Cookware This type of utensil can be found at your finer department stores specialty cooking shops or Restaurant Supply Stores If using regular cookware be very careful if the pans have plastic handles as these large professional size burners can flame up on the outside of the pan an...

Страница 12: ...nd ash can be emptied off the radiant tray when cool by shaking over a waste receptacle Chipping or crack ing of the briquettes may occur as they may get brittle with age depending on frequency of use This is normal and does not affect the cooking Do not replace the radiant tray briquettes with alternates Contact DCS for genuine factory direct replacement parts For proper searing and browning the ...

Страница 13: ...oneness A steak should be at least 1 inch thick to have it turn out rare and juicy The cooking time is affected by the temperature of the meat when you start to cook it the size and shape of the cut and the kind of meat you are cooking The degree of doneness desired also affects the time When turning the meat over always use a spatula as it will not puncture the meat allowing the juices to run out...

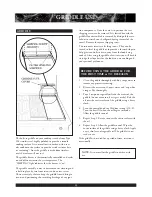
Страница 14: ...er screws are leveling screws They can be turned to level the griddle or to provide a forward slope to help grease and oils to drain away from the food being cooked After using the griddle a few times you will be able to judge the slope best for the foods you are cooking and your personal preference 1 Clean the griddle thoroughly with hot soapy water to remove any protective coating 2 Rinse with a...

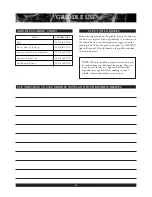
Страница 15: ...ill turn off Place the food on the griddle and cook to desired doneness NOTE When the griddle is properly seasoned it can be used without any additional shortening However it can be used for flavor A light mist of non stick vegetable spray applied before cooking to a cool griddle makes delicate foods easier to turn USE OF THE GRIDDLE GRIDDLE COOKING CHART 14 FOOD TEMPERATURE 225ºF to 250ºF 300ºF t...

Страница 16: ... circulating hot air heats and browns the surface of the food more effectively than in a standard oven This allows most foods to be cooked at lower oven temperatures or in less time if baked at the regular tem perature The air is recirculated and reheated Uncovered longer cooking foods such as large pieces of meat or other foods that can be cooked in low sided baking utensils or air leavened foods...

Страница 17: ... do not conduct heat as well as metal but they can be used Use them for foods that do not require a dark brown crust or crisping such as soufflés Baked items cook more quickly and evenly if they are indi vidually smaller in size i e two or three small foods do bet ter than one large piece When single food items are baked always center the food on the rack If several foods are being baked space the...

Страница 18: ...ing roasting or warming using one two or three racks If you are going to use regular Bake simply push in the BAKE switch on the valve panel above the Large Oven knob and turn the con trol knob to the temperature used in the recipe To use Convection Bake push the Convection Switch located on the Control Panel and turn the control knob to the tem perature desired 1 Press BAKE or CONVECTION BAKE Sele...

Страница 19: ...han the food on the upper rack particularly if you are using large baking uten sils If you are using two racks simultaneously be sure to stagger the baking utensils so that one is not directly above the other and the heated air can circulate freely around each pan Allow at least 1 of space between the oven walls and the pans If using large or commercial size baking utensils the food may take a few...

Страница 20: ...cannot with stand the intense heat of the broiler burner To accurately determine the doneness of a thick steak or chop 1fi inches thick or more use a meat ther mometer Insert the point of the thermometer into the side of the meat to the center Cook the first side to 90ºF for rare meat Cook the first side to 100ºF for medium to well done Cook the second side to the desired degree for the doneness y...

Страница 21: ... the oven control knob to 225ºF place the food in the oven in a pan with a tight fitting lid Follow recipes for this type of cooking To thaw uncooked frozen food set the oven control knob for 150ºF Be sure the food is tightly wrapped in foil Thaw the food just enough to handle it Cook immediate ly Do not refreeze To thaw frozen cooked food set the oven control knob to 170ºF Loosen the freezer wrap...

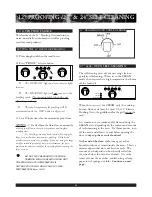
Страница 22: ...OT THE PROOFING OVEN TEMPERATURE IS NOT HOT ENOUGH TO HOLD FOODS AT SAFE TEMPERATURES above 140ºF The self cleaning oven of your new range features pyrolytic self cleaning When set in the CLEAN mode the oven reaches a high temperature that burns off the food soil When the oven is set for CLEAN only the cooktop burners four or six may be used The 12 Electric Proofing Oven the griddle and or the gri...

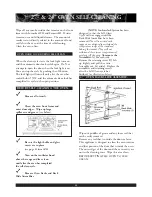
Страница 23: ...ven has completed the self clean cycle Remove Oven Racks and Rack Slide Assemblies NOTE An Interlock System has been designed so that the Self Clean Cycle will not engage until the Rack Slide Assemblies have been removed The roller assisted rack supports are designed to withstand the temperature range of the standard baking thermostat They will not withstand the extreme temperatures of pyrolytic s...

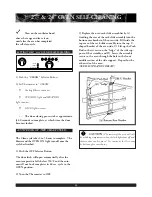
Страница 24: ...ition 2 Turn the Thermostat to OFF 3 Replace the oven rack slide assemblies by A Guiding the rear of the rack slide assembly into the bottom rear bracket of the oven side B Guide the top rear of the rack slide assembly into the top U shaped bracket of the oven side C Lift up the Push Rod so that it rests on the ledge of the side sup port of the assembly and D Screw the assembly secure to the oven ...

Страница 25: ...ean the griddle or the grill very carefully while still hot see directions If you wipe off any part of the cooktop while it is hot do so carefully as using a wet sponge or cloth can result in steam burns When lifting the grates be careful as they are heavy Place them on a protected surface so they won t scratch the sur face they are laid on The burner grates are porcelain enamel over cast iron Whe...

Страница 26: ... as Bon Ami or Soft Scrub can be used For stubborn stains use a soap filled steel wool pad or a harsh abrasive such as Comet or Ajax rubbing lightly Rinse all parts thoroughly GRIDDLE Thoroughly clean the griddle of grease and food particles using a square edged spatula while it is still hot Once the griddle has cooled to a lukewarm temperature rub the surface lightly with vegetable oil do not use...

Страница 27: ...ak Rinse and dry thoroughly It is impor tant to replace these knobs on the correct gas valve on the control panel The cooktop and grill control knobs are similar the cook top knobs have a setting for Simmer the grill does not The oven and griddle control knobs are similar they both have temperatures on them oven knob has a Broil set ting the griddle does not This is made of stainless steel Use the...

Страница 28: ... up with a clean damp sponge or cloth For stubborn stains a soap filled steel wool pad can be used The occasional use of abrasive cleaners is okay if used too often or vigorously they can eventually harm the enamel Dampen the pad rub the surface lightly rinse thoroughly and dry Do Not use Oven Cleaners such as Easy Off or Dow on the oven interiors or rack slide assem blies rack supports Commercial...

Страница 29: ...ace it with a 40 watt appliance light bulb only 4 Replace cover Turn circuit breaker back on if turned off See Caution CAUTION Be sure the Oven light switch is in the OFF position and the cover is cool If the bulb comes loose from the base turn off the power to the oven at the circuit breaker panel before attempting to remove the bulb base from the socket The broiler oven grill or griddle burners ...

Страница 30: ...d agency or the use of unauthorized parts Overtime weekends holidays Discoloration of the griddle plate Improper installation such as no regulator improper hook up etc Chipping of porcelain enamel grates Service visits to Correct the installation You are responsible for providing electrical wiring gas installation and other connecting facilities Reset circuit breakers replace home fuses or establi...

Страница 31: ...rocess at DCS we reserve the right to change specifications or design without notice Litho in USA 02 02 Part No 10605 REV 3 5800 Skylab Road Huntington Beach CA 92647 714 372 7000 Fax 714 372 7001 Direct Parts Customer Service 888 281 5698 ...

Отзывы: