background image

Raider Max 250(single/double-seat) : Owner’s Manual                                     Version:1.0  Oct. 2005 


27

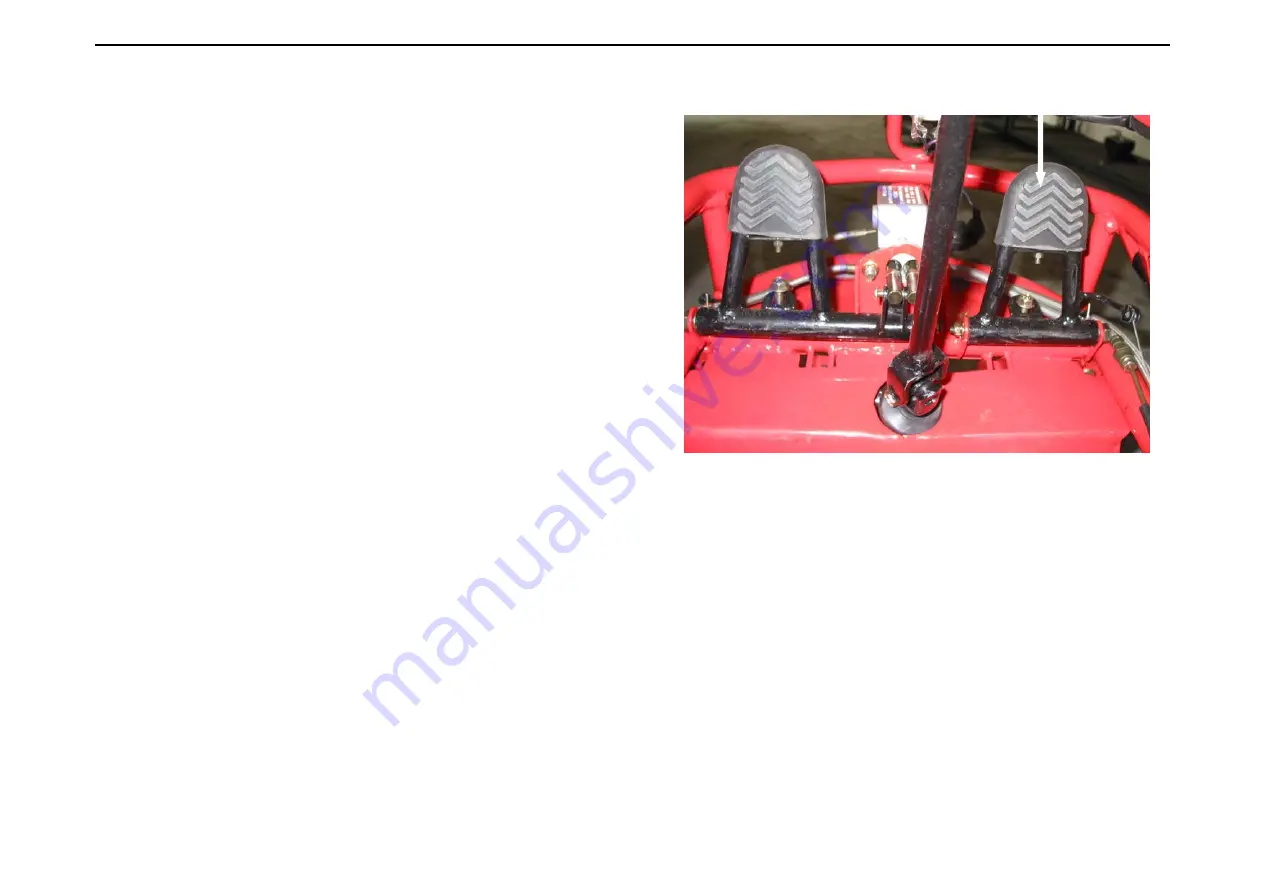
b. Brake 

The brake is located on the left side of the vehicle.   
Applying pressure to the pedal can draw the brake calipers 
around the brake pumps (one at the rear wheel, two at the 
front wheel), and slows or stops your BUGGY. 
 

Warning:

 when use the brake, don’t step on the throttle pedal too hard; 

otherwise the clutch will be burned. 


c. Control Panel 

z


Water Temperature Indicator------ 

indicates the engine water temperature. 

z


Tachometer------

 indicates the engine rotative speed. 

z


Headlight Switch

------It controls the headlight switches. 

z


Position Lamp Switch------

Turn on this switch, the position lamp will show you the position of your 

vehicle. 

z


Headlamp H/L Switch

------It can transform the high beam headlamp to the dipped headlamp, or the 

dipped headlamp to the high beam headlamp. 

Brake Pedal 

Throttle Pedal 

Содержание Raider Max 250S

Страница 1: ......

Страница 2: ...anship under the following terms and conditions This warranty covers the engine and engine related components for a period of 180 days from the date of purchase This warranty does not apply to any parts that in the seller s opinion were defective because of improper maintenance improper assembly alterations abuse negligence usage of non genuine parts or accidents Should warranty service be require...

Страница 3: ...y way so as to adversely affect its safety or reliability c Competition or racing The warranty does not cover any losses of the seller vehicle use any losses of time any inconveniences or any other consequential damages which include but are not limited to the losses or damages to any persons property or expenses of returning damaged units to the vehicle distributor or any DAZON authorized dealers...

Страница 4: ...ords about Safety 6 3 Important Safety Information 8 4 Safety Labels 12 5 Are You Ready to Drive 13 6 Is Your Vehicle Ready to Drive 18 7 Safe Driving Precautions 21 8 Operation 26 9 Service Instructions 39 10 Repairs 49 11 Periodical Checks and Services 50 12 Specifications 51 Attachment Wiring Diagram ...

Страница 5: ...n Failure to follow the warnings contained in this manual can result in serious injuries Be sure to follow the recommended maintenance schedule and service your vehicle accordingly Preventive maintenance is extremely important to the longevity of your BUGGY Beginners should drive this BUGGY in a large open area to practice handling this BUGGY Wear protective gears all the time when driving or ridi...

Страница 6: ...nd other information on labels in this manual This information alerts you to potential hazards that could hurt you or others It is not practical or possible to warn you against all hazards associated with operating or maintaining your BUGGY so you must use your own good judgments You will find important safety information in a variety of forms including Safety Labels on the BUGGY Safety Messages p...

Страница 7: ... Damages to your BUGGY and possible subsequent personal injuries or death could result from the failure to take proper precautions described within the labels Safety Headings such as Important Safety Reminders or Important Safety Precautions Safety Sections such as Buggy Safety Instructions about how to use this BUGGY correctly and safely The whole manual is filled with important safety informatio...

Страница 8: ...ou ll find many helpful recommendations throughout this manual The following are a few of the most important ones Follow the Age Recommendation It is strongly recommended that no one under age of 16 be permitted to drive this BUGGY without adult supervision Always Wear a Helmet Facts have proven that helmets can significantly reduce the quantity and severity of head injuries so when you drive your...

Страница 9: ... should take time to become familiar with how this BUGGY works Practice in a safe area until you have built your skills and gotten accustomed to this Buggy s size and weight Because many accidents have involved inexperienced or untrained drivers we urge all drivers to take a training course approved by the Buggy Safety Institute Check with your dealer for more information on the training course Be...

Страница 10: ...n one drink can reduce your ability of responding to changing conditions and every additional drink can lengthen and worsen your reaction time So don t drink and drive and don t let your friends drink and drive either Never Drive Indoors The exhaust from the engine contains a tasteless odorless but poisonous gas called carbon monoxide For the health of your family please don t drive your BUGGY in ...

Страница 11: ...y to occur on slippery surfaces such as snow ice mud and loose gravel If you skid or slide on ice you may lose all directional controls To avoid skidding or sliding on slippery terrain surfaces you should keep your speed low and drive carefully This section presents some of the most important information and recommendations to help you drive your BUGGY safely Please take a few minutes to read it ...

Страница 12: ...e seat Owner s Manual Version 1 0 Oct 2005 12 SAFETY LABELS The labels should be considered permanent parts of your BUGGY If a label comes off or becomes difficult to read please contact your dealer for warning label replacements ...

Страница 13: ...fore you drive your BUGGY for the first time we urge you to Carefully read this owner s manual and the labels on your BUGGY Make sure that you understand all the safety messages Learn how to operate all the controls on your BUGGY Ask for adult supervision if you are under 16 years old Before each of your drive we urge you to be sure that You feel well and you are in good physical and mental condit...

Страница 14: ... can reduce the chances of injuries when you drive The following suggestion will help you choose the proper driving gear 1 Helmets and Eye Protection Gear Your helmet is your most important driving gear because it offers the best protection against head injuries Your helmet should fit your head comfortably and securely An open face helmet offers some protection but a full face helmet offers more R...

Страница 15: ... your hands Driving pants with knee and hip pads a driving jersey with padded elbows and a chest and shoulder protector z Operating this BUGGY without wearing an approved motorcycle helmet eye protection gear or any protective apparel could increase your chances of head and or eye injuries and even possibly death in the event of severe accidents z Always wear an approved motorcycle helmet an eye p...

Страница 16: ...en accustomed to all the controls on this BUGGY and felt comfortable with its size and weight Age Recommendation It is strongly recommended that no one under age of 16 be permitted to operate this BUGGY without adult supervision z Operating this BUGGY without proper instructions could increase your risks of accidents that could lead to serious injuries or even death z A child driving a BUGGY that ...

Страница 17: ...perating your BUGGY Consult your doctor for the assurance that it is safe to operate your BUGGY after taking some kind of medication Limited Loadage The limited loadage on the rear rack is 10kg or 22lbs z Operating this BUGGY after consuming alcohol or drugs can seriously affect your judgments cause you to react more slowly affect your balance and perception and even could result in serious injuri...

Страница 18: ...also because a breakdo wn or even a flat tire can be a major inconvenience If your BUGGY has overturned or has been involved in a collision please don t drive it until your dealer has inspected it There may be damages or other problems you can t see z Improperly maintaining your BUGGY or failing to correct a problem before driving can cause a crash in which you can be seriously hurt or even killed...

Страница 19: ...ded look for signs of damages or excessive abrasion z Nuts Bolts Check the wheels and all the accessible parts to see if the nuts bolts and fasteners are tightened use a wrench to tighten them if needed z Underbody Exhaust System Check for any dirt vegetation or any other debris that could cause fire hazards or interfere with the proper operation of your BUGGY and remove them z Air Cleaner Housing...

Страница 20: ...se it to make sure it snaps back automatically z Brakes Press the rear brake pedal several times and check the brake pedal free play make sure there is no brake fluid leakage z Engine Stop Button When the engine is running press and hold the Engine Stop Button for two seconds to see if the engine stops z Steering Wheel Turn the steering wheel to see if it turns properly z Cable Check the cable hou...

Страница 21: ... to drive on private property Avoid posted areas and obey no trespassing signs Never drive your BUGGY on public streets roads or highways even if they are not paved Drivers of street vehicles may have difficulty in seeing and avoiding you which could easily lead to collisions In many states it is illegal to operate BUGGIES on public streets roads and highways z Operating your BUGGY on paved surfac...

Страница 22: ...can reduce your ability of controlling your BUGGY z Operating your BUGGY on public streets roads or highways can cause collisions with other vehicles z Never operate your BUGGY on any public streets roads or highways z Removing your hands from the steering wheels or your feet from the foot controls during operation can reduce your ability of controlling your BUGGY or cause you to lose your balance...

Страница 23: ...Rough Terrain Before driving in a new area always check the terrain thoroughly Don t drive fast on unfamiliar terrain or when the visibility is limited Sometimes it s difficult to gain the reaction time before you see obstructions like hidden rocks bumps or holes in time to react z Operating your BUGGY at excessively high speed increases your chances of losing control which can easily result in an...

Страница 24: ...out of control or overturn z When operating your BUGGY on unfamiliar terrain always drive slowly always be especially careful and always be alert to changing terrain conditions z Failure to use your extra care when operating on excessively rough slippery or loose terrain could cause loss of traction or vehicle control which could result in accidents including an overturn z Don t operate on excessi...

Страница 25: ...ould always operate your BUGGY in a safe and reasonable manner When driving always keep all of the four wheels on the ground z Attempting wheelies jumps and any other stunts increases the chances of accidents including an overturn z Never attempt stunts such as wheelies or jumps Don t try to show off ...

Страница 26: ...eed is above idle the clutch automatically engages and moves the vehicle forward To disengage the clutch at any time allow the throttle to return to the idle position z Each time before starting the engine check the throttle assembly to ensure that when you push the pedal all the way forward the throttle assembly is working smoothly and when you release the pedal the throttle assembly returns to i...

Страница 27: ... step on the throttle pedal too hard otherwise the clutch will be burned c Control Panel z Water Temperature Indicator indicates the engine water temperature z Tachometer indicates the engine rotative speed z Headlight Switch It controls the headlight switches z Position Lamp Switch Turn on this switch the position lamp will show you the position of your vehicle z Headlamp H L Switch It can transf...

Страница 28: ...engine is running move the Stop Button to the OFF position z Key Switch Insert the key into the key switch turn the key clockwise and release the key when the engine starts The engine will warm up within 5 minutes and the engine choke will close automatically and operate at the formal RPM Warning Don t crank the starter more than 5 seconds at one time Water Temperature Gauge Tachometer H L Switch ...

Страница 29: ... and pressures e Drive Chain Check for the chain conditions and tension lubricate it if necessary f Throttle Check for the smooth operation assure that the throttle snaps back to the idle position g Engine Stop Button Perform the engine stop button test repair it if necessary h Nuts Bolts Fasteners Check all the nuts bolts and other fasteners to see if they have been tightened to the specified con...

Страница 30: ...heck the wheels to see if all the axle nuts have been tightened properly and been secured by cotter pins l Steering Check for the free operation of the steering and for any unusual looseness in any area Locations of Parts z Always follow rules for safe operation z Always wear a helmet ...

Страница 31: ...Max 250 single double seat Owner s Manual Version 1 0 Oct 2005 31 Single seat Front Wheel Headlight Rearview Mirror Control Panel Rollbar Rear Rack Rear Wheel Seat Seat Belt Steering Wheel Front Shock Absorber ...

Страница 32: ...e double seat Owner s Manual Version 1 0 Oct 2005 32 Sub Water Tank Engine Trailer Hook Fan Radiator Air Cleaner Rear Reflector Rear Rack Rear Shock Absorber Rear Wheel Brake Handle Reverse Handle Rear Guard Bar Taillight ...

Страница 33: ...der Max 250 single double seat Owner s Manual Version 1 0 Oct 2005 33 Double seat Front Wheel Headlight Rearview Mirror Control Panel Rear Rack Rear Wheel Seat Seat Belt Steering Wheel Front Shock Absorber ...

Страница 34: ...ified a Oil Capacity Anticorrosive Antifreeze Capacity a Oil Capacity Crankcase 1 0 L Transmission Box 0 18 L b Anticorrosive Antifreeze Capacity Radiator 1100cc Reserved Water Tank 300cc Total 1400cc b Way of Adding the Anticorrosive Antifreeze a Remove the radiator cover and add the antifreeze up to the top of the radiator b Fasten the radiator cover c Start the vehicle d Stop the vehicle when t...

Страница 35: ...ider only for the single seat unit and two riders for the double seat unit The maximum weight of the driver should not exceed 90kg or 200lbs for the single seat unit and the maximum weight of the driver and passenger should not exceed 180kg or 400lbs for the double seat unit E Seat Adjustment The seat must always be securely fastened in the position which affords the best control of the foot pedal...

Страница 36: ... snaps back into place and that the seat is locked into position z Never operate your BUGGY when the provided seat is not securely fastened Otherwise it could result in a strong possibility of severe personal injuries or loss of life z Before attempting to adjust the seat ensure that the engine of your BUGGY has stopped z Before attempting to adjust the seat ensure that the engine of your BUGGY ha...

Страница 37: ...at high speed You d better slow down to a more controllable speed to prevent your BUGGY from rolling over e To prevent your vehicle from rolling over when turning be sure to only turn your vehicle at a more contr ollable slow speed and to keep your heel on the ramp of the main board If you keep your legs on the foot pedals you can feel the vehicle is stable because the gravity is adjusted So your ...

Страница 38: ...an 3 4 seconds for one time wait for about 10 seconds to repress and press the button with the throttle slightly opened 4 In cold weather warm up the engine for several minutes at the idle speed then speed up once the operation temperature has reached the requirements specified 5 In hot weather avoid running the engine at the idle speed for a long time otherwise it may overheat the engine H Stoppi...

Страница 39: ...uphill or on rough roads for a long time 4 Keep the oil lines smooth 5 Avoid speeding up suddenly or running the engine at a high speed without loading 6 Maintain your vehicle according to the service intervals and if necessary repair it as soon as possible 7 After the running in period clean the crankcase and replace the oil remove the carbon on the top of the piston and in the combustion chamber...

Страница 40: ...y 20 hours of usage Note Service more often when running under dusty conditions a Remove the air cleaner cover b Remove the air cleaner element c Fill the non flammable cleaning agent into a basin and dip the element in it d Dry it after cleaning and dip it into the engine oil specified by the manufacturer then dry it again Air Cleaner ...

Страница 41: ...ss oil will greatly reduce the proper engine performance If possible check the spark plug gap area between the electrodes with a wire feeler gauge This specification is 0 6 0 7mm b Before installing the spark plug coat the threads lightly with the graphite grease if possible to ensure the easy removal next time when the spark plug needs inspection c It is advisable to replace the spark plug at lea...

Страница 42: ...ter before the adjustment a Warm up the engine for about 5 10 minutes b Tighten the airscrew gently and back out 2 3 8 turns anticlockwise c Connect the tachometer and adjust the throttle to limit the idle speed the standard value is 1500 100 RPM d Slowly turn the airscrew anticlockwise observe the RPM of the engine and stop the adjusting as the RPM reaches the top speed e Adjust the screw and adj...

Страница 43: ...nd oil Keep the engine clean of foreign objects and be sure that the water tank fan is free of debris for proper cooling E Vehicle Lubrication Lubricate your vehicle every 90 days of use Apply several drops of oil in the specific points F Chain Lubrication Fill a spay atomizer with the specified chain lubrication and lubricate the chain G Chain Adjustment Check the chain adjustment after the first...

Страница 44: ...tric sleeve with a specialized adjust spanner d Find out the correct direction in which the chain can be tensed e Move the eccentric sleeve in this direction by turning the spanner until the chain has been adjusted to a proper tension degree H Adjustment of Front Shock There are five adjustable positions on each shock The default position is in the middle set by the manufacturer Use a round nut wr...

Страница 45: ...d carburetor b Remove the spark plug pour one ounce of clean cylinder lubricating oil through the spark plug hole into the cylinder and crank the engine slowly to spread the oil so as to lubricate the cylinder better replace the spark plug c Don t save or store gasoline over winter because the old gasoline has deteriorated in the winter storage and will cause hard starting and affect the engine pe...

Страница 46: ...asten or replace them if necessary c Check for the oil leakage and check the compression at the mating surface d Check the engine oil and add some if necessary Note The oil level should be between the upper index line and the lower index line of the gauge 2 50 Hour Maintenance a Finish the daily maintenance b Remove the dust in the air cleaner element replace the element if there is too much dust ...

Страница 47: ...to the transmission belt c Remove the carbon on the spark plug d Clean the crankcase and replace the oil e Clean the transmission box and replace the gear oil z Remove the cap z Remove the filling bolt z Remove the drain bolt Note When draining the oil the engine should be at some temperature which can ensure the quick and complete draining z Don t clean the element with gasoline or solvent of low...

Страница 48: ... water until the water level reaches the upper limit 3 100 Hour Maintenance a Finish the 50 hour maintenance b Remove the cylinder cover and cylinder body and clean out the carbon on the cylinder cover cylinder body piston top and in ex valve etc c Clean the inner part of the crankcase and rotate the crankshaft during the cleaning to clean the main bearing and connecting rod big end needle bearing...

Страница 49: ...ls replace the oil seals if necessary 5 300 Hour Maintenance a Finish 150 hour maintenance b Check if the parts of the clutch and the transmission are normal adjust or replace the parts if necessary 6 500 Hour Maintenance a Finish 300 hour maintenance b Disassemble the engine except the crankshaft connecting rod check the parts for wear and repair or replace the parts if necessary c Replace the co...

Страница 50: ... tighten the nuts so that the wheels turn freely on the axle with minimum endplay Tighten the nuts after replacing the wheels B Rear Wheel Replacement Don t disassemble the castle nuts M8 when replacing the rear wheels It is only necessary to tighten the nuts so that the wheels turn freely on the axle with minimum endplay Tighten the nuts M5 and put on the cotter pins after replacing the wheels ...

Страница 51: ...eas requires more frequent services Items First week Monthly Quarterly Yearly Tire pressure wear Brake performance Tightness of screws I I Air cleaner C C I Carburetor I A C Spark plug C A Drive chain I I C A L Brake fluid I Replace gearbox oil I R Chassis C I L Fuel switch fuel tank C Battery I I Engine oil R Valve clearance of engine A Note A adjust C clean I inspect clean or replace if necessar...

Страница 52: ...erall Width 1310mm 1610mm Overall Height 1425mm 1533mm Wheelbase 1555mm 1700mm Ground Clearance 200mm 250mm VIN accord with GMVR A01 01 Statutory Plate Safety Labels accord with GB 7258 1997 ENGINE Model PMI172MM Type Forced Water cooled Single Cylinder 4 stroke Engine Capacity 250cc Displacement 244 3ml Bore Stroke 72mm 60mm Max Power 12 5kw or 6500rpm ...

Страница 53: ...or Above Unleaded Min Fuel Consumption 354g KW h Lubricate Oil Type SAE 10W 30SF Lubrication Pressure Splash Cooling Fluid SHELL Antifreeze Antifreeze Temperature of Cooling Fluid 450 C Mixing Ratio Cooling Fluid Water 1 1 Cooling Water cooled Electric Ignition C D I Starting Electric Spark Plug D7 Spark Plug Gap 0 6 0 7mm Transmission Chain Transmission Transmission Ratio forward 1 1 backward 1 1...

Страница 54: ...Dry Shoe Type Generator Outer Rotor Flywheel Carburetor Vacuum Film Type Absorber normal in 10 6 X10⁴ times of experiments Air Cleaner Paper Element Filtration Type Gear Shifting Automatic Centrifugal Engine Size 422mm 430mm 527mm Engine Net Weight 31 5 kg CAPACITIES Fuel Tank 9 0L 130kpa no leakage in experiments Starting Time 15s Climbing 20 Top speed 70km h Tachometer 33 40kmph ...

Страница 55: ...rn 12V 3A 105dB Headlight 12V 25W Taillight 12V 5W 21W Battery 12V 9Ah 12V 12Ah CHASSIS Front Rear Brake Hydraulic disc foot control Front Wheel Brake Force 923N 1258N Rear Wheel Brake Force 832N 1488N Braking Distance 7 m 30km h Parking Brake Hydraulic disc hand control Front Tire 21 X 7 10 Rear Tire 22 X 11 10 TIRE PRESSURE Front 175kpa ...

Страница 56: ...Raider Max 250 single double seat Owner s Manual Version 1 0 Oct 2005 56 Rear 200kpa WEIGHT Net Weight 245kg 320kg ...

Отзывы: