background image

7

4. Setting up the device

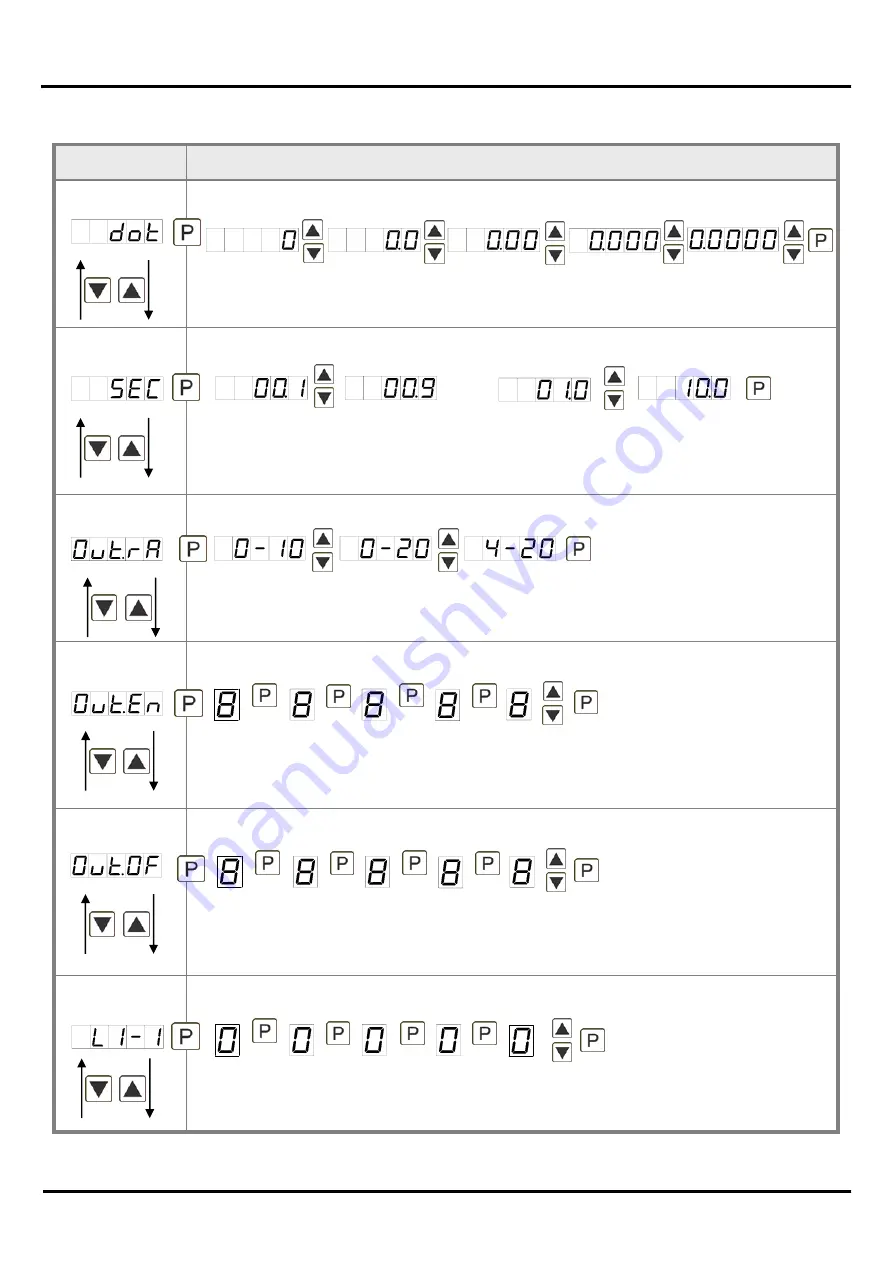
Setting up the initial value of the analog output, 

Out.OF:

The final value is adjusted from the smallest digit to the highest digit with

[

] [

]

and 

digit by digit confirmed with

[P]

. A minus sign can only be parameterised on the

highest digit. After the last digit, the device changes back into menu level.

Setting up the final value of the analog output, 

Out.En:

The final value is adjusted from the smallest digit to the highest digit with

[

] [

]

and 

digit by digit confirmed with

[P]

. A minus sign can only be parameterised on the

highest digit. After the last digit, the device changes back into menu level.

Selection of analog output, 

Out.rA:

Three output signals are available: 0-10 VDC, 0-20 mA and 4-20 mA, with this
function, the demanded signal is selected.

Threshold values / Limits,  

LI-1:

This value defines the threshold, that activates/deactivates an alarm. 

Setting up the display time, 

SEC

:

The display time is set with [

] [

]. The display moves up in increments of 0.1 sec up 

to 1 sec and in increments of 1.0 sec up to 10.0 sec. Confirm the selection by pressing 
the 

[P] 

button. The display then switches back to the menu level again.

Setting the decimal point, 

dot

:

The decimal point on the display can be moved with [

] [

] and confirmed with 

[P]

The display then switches back to the menu level again.

Parameterisation level

Menu level

then

Содержание M3

Страница 1: ...ring of HOLD TARA permanent min max value recording volume measurement totaliser arithmetic function zero point slowdown programming interlock via access code protection class IP65 at the front plug i...

Страница 2: ...m BxHxD 1 Setpoints 0 no setpoints Type of display 2 2 relay outputs V A V 4 4 relay outputs 8 8 PhotoMos outputs Display colour Blue B Protection class Green G 1 without keypad operation on the back...

Страница 3: ...ral device parameters FCT 13 4 3 3 Safety parameters COD 17 4 3 4 Serial parameters SER 18 4 3 5 Analog output parameters 1 Out 19 4 3 6 Analog output parameters 2 Out2 21 4 3 7 Relay functions rel 23...

Страница 4: ...lick the fixing elements back into place and tighten the clamping screws by hand Then use a screwdriver to tighten them another half a turn CAUTION The torque should not exceed 0 1 Nm The dimension sy...

Страница 5: ...2 Electrical connection 3 2 Electrical connection...

Страница 6: ...ameters deposited in the menu item can here be parameterised Functions that can be changed or adjusted are always signalised by a flashing of the display Settings that are made in the parameterisation...

Страница 7: ...5 3 Function and operation description Function chart...

Страница 8: ...th cal the device takes over both the display value and the analogue input value Selection of the input signal tYPE Available as measuring input options are 0 50 10 VAC or 0 5 1 AAC signals as works c...

Страница 9: ...ast digit the device changes back into menu level Selection of analog output Out rA Three output signals are available 0 10 VDC 0 20 mA and 4 20 mA with this function the demanded signal is selected T...

Страница 10: ...splay shows COde and enables the user to reach all parametes by entering the A codE Under run the parametrisation can be activated permanently by selecting ULOC or ProF thus at an anew pushing of P in...

Страница 11: ...ected the keyboard is locked To get back into the menu level press P for 3 seconds in operating mode Now enter the CODE works setting 1 2 3 4 that appears using plus P to unlock the keyboard FAIL appe...

Страница 12: ...llest to the highest digit with and confirm each digit with P A minus sign can only be parameterised on the highest value digit After the last digit the display switches back to the menu level If Sens...

Страница 13: ...works setting without applying a measuring signal If sensor calibration has been selected these parameters are not available Setting up the physical unit UnIt One can choose between the above shown p...

Страница 14: ...put signal The desired analog values can be freely parameterised in ascending order Back to menu group level rEt With P the selection is confirmed and the device changes into menu group level INP Disp...

Страница 15: ...is confirmed and the device changes into menu level Sliding average determination AVG Here the number of the meterings that need to be averaged is preset The time of averaging results of the product...

Страница 16: ...alues of the threshold can be changed during operation without disturbing the operating procedure With tArA the device is tared to zero and safed permanently as offset The device confirms the correct...

Страница 17: ...value for approx 7 seconds after this the device switches back on the parametrised display value The same goes for AVG here the sliding average values will be displayed At AL 1 AL 4 an output can be...

Страница 18: ...n operation mode the above shown parameter can be laid on the optional digital input too Function description see tASt 4 Back to menu group level rEt With P the selection is confirmed and the device c...

Страница 19: ...20mA to 4 20mA or 0 10VDC At ALL analog output parameters are released At no all analog output parameters are locked Master code A Code By entering A CodE the device will be unlocked and all parameter...

Страница 20: ...ge of value and the alarm trigger can be changed ALL all alarm parameters are released no all alarm parameters are locked Parameterisation level Menu level Menu group level 4 3 4 Serial parameters Men...

Страница 21: ...risation level Menu level Menu group level 4 3 5 Analog output parameters for analog output 1 Menu level Selection reference of analog output OutPt The analog output signal can refer to different func...

Страница 22: ...DC can be reached With P the selection is confirmed and the device changes into menu level Setting the initial value of the analog output Out OF The initial value is adjusted from the smallest to the...

Страница 23: ...he min value the max value or the totaliser sum function If HoLd is selected the signal of the analog output will be kept It can be continued processing after a deactivation of Hold With P the selecti...

Страница 24: ...value analog output switches on e g 4 mA to End higher than final value analog output switches on e g 20 mA If to MIn or to MAX is set the analog output jumps on the smallest or highest possible binar...

Страница 25: ...display are set not set on the front of the device With P the selection is confirmed and the device changes into menu level With P the selection is confirmed and the device changes into menu level A1...

Страница 26: ...s for relay 1 CoM 1 The allocation of the alarms to relay 1 happens via this parameter one alarm or a group of alarms can be chosen With P the selection is confirmed and the device changes into menu l...

Страница 27: ...nu level Menu group level 4 3 8 Alarm parameters Menu level Dependency alarm1 ALrM 1 The dependency of alarm 1 can be related to special functions in detail these are the current measuring value the M...

Страница 28: ...and allocated with function High an alarm is activated by reaching of the threshold level If the threshold value was allocated to Low an alarm will be activated by undercutting the threshold value as...

Страница 29: ...of e g l h possible at this the scaled input signal is integrated by a time and steadily select Stead or temporarily select temp safed If Off is selected the function is deactivated With P the selecti...

Страница 30: ...last digit the display switches back to the menu level The activator for the reset is parameter driven via the 4th key or via the optional digital input Back to menu group level rEt With P the select...

Страница 31: ...neous value Min Max value Hold value totaliser value Alarm Relay x 4 4 Alarms Relays Operating current By operating current the alarm S1 S2 is off below the threshold and on on reaching the threshold...

Страница 32: ...th twisted wires Twisted Pair On each end of the bus segment a termination of the bus lines needs to be connected This is neccessary to ensure a secure data transfer to the bus For this a resistance 1...

Страница 33: ...og output 1 0 second 10 0 seconds to 0 1 second Measuring time to Display of decimal point to Offset to Final value Default values Sensor calibration 50 VAC Sensor calibration 50 VAC 0 1 AAC 0 5 AAC S...

Страница 34: ...erlock Standard operation run to Limit value 2 Menu items Parameter to Offset Default values Sensor calibration 50 VAC to Final value Sensor calibration 50 VAC 0 1 AAC 0 5 AAC Sensor calibration 1 AAC...

Страница 35: ...ay value 30 to Analog value 1 to Display value 1 to Number of setpoints no C F L A U t no Display unit to Display offset to Analog final value Default values 1 0 second to Display underflow to Analog...

Страница 36: ...ue no Alarm 3 Alarm 1 2 Alarm 2 Alarm 1 4 Alarm 1 Alarm 3 4 no Alarm 4 Flashing at No slowdown at x digit display zero to No slowdown Zero point slowdown no Square Square root Reciprocal value no Arit...

Страница 37: ...no Default values no Totaliser reset Alarm 1 Totaliser value Sliding average value Set tara value Hold Alarm 4 Tara function Display measurand Alarm 3 no Extremum reset Alarm 2 Special function 4th ke...

Страница 38: ...meters Range of value source Range of value not changeable Analog output level Default values to Administrator code to User code Menu items Parameter Safety parameters no monitoring X seconds no traff...

Страница 39: ...value Switch to start Switch to final value Run to limit value Overflow behaviour to Final value 4 20 mA Default values Current measurand 4 20 mA 0 20 mA 0 10 mA Output range Hold Totaliser Maximum Mi...

Страница 40: ...t value Switch to smallest value Switch to start Switch to final value Run to limit value Overflow behaviour to Final value 4 20 mA Default values Current measurand 4 20 mA 0 20 mA 0 10 mA Output rang...

Страница 41: ...ot Alarm 4 activated to to declined at Alarm 1 not Alarm 1 via logic Relay function 2 Alarm 1 Alarm 1 3 Alarm 3 Alarm 1 2 Alarm 2 Alarm 1 2 3 4 Alarm 1 and so on up to Alarm combi nation relay 1 activ...

Страница 42: ...3 Alarm 3 Alarm 1 2 Alarm 2 Alarm 1 2 3 4 Alarm 1 and so on up to Alarm combi nation relay 4 active if at least 1 alarm is Alarm 3 Alarm 1 3 Alarm 3 Alarm 1 2 Alarm 2 Alarm 1 2 3 4 Alarm 1 and so on u...

Страница 43: ...3 Alarm 3 Alarm 1 2 Alarm 2 Alarm 1 2 3 4 Alarm 1 and so on up to Alarm combi nation relay 5 Alarm 6 Alarm 1 3 Alarm 3 Alarm 1 2 Alarm 2 Alarm 1 2 3 4 Alarm 1 and so on up to Alarm combi nation relay...

Страница 44: ...3 Alarm 3 Alarm 1 2 Alarm 2 Alarm 1 2 3 4 Alarm 1 and so on up to Alarm combi nation relay 8 Alarm 5 Alarm 1 3 Alarm 3 Alarm 1 2 Alarm 2 Alarm 1 2 3 4 Alarm 1 and so on up to Alarm combi nation relay...

Страница 45: ...tion delay 1 Exceedance Exceedance Undercut Function 1 to Hysteresis 1 to Limit value 1 Current measurand Hold Totaliser Maximum measurand Minimum measurand external input DigIn Tast4 Current measuran...

Страница 46: ...and Hold Totaliser Maximum measurand Minimum measurand external input DigIn Tast4 Current measurand Sliding average value Alarm source 2 Default values Menu items Parameter to Hysteresis 3 to Limit va...

Страница 47: ...nu items Parameter no 100 seconds to no Deactivation delay 4 no 100 seconds to no Activation delay 4 Exceedance Exceedance Undercut Function 4 to Hysteresis 4 to Limit value 4 Current measurand Hold T...

Страница 48: ...tion delay 5 Exceedance Exceedance Undercut Function 5 to Hysteresis 5 to Limit value 5 Current measurand Hold Totaliser Maximum measurand Minimum measurand external input DigIn Tast4 Current measuran...

Страница 49: ...and Hold Totaliser Maximum measurand Minimum measurand external input DigIn Tast4 Current measurand Sliding average value Alarm source 6 Default values Menu items Parameter to Hysteresis 7 to Limit va...

Страница 50: ...nu items Parameter no 100 seconds to no Deactivation delay 8 no 100 seconds to no Activation delay 8 Exceedance Exceedance Undercut Function 8 to Hysteresis 8 to Limit value 8 Current measurand Hold T...

Страница 51: ...g procedure should be used Switch off the power supply Press button P Switch on voltage supply and press P button until is shown in the display 5 2 Reset to default values To return the unit to a defi...

Страница 52: ...ft of temperature 92 0 0 8 x 45 0 0 6 mm Panel cut out 96x48x139 mm BxHxD including plug in terminal Measuring error Input 0 1 to 10 0 seconds Display time horizontal bars at the bottom Underflow hori...

Страница 53: ...cs according to DIN EN 60255 Relay with change over contacts Switching cycles Closer contacts 30 VDC AC 0 4 A PhotoMos outputs 0 4 20 mA or 0 10 VDC 16 Bit switchable Analog output 230 VAC 10 max 10 V...

Страница 54: ...noid valves etc near the device and suppress any interference with the aid of RC spark extinguishing combinations or free wheeling diodes Keep input output and supply lines separate from one another a...

Страница 55: ...it according to your application The word HELP lights up in the 7 segment display The input has a very low measurement check the measuring circuit With a selected input with a low voltage signal it is...

Страница 56: ...M3_14GB pdf Stand 15 10 2011...

Отзывы: