


5
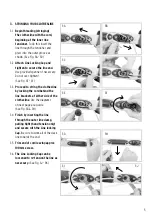
3. STRINGING YOUR CLOTHESLINE
3.1
Begin threading (stringing)
the clothesline with the cord,
beginning at the inner line
tensioner.
To do this insert the
line through the tensioner and
press into the outer groove as
shown. (See Fig. 3A – 3D)
3.2
Attach Line Locking Cap and
tighten to secure the line end.
Use provided spanner if necessary.
Do not over tighten!
(See Fig. 3E – 3F)
3.3
Proceed to string the clothesline
by locking the cord behind the
line brackets at either side of the
clothesline.
Use the diagrams
on next page as a guide.
(See Fig. 3G & 3H)
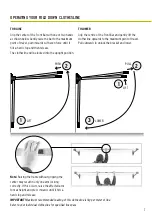
3.4
Finish by inserting the line
through the outer line clamp,
pulling tight (hand tension only)
and secure with the Line locking
Cap.
Be sure to work all of the slack
line towards the end.
3.5
Trim end of cord leaving approx
100mm excess.
3.6
The Line Locking Cap can be
loosened to re-tension the line as
necessary.
(See Fig. 3J – 3K)
3A
3C
3E
3G
3B
3D
3F
3H
3I
3J


