Daymak EM4 Скачать руководство пользователя страница 13

13

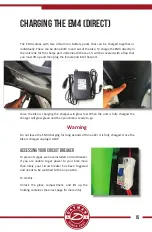
Charging your E-Bike

Charging your e-bike is a simple process. You require the following:

• 

The charger that came with your e-bike.

• 

A 110V household electrical outlet.

Charger Warning

Only use the chargers that were supplied with your e-bike. Using chargers that do not have 

specifications identical to those which came with the e-bike could irreparably damage 

your e-bike’s battery and electrical systems, and may cause injury.

To charge your e-bike, follow these steps:

1.  Turn off the e-bike and remove the key from the “ignition.”

2.  Plug the female end of the charger cable into the charging slot on the e-bike. 

3.  Plug the male end of the charger power cable into your wall socket. This should be 

a110v household electricity supply. You can also use a portable generator, if necessary, 

but make sure it provides 110V current.

4.  Allow  the  e-bike’s  battery  to  charge  for  the  appropriate  amount  of  time 


(6-12 hours).

5.  Disconnect the charger when the LED light on the charger is green. The batteries 

have been fully charged.

If your charger’s LED status light does not change from red to green over an extended 

period of time, for perhaps more than 14 hours, and the battery is very hot, the battery 

or  charger  may  need  replacing.  Stop  charging  and  bring  both  to  your  Daymak  dealer 

immediately. Do not charge the battery.


Содержание EM4

Страница 1: ......

Страница 2: ...use for long periods of time If you bring your charger avoid shaking rattling charger while riding Do not over charge the battery by leaving the charger in the charging port Once the battery is fully...

Страница 3: ...been developing over the last 40 years or more E bike technology has been dramatically refined since the introduction of the first custom conversion bicycles Today electric bicycles are a supremely re...

Страница 4: ...ills of our staff and careful ongoing design work by our engineers We hope you enjoy using this product and welcome any feedback that you may have New Laws Most provinces in Canada most states in the...

Страница 5: ...TIONS 7 THE BATTERY 12 CHARGING YOUR E BIKE 13 UNDERSTANDING YOUR VOLTAGE 14 CHARGING THE EM4 DIRECT 15 CHARGING THE EM4 OUT OF UNIT 16 OPERATION 19 DISPLAY 22 PEDALS24 BRAKES24 TECHNICAL DATA 25 VEHI...

Страница 6: ...er serviceable and should be repaired only by trained professionals This is especially true of the electrical systems and the mechanical components 1 Ignition 2 Brakes 3 Display 4 Mirrors 5 Headlight...

Страница 7: ...caution at all times especially when travelling in mixed traffic Always take into account driving and traveling conditions Obey the Law Be sure to follow all provincial and city traffic laws This inc...

Страница 8: ...have it properly examined Also be sure to listen for changes in the sounds your e bike makes over time Any mechanical or power issues may have effects on the sounds the bicycle makes Holding the Hand...

Страница 9: ...possibly injuring you or others and the e bike may be damaged by being dropped Stopping Your e bike has two sets of brakes at the front and at the rear The levers attached to the handlebars on the lef...

Страница 10: ...the motor by pedaling This increases the distance you can travel on your e bike because it assists the motor and reduces the amount of electricity you draw from the battery Riding in Wet Weather Your...

Страница 11: ...mum load the performance of the bike will suffer Exceeding the maximum load of your e bike could cause damage to the shocks to the mechanism and ultimately even to the frame It could also cause your m...

Страница 12: ...other issues such as proper air pressure in the tires Saving Power If you are traveling long distances you can save a lot of electricity by using better driving habits Coasting When going downhill or...

Страница 13: ...the charger cable into the charging slot on the e bike 3 Plug the male end of the charger power cable into your wall socket This should be a110v household electricity supply You can also use a portab...

Страница 14: ...this it will significantly increase the life expectancy of your unit If you find that your motor starts cutting off at a certain speed or not engaging at all it may be because your voltage is dropping...

Страница 15: ...charger will glow red When the unit is fully charged the charger will glow green and then your bike is ready to go Warning Do not leave the EM4 charging for long periods of time after it is fully cha...

Страница 16: ...he keyhole on the left side of the bike just under the seat of the unit Put the key in here and then turn it to unlock the glove compartment Once the glove compartment is unlocked and lifted up you ca...

Страница 17: ...arge them directly in the charging ports that are on the battery This will allow you to charge one battery while the other is powering your bike You can see the charge port on the pictures below Note...

Страница 18: ...s power and will neutralize the lead acid Placing the battery on concrete for any length of time will likely result in the battery being drained of power and possibly losing its ability to store elec...

Страница 19: ...e unit is running press this button to remain at this speed without the throttle being rotated To disengage cruise control just hit either brake lever Manual cruise must be on in bluetooth settings 5...

Страница 20: ...eaker The EM4 comes with a bluetooth MP3 player To connect to it look on your smart phone for DPL under your bluetooth devices Once you connect to it you can play music from your phone and it will pla...

Страница 21: ...ike the alarm will sound 2 Remove alarm This will disengage the alarm Use this before riding your bike Also disengeages remote start 3 Panic Button This will automatically set the alarm off 4 Remote S...

Страница 22: ...Shows the current speed 3 Trip Meter Odometer Shows how far you have travelled in total and then shows how far you ve travelled since this has been turned on 4 Voltage This is a numeric reading of th...

Страница 23: ...y bluetooth devices as well as the Front and rear motor Connect to the rear motor or front whatever is your preference For the first time you connect it will require you to input a password 12345678 O...

Страница 24: ...handle bar you will find a brake lever as picutred on the right Pull this lever towards the unit to engage them The left brake lever engages the rear brakes and should always be used first The right...

Страница 25: ...his feature will allow you to achieve faster speeds when coasting moving downhill or moving with the wind It will also allow you to conserve electrical power because you will be able to let to the mot...

Страница 26: ...tted Rear Brakes The rear brakes on your e bike are EABS Brakes Electric Absorption Braking System These provide a good friction grip when they are activated They significantly less than standard drum...

Страница 27: ...ase even if there are no leaks in the tire tube To replace the air in your tires follow this procedure 1 Identify the required pressure by examining the text along the side of the tire rim This text s...

Страница 28: ...running hours or so The Chain Ensure that the chain on your e bike is well oiled and lubricated It is an important part of your e bike As with any bicycle it needs to be maintained if it is to functio...

Страница 29: ...some parts that need closer inspection Lubricating It is also recommended to lubricate the chain levers derailleur cables etc A clean lubricated e bike tends to be faster smoother and quieter It s lik...

Страница 30: ...tires Check range of battery Inspect all components of t he ebike Check that connections are nice and tight Look inside where you controller is and clean in detail Check that all plugs Go over every...

Страница 31: ...y Back Lit LED Front Wheel 110 70 17 Rear Wheel 140 70 16 Battery Weight 13 lbs each Boxed Length 78 Boxed Width 22 Box Height 71 Boxed Weight 300 lbs Assembled Length 78 Assembled Width 32 Assembled...

Страница 32: ...gnition Remote Start Front Shocks 7 of Travel Rear Shocks Coil Controller Daymak Drive Bluetooth Rear Basket Storage No Under Seat Storage No Rear Basket Storage Volume N A Under Seat Glove Storage 32...

Отзывы: