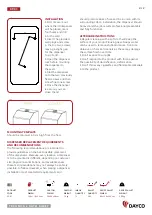
INSTALLATION
+
First measure out
where the lid dispenser
will be placed, mark
four holes and drill
into the wall.
+
Insert the provided
wall plugs and screw
in the top two screws,
leaving a slight gap
for the dispenser
to slot onto.
+
Open the dispenser
lock before mounting
the dispenser to
the wall.
+
Slot the dispenser
onto the two previously
fixed screws and then
screw final one screw.
+
Once the dispenser
is secure, you can
close the lid.
MOUNTING TEMPLATE
Should be minimum 60 cm high from the floor.
DISPENSER REPLACEMENT REQUIREMENTS
AND RECOMMENDATIONS
The following recommendations are intended to
provide guidelines on the best possible placement
of the dispensers. Because every location a dispenser
is to be mounted is different, depending on customer
site, physical size limitations, and available space,
these recommendations may not always be entirely
possible to follow.However, when placing a dispenser
installation must meet ADA requirements and
2 / 2
T E C H N I C A L D A T A S H E E T
should promote ease of use and be in union with its
surroundings.Upon installation, the dispenser should
be level and the job results professional,presentable
and fully functional.
AFTERCARE INSTRUCTIONS
+
Regular cleaning with a soft cloth will keep the
surface of your product looking new. Soapy water
can be used to remove stubborn marks. Dont use
abrasive or chemical cleaners as these may damage
the surface finish over time.
+
Don’t expose to sunlight.
+
Don’t respond to the product with force against
the possibility of damnification, deformation.
+
Don’t throw any cigarettes and flammable materials
into the product.
80
115
0 9 0 1
Kg
Kg
X
Y
Z
X
Y
Z
X
Y
Z
PRODUCT
PRODUCT
CARTON
CARTON
INBOX
PALLET
GROSS PALLET
GROSS PALLET
CODE
DIMEN.
DIMEN.
WEIGHT QUANTITY QUANTITY DIMEN.
WEIGHT
0901
10,5x11,5x22 cm
36x44x46 cm
12 kg
12
240
80x120x200 cm
255 kg


