background image

8

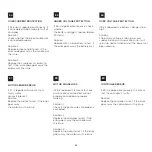
1. First, ensure the two parts of the charger are connected securely. The wall AC plug should be connected to the

charger box. The connection between the cable and box should feel firm with no wobble or play.

2. Next, locate the charging port cap on your scooter and open it to find the charging port. Locate the round connec-

tor on one end of the charger, this is the end you must insert in the charging port.

3. Gently insert the cable.

4. Proceed to plug the AC plug on the other end of the charger into power outlet. If the battery is 100% full, the

charger light will turn green. If the battery is not fully charged, the charger light will light up red.

1

3

2

4

Содержание BANDICOOT

Страница 1: ...USER MANUAL v1 0 Daxys Bandicoot Kickscooter ...

Страница 2: ...USER MANUAL Please read this manual very carefully before using the product The manual contains important instructions for the safe use and longevity of your bike ...

Страница 3: ...1 CONTENTS Unboxing 2 Operation 7 Display 12 Battery Info 13 General Safety 14 Maintenance 15 Troubleshooting 19 FAQs 22 Warranty 24 ...

Страница 4: ...g up your scooter right is the single most important step to your safety We recommend having the following items ready prior to starting the setup process Box cutters or knife Stool or bench Air pump Open the box using the box cutter and fold open the top Inside you should see protective styrofoam along with the following contents Daxys Bandicoot electric scooter Manual Charger and cable Allen key...

Страница 5: ...rear foot rest 2 Unfold the stem by pulling it to a vertical position Ensure you do so until the stem is completely vertical 3 Locate the folding latch and bring it up locking the stem The latch will require some force to lock fully upright 4 Lastly make sure the safety button of the folding mechanism is clipped in the stem This safety mechanism prevents the latch from unlocking due to vibration o...

Страница 6: ...cable when connecting the handlebar to the front stem 4 You will find that the latches and buttons on your handlebar are not tight We deliver this way to avoid damage during shipping Before tightening the screws adjust the left button panel Twist it upward or downward until it reaches a comfortable angle keep in mind that once on a scooter you will be higher up than you are while setting up your s...

Страница 7: ...t spinning PLEASE DO NOT ATTEMPT TO OPERATE THE SCOOTER Contact us immediately 2 Begin by testing your brakes Press the throttle on the right side of your handlebar and notice rear wheels start to accelerate and spin the front wheel with your hand Continue to accelerate for 5 seconds then release the throttle and slam both brakes at the same time The wheel should stop immediately 3 Test gear chang...

Страница 8: ...andle bar Your indicators should turn on To turn them off click on the button again 7 Next grab an air pump and locate the air valve on the front tire Remove the safety cap and attach the pump tube to the tire valve Turn on the air pump and read the PSI measure the ideal tire pressure for the Bandicoot is 45PSI 8 Inflate or deflate the tire as needed until the pressure is 45PSI Repeat the step wit...

Страница 9: ...tools to correctly perform all assembly steps in the manual consult our support team or a local electric scooter shop This section focuses on how to charge your scooter correctly For information about battery health and best practices please review the Battery Information section The battery pack comes with a built in battery management system This includes overcharging protection amongst other fe...

Страница 10: ...charging port cap on your scooter and open it to find the charging port Locate the round connec tor on one end of the charger this is the end you must insert in the charging port 3 Gently insert the cable 4 Proceed to plug the AC plug on the other end of the charger into power outlet If the battery is 100 full the charger light will turn green If the battery is not fully charged the charger light ...

Страница 11: ... brake for long periods of time for example a long downward hill can generate a lot of heat and have a negative impact on the controller We recommend using the regen brake only for short period of time Warning In rain or wet weather braking distances increase A failure to take this into consideration in such conditions can cause component or performance failure loss of control serious injury or de...

Страница 12: ...r the folding latch is released 3 Pull it down until you feel the latch is fully open 4 Fold down the stem towards the foot stand 5 Make sure it is folded all the way down before moving on to the next step 6 Locate the locking hook on the inside of the from stem and take it out 7 Attach the hook on the stem to the locking ring located at the end of the deck near the foot rest and the rear wheel At...

Страница 13: ... right hand side of the handlebar 3 Accelerator throttle Power button Gear change 4 Accelerator throttle light signal 5 E brake throttle left side of the handlebar 6 E brake throttle left turning signal 7 E brake throttle right turning signal 1 2 3 4 5 6 7 ...

Страница 14: ...p your scooter right is the single most important step to your safety We recommend having the following items ready prior to starting the setup process Box cutters or knife Stool or bench Air pump Open the box using the box cutter and fold open the top Inside you should see protective styrofoam along with the following contents Daxys Bandicoot electric scooter A5 Card Manual Charger and cable Alle...

Страница 15: ...ult our support team or a local electric scooter shop Charge the scooter fully after every ride This will prolong the battery life When charging wait for the charger light to turn green The charging process will then be complete and all the cells will have been balanced by the battery management system If not used power on the scooter once at least once a month to check the charge level Ideally th...

Страница 16: ...r death By purchasing a Daxys scooter you assume the responsibility for its safe and lawful operation as well as the risks for any failure to safely and lawfully operate it Any fines due to illegal or unauthorized use including but not limited to any failures to wear protective equipment are your responsibility Should you have any questions or concerns feel free to contact us at support panmi com ...

Страница 17: ...irectly through email support pan mi com au A tune up consists of the following steps Tire pressure check Bearing lubrication Suspension lubrication Brake adjustment Screw tightening You will need a few things to get these done all of them can be purchased at a local hardware store If you have difficulty locating these items contact our support team for help Electric tire pump inflator Jig a loo l...

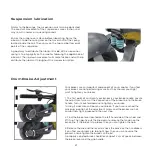
Страница 18: ...u will hear the air escape Do so until the tire feels flat then reattach the electric pump and inflate until at 45PSI When the tire is properly inflated put the cap back on the air valve Repeat the process with the other tire Bearing lubrication The next maintenance step is to lubricate the bearings Your bearings are the connection between the rotating wheels of your scooter and the non rotating f...

Страница 19: ...ur brakes are not performing as well as they should you might want to tighten your brakes 1 The first point of control of your brakes is your brake handle Locate the adjustment screw at the connection of the brake line to the brake handle Turn it counterclockwise to tighten your brake Turning it clockwise will loosen your brake If you have reached the maximum position of the adjustment screw and t...

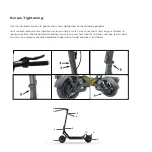
Страница 20: ...s Your scooter motor creates vibrations when you ride it which may cause the screws on your scooter to loosen over time We recommend checking your screws every few months to make sure they remain tight You can use a medium strength headlocker adhesive to further improve their stability 1 2 3 4 5 6 7 10 9 8 ...

Страница 21: ...ccessories before riding In the event of a malfunc tion of any of the components during set up or use please discontinue set up or use and contact our support team If you are not sure you have the experience skills and tools to correctly perform all assembly steps in the manual consult our support team or a local electric scooter shop Error codes Your scooter comes with a built in communication sy...

Страница 22: ...rted when the power on self test fails E2 is reported when the error occurs during operation Error Code If E2 F2 is reported the throttle or it s connection could be faulty Solution 1 Check whether the throttle wire is connected properly and the throttle isn t out of position Solution 2 Replace the throttle to test if the error code goes away the throttle was the issue Solution 3 Replace the handl...

Страница 23: ...olution The battery voltage is too high avoid sudden braking rushing actions and it will return to normal when part of the power has been used up E7 MOTOR SENSOR ERROR If E7 is reported this means that a faulty motor sensor is present Solution Replace the motor to test if the error goes away the motor was the issue E8 MOTOR PHASE LOSS If E8 is reported this means that one or more phase connectors ...

Страница 24: ...use and contact our support team If you are not sure you have the experience skills and tools to correctly perform all assembly steps in the manual consult our support team or a local electric scooter shop Avoid Exposure to Water and Humidity You must avoid exposing your scooter to water and humidity Daxys scooters are not waterproof and are not designed for extreme or prolonged exposure to water ...

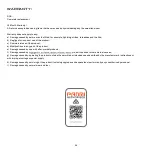
Страница 25: ...roduct c Commercial use of the product d Modi cations to any part of the product e Damage caused by use with after market products f Damage caused by re earthquake or other external causes g Damage caused by operating the product outside the permitted or intended uses described by the manufacturer s instructions or with improper voltage or power supply h Damage caused by servicing of the product i...

Отзывы: