


Voyager DVI Extender
Introduction
Thank you for purchasing the Voyager DVI Extender. This product will allow you to place your Monitor
with a
D
igital
V
ideo
I
nterface, your Keyboard and Mouse up to 150 meters (dependant on cable type)
away from your computer.
Product Features
¾
Support for DVI-D Graphic cards (all devices)
¾
Support for PS2 Keyboards and Mice or USB Keyboard and Mice, depending on version
¾
Maximum resolution: DVI-D: 1600x1200@60Hz
¾
Supporting 18 Bit color depth = 256,000 colors
¾
Status indicator LEDs on each device
¾
Small footprint chassis
¾
Rack mount options available
¾
CPU cables and Adapters included
Preparing installation
For first-time users, we recommend that you carry out a test placement, confined to a single room,
before commencing full installation. This will allow you to identify and solve any cabling problems, and
experiment with the Voyager DVI extender.
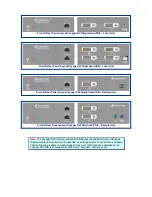
Hardware Installation
Connecting Up
1.
Switch off your computer.
2.
Connect the Voyager Local Unit to the PC KVM Cable
3.
Connect the USB cable from the Local unit to the PC (USB versions only)
4.
On a dual system plug in your Keyboard, Monitor and Mouse into the corresponding
Keyboard / Monitor via the supplied adaptor (PS/2 Keyboard and mice). The keyboard can
be plugged in directly to the unit if required. If you are using USB keyboards and mice they
will plug into the USB ports on your computer. (You can use the Voyager without having a
Local Keyboard, Monitor and Mouse connected).
5.
Connect the power supply unit to the Voyager Local unit.
6.
Connect your UTP cable to the Voyager Local Unit.
7.
Connect the PC KVM cable to your computer’s Keyboard Monitor and Mouse ports.
8.
Connect the other end of your UTP cable to the Voyager Remote Unit.
9.
Connect the power supply unit to the Voyager Remote unit.
10. Plug in your Keyboard, Monitor and Mouse into the corresponding Keyboard, Monitor and
Mouse ports on the Voyager Remote Unit.
11. Power on your computer.
12. Check that the keyboard and mouse operate correctly.
The remote unit (when installed in its final location) may be left permanently powered up.
Cable Requirements
Cables to connect the Voyager DVI Local unit to your PC’s system unit are supplied in the package.
Your keyboard, monitor and mouse will plug in to the Voyager DVI Local with the supplied PS/2
Keyboard and Mouse adaptor cable. On the Voyager DVI Remote Units your keyboard and Mouse will
plug directly into the unit.
The Voyager DVI is a dual access unit, in that it allows for an access point next to your computer as
well as access point up to 150m away.
Содержание VOYAGER DVI EXTENDER
Страница 1: ...Voyager DVI Extender Installation guide ...
Страница 5: ...Quick Setup System Guide ...


