background image

10 

THE USE OF THE DEVICE

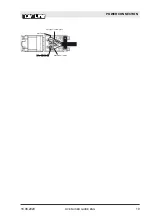
Fig. 13: Pop out off

Fig. 14: Pop out on

The buttons of your oven are the type

of pop-out buttons that pop out when

pressed in.

n

Press inward to pop out the button

and then adjust (Fig. 14).

n

When cooking is finished, turn the

switch to the off (top) position and

press it inwards (Fig. 13).

10.1  Temperature Set-

ting of the Appli-

ance

Fig. 15

Your appliance starts heating just a

few seconds later when you set the

temperature.

Turn off the appliance by bringing the

function selection switch to zero posi-

tion when your food is ready.

THE USE OF THE DEVICE

Temperature Setting of the Appliance 

18.08.2020

OVEN USER GUIDE ENG

32

Содержание DSWO 8004

Страница 1: ...OVEN USER GUIDE ENG MODELS DSWO 8004 WHITE DSBO 8004 BLACK DSXO 8004 INOX DSGO 8004 GREY...

Страница 2: ...1 en_US IMPORTER DAVOLINE KLIMATECHNIKI S A 35 MAR NOU ANT PA THESSALONIKI GREECE 18 08 2020 OVEN USER GUIDE ENG 2...

Страница 3: ...ODUCTION OF APPLIANCE 23 7 1 Accessories of the Oven 24 8 BEFORE FIRST USE 25 9 SPECIFICATIONS AND OPERATION OF THE APPLIANCE 26 9 1 Specifications of the Oven 26 10 THE USE OF THE DEVICE 32 10 1 Temp...

Страница 4: ...nformation for safe installation use and mainte nance of your product and necessary warnings to get the most out of your appliance Keep this manual in a safe place where it can easily be reached to us...

Страница 5: ...jects that are kept on the cooking compartment may get ignited Do not keep the flam mable flammable objects on the cooking compartment n Use oven gloves when you are taking hot food or utensils such a...

Страница 6: ...ay be hot Keep away from children while grilling n Spilt food stains shall be removed before cleaning WARNINGS BEFORE INSTALLA TION AND DURING INSTALLATION n The appliance shall always be installed by...

Страница 7: ...r cook or fry on the bottom of the oven n Do not cover the bottom of the oven with aluminium foil n Unplug the appliance while moving cleaning or servicing the oven n Never attempt to remove the plug...

Страница 8: ...t is responsibility to ensure the compliance of this appliance to the European directives and meeting the legal requirements in terms of safety health and environment Ensure that the oven is good cond...

Страница 9: ...iance to the certain collection centers by consulting your manufacturer to ensure that the electrical and elec tronic parts are re used Keeping this user manual is rec ommended since this provides inf...

Страница 10: ...3 SPECIFICATIONS OF THE OVEN These appliances are designed to operate with a single phase supply voltage of 220 240V at 50 60Hz Fig 1 SPECIFICATIONS OF THE OVEN 18 08 2020 OVEN USER GUIDE ENG 10...

Страница 11: ...ensions Depth 547 mm Product Dimensions Height 595 mm Product Installation Cabinet Dimen sions Width 560 mm Product Installation Cabinet Dimen sions Depth 550 mm Product Installation Cabinet Dimen sio...

Страница 12: ...e oven even after installing the oven in the kitchen You may see this nameplate when you open the door the oven Use the information provided in this nameplate to specify the model of your oven while o...

Страница 13: ...up board to ensure correct operation of the appliance Walls of furniture where the appliance is installed shall be resistant to heat Particularly if the side walls are made of coated particleboard the...

Страница 14: ...Dimensional information pro vided in the drawings are given in mm INSTALLATION OF APPLIANCE 18 08 2020 OVEN USER GUIDE ENG 14...

Страница 15: ...THE OVEN TO THE CABINET 560 n 550 600 130 300 130 80 80 8 8 556 595 20 547 595 573 50 590 m n 577 max 594 80 80 m n 550 560 130 300 130 Fig 3 INSTALLATION OF THE OVEN TO THE CABINET 18 08 2020 OVEN U...

Страница 16: ...ppliance and drill holes by aligning with the holes on the body of the oven using a drill with a screw diameter of 3 9x22 and install the screw Installing the screw without drilling a hole suitable fo...

Страница 17: ...from the rear of the kitchen unit where the oven is installed n Parts that provide insulation and protection shall be installed so that they cannot be removed by using any tool n When a built in stove...

Страница 18: ...e the authorized service replace the cord with a new one with the same dimensions and plastic insulation and that may withstand the elec trical current required by the appliance n If the appliance sha...

Страница 19: ...sar ye l yellow green mav blue kahvereng brown 3 ad M4x6 V da 3 pcs M4x6 Screw POWER CONNECTION 18 08 2020 OVEN USER GUIDE ENG 19...

Страница 20: ...brown 1x1 50 mm2 red 1x1 50 mm2 blue 1x1 50 mm2 blue 1x1 50 mm 2 yellow 1x1 50 mm2 red 1x1 50 mm2 OVEN LAMP yellow green 1x1 50 mm 2 yellow green 1x1 50 mm 2 yellow green 1x1 50 mm 2 NC 110 C LIMIT T...

Страница 21: ...fore putting any food inside the oven n Clean the inside of the oven using a soft cloth slightly dampened with soapy water Fig 6 Always grab the handle from its center to open the oven door CAUTION Wa...

Страница 22: ...meal cooked with a lower temper ature out first and use less energy without changing the oven temper ature n Excess heat remaining after cooking a meal shall be used for the next meal too This shall s...

Страница 23: ...reen Timer 3 Oven Temperature Setting Knob 4 Upper Resistance 5 Lamp 6 Shallow Tray 7 Oven Grill 8 Fan 9 Telescopic Rails 10 Deep Tray 11 Wire Rack 12 Lower Resistance 13 Internal Glass 14 Oven Door 1...

Страница 24: ...plate and spilling the food Shallow Tray Fig 9 For cakes and cookies made in the tray Do not use the shallow tray for cooking as it shall cause smell and oils may splash out of the tray and soil the...

Страница 25: ...nsure that no packaging residues such as styrofoam are left inside the cooking compartment and remove adhesive tapes on or inside the appli ance Wipe the straight surfaces of the cooking compartment w...

Страница 26: ...Key Usage Each time pressed on this button the child lock time setting if cooking time is not set alarm sound volume setting and screen brightness setting modes are acti vated in order and the releva...

Страница 27: ...you are not in any menu respectively When Menu button is touched once Key Lock icon flashes OFF text appears on the screen by tapping this key deactivate child lock ON appears on the screen and the ic...

Страница 28: ...e times symbol flashes on the screen press and to select the desired volume After adjusting the volume touch the Menu key or wait 5 seconds to end the set ting mode The factory default setting is b 03...

Страница 29: ...ogram key is touched once adjust the cooking time by tapping the and keys After setting the cooking time the icon remains fixed on the display NOTICE In cooking programs set up in under an hour the ti...

Страница 30: ...ther option is n When the Program key is touched Cooking Time icon flashes touch the set cooking time is reduced to 00 00 The End caption and Cooking Time icon appears on the display Reminder Timer Yo...

Страница 31: ...switched off 2 Thermostat If the oven temperature is lower than the set temperature the icon appears on the screen When the oven temperature reaches the set temperature the icon disappears from the sc...

Страница 32: ...ing is finished turn the switch to the off top position and press it inwards Fig 13 10 1 Temperature Set ting of the Appli ance Fig 15 Your appliance starts heating just a few seconds later when you s...

Страница 33: ...to prevent it falling in the oven and causing damage To remove the telescopic rails wait for the oven to cool down Inserting Telescopic Rails C A B Fig 17 To insert the telescopic rails to the grill...

Страница 34: ...ng the Wire Grill Fig 18 Place the wire grill to the telescopic rails with their legs looking down Fig 18 Using Cooker Fig 19 Place the cooker on the telescopic rails Fig 19 The high edges around the...

Страница 35: ...achers nitric acid or hydrochloric acid n Do not clean your oven using steam cleaners n Do not try to remove the buttons from the control panel as these are not removable in some models n Do not use c...

Страница 36: ...soapy water Then wipe once more with a damp cloth and dry n Do not use abrasive materials such as sandpaper steel wool or bleachers Otherwise the enam elled part of the oven may get damaged n Clean th...

Страница 37: ...he oven and causing damage To remove the telescopic rails wait for the oven to cool down Fig 22 Remove the serrated screw inside the oven by rotating it counter clockwise to clean the wire rack inside...

Страница 38: ...Fig 26 Close the oven door so that it contacts the hinge lock as shown in Fig 26 1 2 Fig 27 1 Hinge 2 Hinge Housing Remove the hinges from the hinge housing by holding the door with both hands to remo...

Страница 39: ...n Wipe the glass cover with soft sponges and clothes cleaning and drying n Do not use harsh abrasive cleaning agents and sharp metal scrapers to clean the oven glass Cleaning in such a way may scratch...

Страница 40: ...loth or sponge n nspect the condition of this gasket in regular intervals Clean without using abrasive cleaning agents when required n Door may not be closed properly when dirt is collected on the doo...

Страница 41: ...f the lamp A lamp with same power rating should be used when replacing the lamp To find out the power rating used in the product see the declaration label in the product The bulb used in this product...

Страница 42: ...e and replace the oven lamp by rotating it counter clockwise Fig 33 Reverse the procedure provided in Fig 32 for the installation of the lamp cover REPLACEMENT OF THE LAMP 18 08 2020 OVEN USER GUIDE E...

Страница 43: ...nce to bake pizza or food that requires to be browned on the lower section Lower and upper heaters and the fan on the rear wall are on Hot air is dis tributed equally and rapidly inside the oven thank...

Страница 44: ...heating and fan heating are open Each side of the product to be cooked is cooked equally and quickly Use a single tray for cooking With this function you can also preheat quickly For cooking and fryi...

Страница 45: ...s Cooking Times Chart Values specified are determined under laboratory conditions Your values may differ from these values 1st rack of the oven is the bottom rack CAUTION Do not place an aluminium foi...

Страница 46: ...2 200 30 40 Pizza Single level 2 200 220 15 20 Beaf full Roast Single level 3 25 minutes 250 then 180 190 100 120 Leg of lamb stew Single level 3 25 minutes 250after 190 70 90 Roasted chicken Single l...

Страница 47: ...ith a sauce made of milk butter egg and yoghurt n If the cooking time of your pastry is too long ensure that the thickness of the pastry does not exceed the tray n If the top of the pastry is cooked b...

Отзывы: