Accuracy Matters • www.datrend.com
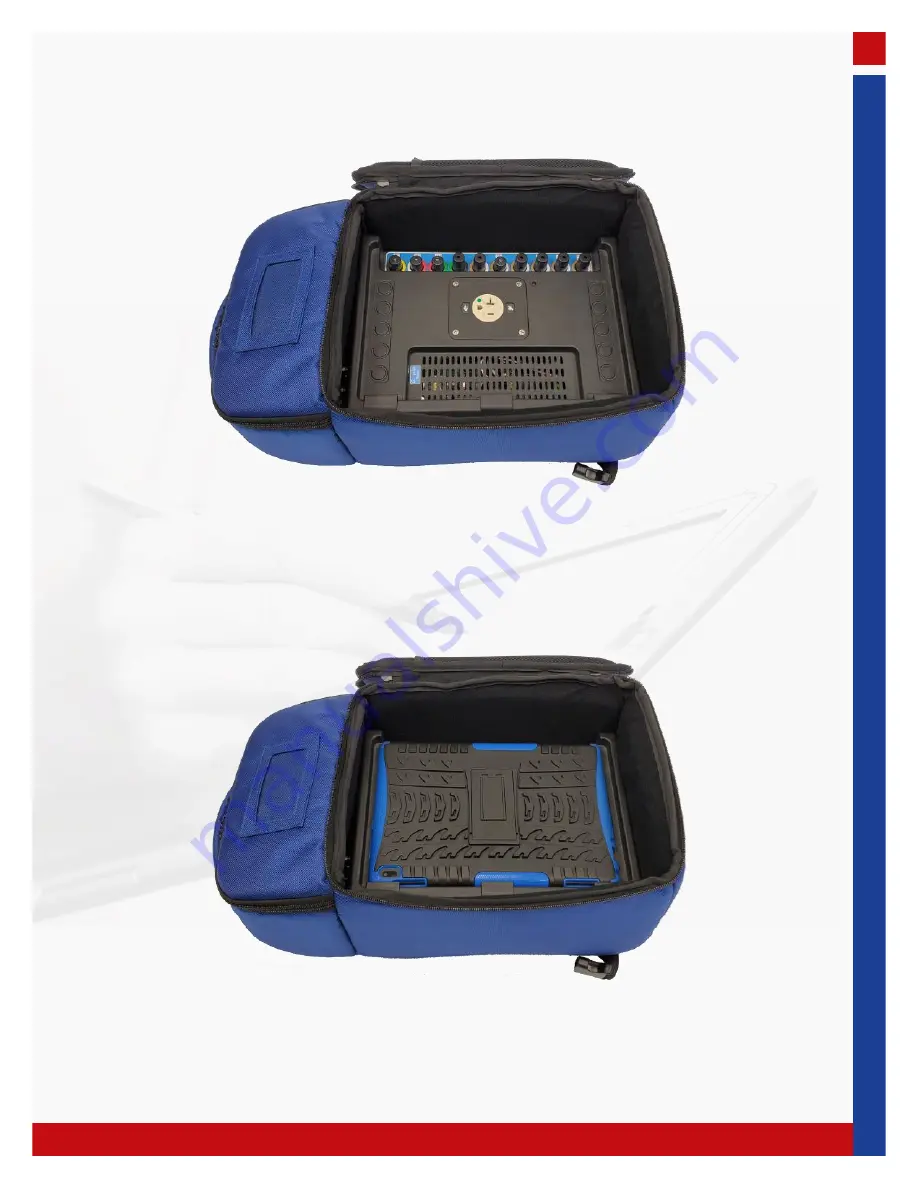
Figure 15:
The entire unit should fit snugly in the backpack.
Figure 16:
With the tablet facing down, place it on top of the base.
11/19
Страница 1: ...Accuracy Matters www datrend com 1 19 Multipurpose Backpack User Guide MN 144a ...
Страница 2: ...ot result in damage to test instrumentation or accessories Datrend Systems warrants the Multipurpose Backpack to be free from defects in material and workmanship for a period of 90 days from the date of receipt Datrend assumes no responsibility for Backpack contents and in no way warrants guarantees or implies that such contents will not suffer damage as a result of transport mishap or any other c...
Страница 3: ...N 7006 065 4 Configuration Instructions for vPad A1 5 Configuration Instructions for venTest 8 Configuration Instructions for vPad ES 2 vPad ES vPad 353 10 Configuration Instructions for Phase 3 13 vPad IV Backpack Overview P N 7006 068 15 Configuration Instructions for vPad IV 16 3 19 ...
Страница 4: ...ts are individually labeled below so that they can be referenced later in this document The Top Compartment also has a divider labeled below as item 6 1 2 3 4 5 6 Figure 1 Backpack with all of its dividers removed Figure 2 Backpack Velcro dividers shown Main Divider 1 Support Block 2 venTest Protector 3 Standard Divider 4 5 Top Compartment Divider 6 Top Compartment Main Compartment 4 19 ...
Страница 5: ...ww datrend com Configuration Instructions for vPad A1 Figure 3 Attach the Main Divider 1 Figure 4 Insert Support Block 2 and adjust Main Divider 1 if necessary so that it is resting against the Support Block 2 1 2 1 5 19 ...
Страница 6: ...nd com Figure 5 Push the Support Block 2 to the bottom of the Backpack 1 2 Figure 6 vPad A1 should now fit snugly into the space provided Note during transport the smartphone should be oriented so that the screen faces downward 6 19 ...
Страница 7: ...nly one Standard Divider has been used to create a space for vPad O2 Figure 8 Finally the power supply and power cord are stored in the Backpack The Top Compartment Divider 6 is already installed The Top Compartment can be used to store other accessories and cables used for patient monitor testing 4 6 7 19 ...
Страница 8: ...ww datrend com Configuration Instructions for venTest Figure 9 Attach the Main Divider 1 1 Figure 10 If necessary use the Support Block 2 to set proper spacing for the Main Divider 1 Remove the Support Block afterward 2 8 19 ...
Страница 9: ...s and the optional 10 bar pressure input if present Try avoid having the venTest Protector covering the power button green to reduce the chance of accidentally turning on the device during transport 3 4 Figure 12 Insert the other Standard Divider 5 Its position should align near the mid point of the venTest to provide proper support All sensors accessories and power supply can now be stored in the...
Страница 10: ...datrend com Configuration Instructions for vPad ES 2 vPad ES vPad 353 Figure 13 Remove all dividers from the Main Compartment Figure 14 The most efficient way to load the unit is to slide it in from one end as shown above 10 19 ...
Страница 11: ...Accuracy Matters www datrend com Figure 15 The entire unit should fit snugly in the backpack Figure 16 With the tablet facing down place it on top of the base 11 19 ...
Страница 12: ...et The Kelvin cables and other accessories can be placed in the Backpack s Top Compartment The Main Divider 1 can be attached to the backpack as shown This will allow the power cord to be held more tightly in place Figure 18 Note the left Velcro of the Main Divider 1 should adhere to itself 1 12 19 ...
Страница 13: ...gure 20 Insert the paddle plate for the Phase 3 as shown Figure 19 Insert the Support Block 2 and attach the Standard Divider 4 A gap identified by an arrow in the photo which lies between the Standard Divider and top of the Main Compartment should be less than 2 cm 2 4 13 19 ...
Страница 14: ...t Block 2 will protect the LCD display Power supply cables and accessories can be placed in the Top Compartment Figure 22 An alternative setup shown above is to place the paddle plate on top of the Phase 3 Note This method should only be used if more room is needed for extra cables and accessories identified by the arrow above 14 19 ...
Страница 15: ...e of transporting either one or two channel vPad IV systems Customers with unused Standard Backpacks may order the additional inserts to convert the Standard Backpack to P N 7006 068 The Divider Foam set for vPad IV Backpack includes four dividers vPad IV Spacer Block 7 vPad IV Cover Protector 8 9 vPad IV Bag Divider 10 8 9 7 10 Figure 23 Standard Backpack with additional vPad IV Backpack Inserts ...
Страница 16: ... vPad IV Spacer Block 7 For a one channel vPad IV analyzer leave the Spacer Block in the Backpack For a two channel vPad IV analyzer remove the Spacer Block Note In Figure 25 the Spacer Block has been installed at an angle to make it more visible Typically the Spacer Block is placed at the bottom of the Backpack or is removed according to the number of channels to be packed 10 7 16 19 ...
Страница 17: ...Cover Protector Note Whether you are using the Spacer Block or not placement of the Cover Protector is identical for both one and two channel systems 8 Figure 27 Place the vPad IV system into the Backpack so that the handle rests inside the rectangular gap Although not essential vPad IV Modules should be oriented so that the output port faces the bottom of the Backpack 17 19 ...
Страница 18: ...Spacer 9 into the Backpack 9 Figure 29 The tablet power supply input output tubing kit and remaining accessories can be placed inside the Backpack Try keep the tablet away from the vPad IV handle by leaving a gap identified by an arrow in the above photo in the mesh pocket 18 19 ...
Страница 19: ...Accuracy Matters www datrend com Figure 30 An alternative way to pack the vPad IV is shown above where the handle is closer to the zipper side 19 19 ...