XM-DVR Pro
Dual Channel DVR Page 19 of 32
December 2009 Manual Rev 3.05
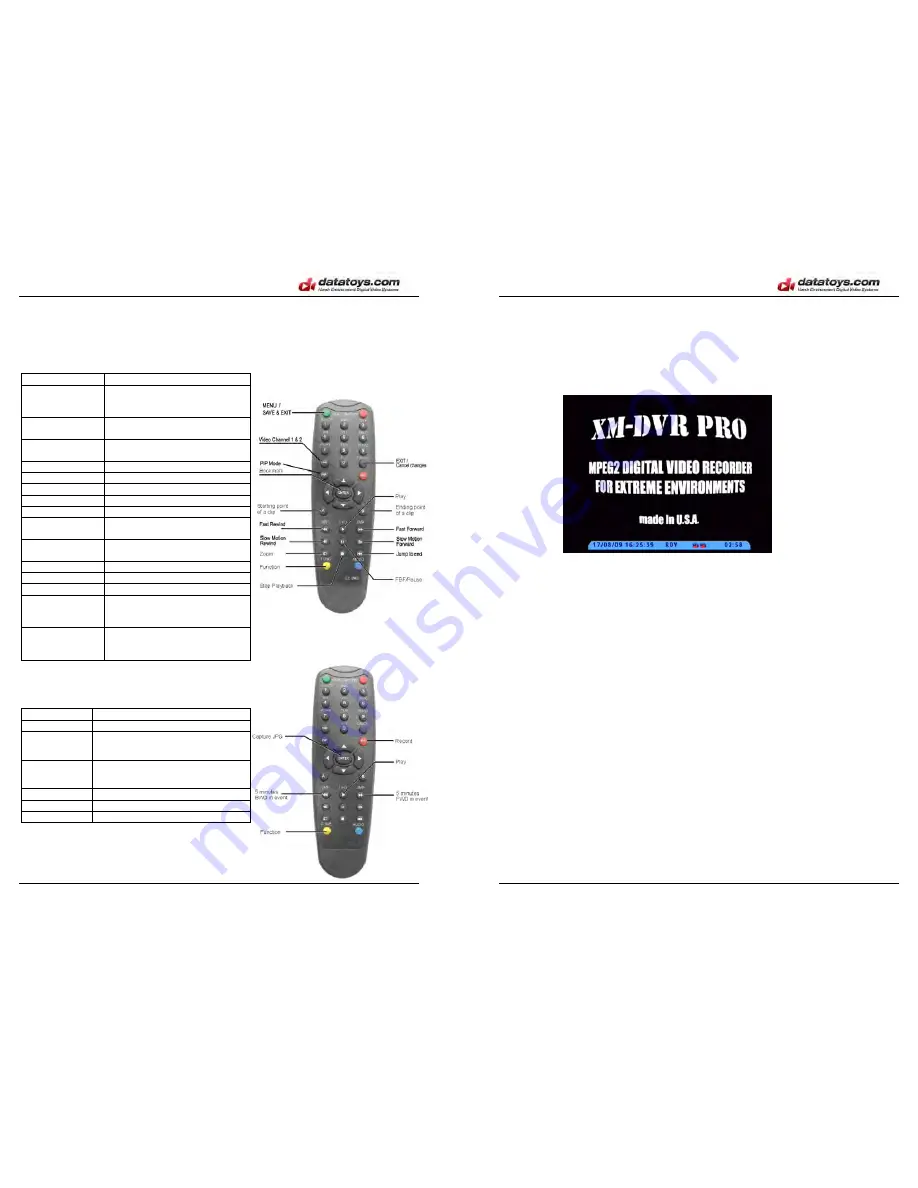
Menu and Settings
Remote Control
Button
Function:
Menu / Save &
Exit
Enter OSD.
When in OSD: exit and save
setting
Fast Rewind
Rewind video, fast mode:
2X / 4X / 8X / 16X
Slow Motion
Rewind
Slow backward.
Zoom
Enlarge displayed image
Function
Activate function buttons
Stop playback
Stop file debriefing
Cancel
Exit OSD without saving
Play
Play selected file
Fast Forward
Forward video, fast mode:
2X / 4X / 8X / 16X
Slow Motion
Forward
Slow forward
Jump to end
Go to end of displayed section
Enter
Bookmark
FBF/Pause
Frame by frame or Pause
PIP Mode
First press turns on
PIP
function, Second press switch
between channels or cameras.
Video Channel 1
& 2
Press
CHNL
button to Switch
full screen view between the two
channels or cameras.
For the following buttons require pressing the
Function
key then the appropriate button.
Button
Function:
*Enter
Capture JPEG/Bookmarks
BWD (JMP)
or F1
Jump 5 minutes back in current
video
FWD (JMP)
or F3
Jump 5 minutes forward in current
video
REC
Activate a manual alarm event.
A
Camera #1 Settings
B
Camera #2 Settings
*does not require the use of the function key
.
XM-DVR Pro
Dual Channel DVR Page 20 of 32
December 2009 Manual Rev 3.05
On-Screen Display
All settings for the XM-DVR Pro are configured through the on-screen display. To
view the on-screen display you
must
connect a monitor per the instructions on page
15.
Once the DVR boots you notice a blue info bar at the bottom of the screen.
This info bar will display:
•
Current Time and Date
– displayed in DD/MM/YY HH:MM:SS format
•
System Mode
– Recording Mode
o
RDY
– Ready to Record
o
TRG
– Recording (Flashing)
o
STBY –
Stand By
o
VCR –
(in VCR mode only)
o
OFF –
(in VCR mode only)
•
Camera Status
– (Channel 1 – Right, Channel 2 - Left)
o
Red
– Offline
o
Blue
- Online
•
Record Space Available
– displayed in HH:MM format


