background image


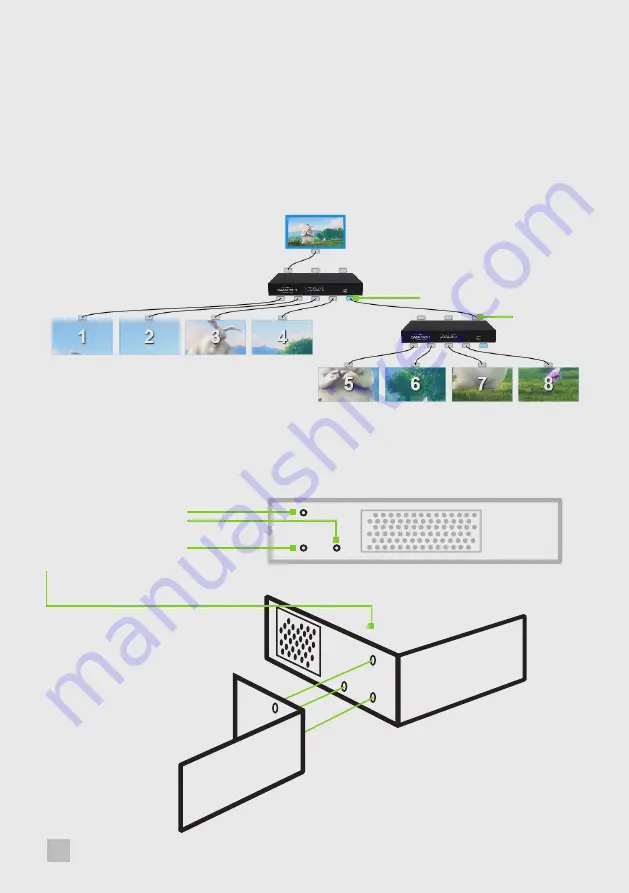
STEP 7 CONNECTING MULTIPLE DEVICES

Where more than four outputs are required, the 

Auto Configure

 function 

in the 

Devices

 tab (12) will determine the most logical way to connect  

all devices.

DisplayPort Out Loop

DisplayPort In

STEP 10 RACK MOUNTING (OPTIONAL)

Remove the stud screws on  
the side of your controller.  
Secure the rack mounts  
using the screws provided.

12

x-Series Quick Start Guide

Содержание x Series

Страница 1: ...Engineering the world s best visual solutions Quick Start Guide Fx4 HDR Fx4 Fx4 SDI Hx4...

Страница 2: ...MI Model Fx4 SDI x1 Hx4 x5 2 x rack mount attachments 6 x rack mount screws Thank you for purchasing the Datapath x Series multi display controller The aim of this document is to quickly guide you thr...

Страница 3: ...controllers are not supplied with input and output cables Please ensure you have the relevant cables to hand to complete your project The latest version of the Wall Designer software for Mac OS and Wi...

Страница 4: ...Connect your display cables to the display output connectors on the rear of your multi display controllers The output connectors are clearly marked on the rear panel of your controller You can connec...

Страница 5: ...om the Datapath website www datapath co uk When the controller has booted connect it to your PC using the USB cable provided The controller is a plug and play device Wall Designer will detect it when...

Страница 6: ...aning multiple devices can be connected Connect the controller to a network using a LAN connector then open Wall Designer and create your display layout see Step 6 OUTPUTS LAN USB 100 240V 1AMAX 50 60...

Страница 7: ...layed 1 2 3 4 It is highly recommended that when using Wall Designer for the first time all users take the Quick Start Tour 1 Operation Modes Select outputs inputs configure devices and check the stat...

Страница 8: ...Output Selection list on the left Then select the model 6 Choose the number of outputs by highlighting cells in the Add Outputs grid 7 Select a Background Image to enhance the Virtual Canvas 8 Click...

Страница 9: ...Inputs list to set up the input sources that are to be displayed on your monitors 10 Click on the Create button 11 Use the drop down list to select a Sample Source This will offer a preview of what t...

Страница 10: ...ice This will indicate how the displays are connected to the controller 13 Right click of the virtual device and associate it with the physical device connected to your PC or on the network This will...

Страница 11: ...your computer or LAN Click on a device to display its status information 16 The status information panel displays a summary of the selected device This includes details of the Flash and Firmware versi...

Страница 12: ...re function in the Devices tab 12 will determine the most logical way to connect all devices DisplayPort Out Loop DisplayPort In STEP 10 RACK MOUNTING OPTIONAL Remove the stud screws on the side of yo...

Страница 13: ...ed If all the display screens turn red this indicates that there is an issue with HDCP compliance Check both the input source and the monitors are HDCP compliant Front Panel LED Lights Flashing Contin...

Страница 14: ...st every effort is made to ensure that the information contained in this Quick Start Guide is correct Datapath Limited make no representations or warranties with respect to the contents thereof and do...

Страница 15: ...Bemrose House Bemrose Park Wayzgoose Drive Derby DE21 6XQ UK A full list of product compliance certifications can be found in the product User Guide CERTIFICATION This device complies with part 15 of...

Страница 16: ...2550 Blvd of the Generals Suite 320 Norristown PA 19403 USA 1 484 679 1553 sales us datapath co uk Datapath France 33 1 3013 8934 sales fr datapath co uk Datapath Germany 49 1529 009 0026 sales de dat...

Отзывы: