background image


STEP 3  CONNECT VIDEO INPUT SOURCES

Page 3

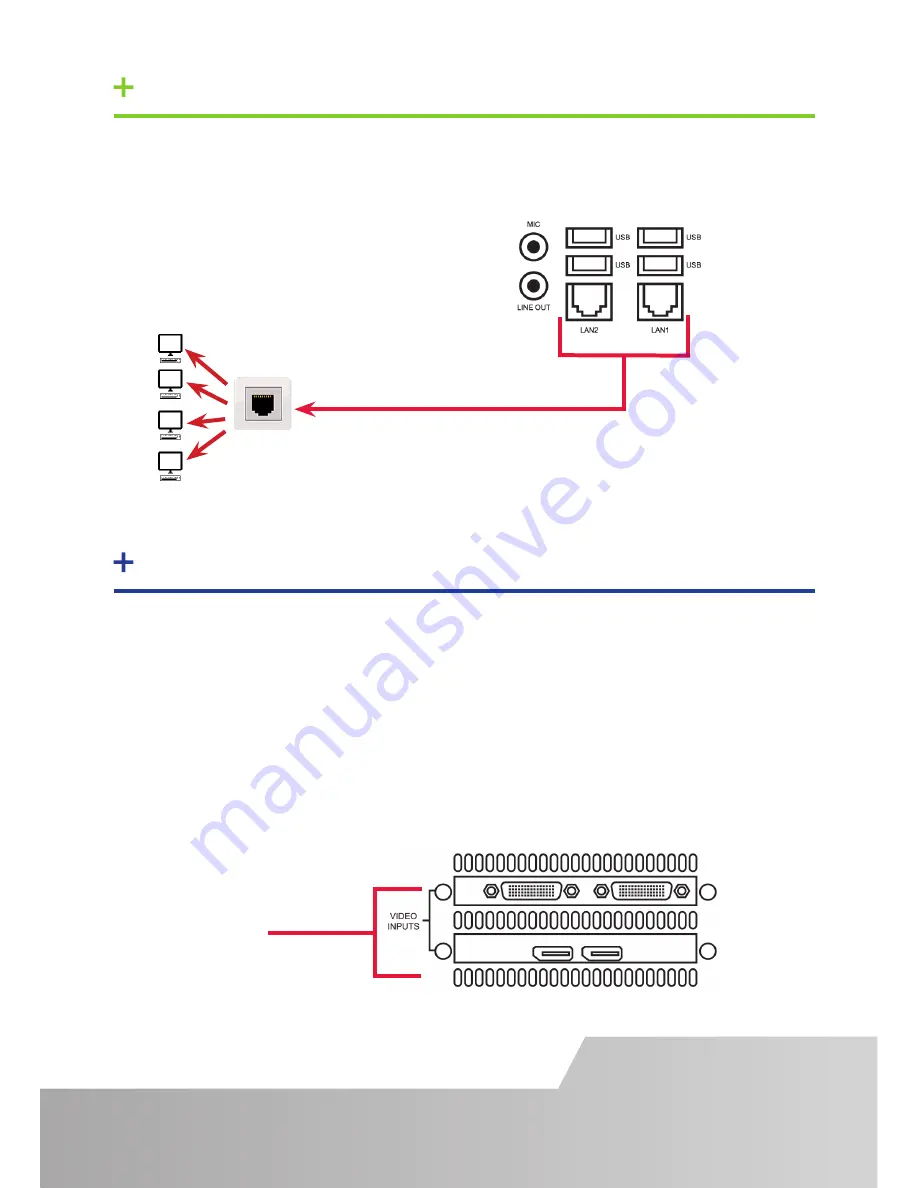
Input Connectors

As each iolite 12i  is custom built, the number and type of video inputs will differ 

from system to system.  If you have purchased an iolite 12i with video inputs, the 
input connectors are located on the rear panel as shown below. 

The printed diagram shipped with the iolite 12i shows the types of input and  

connectors built into your specific system.

Connect the input sources to the relevant input connectors, cables may be supplied 
for some inputs.  See content list for details.

If the iolite 12i  is to be used over a network, connect the iolite 12i to a network 
point (cables not supplied) using one of the LAN connectors on the rear panel.


STEP 2 CONNECT TO A NETWORK (OPTIONAL)

Содержание iolite 12i

Страница 1: ...aim of this document is to quickly guide you through the process of initial setup For detailed instructions consult the system User Guide which can be found on the Documentation Media Quick Start Guid...

Страница 2: ...el of the system Any input cables supplied are clearly labeled and will indicate which of the video input connectors they relate to Connect Keyboard and Mouse to convenient USB Ports USB Ports are loc...

Страница 3: ...panel as shown below The printed diagram shipped with the iolite 12i shows the types of input and connectors built into your specific system Connect the input sources to the relevant input connectors...

Страница 4: ...A control screen is initially required to set up the system including the operating system Windows 10 If a control screen is unavailable connect a single video wall display into either the DisplayPort...

Страница 5: ...requirement for users to activateWindows 10 activation is done automatically An internet connection is required to complete the automatic activation STEP 6 WINDOWS 10 SETUP Once theWindows 10 setup i...

Страница 6: ...P Cubes Overlapable Displays Projectors LED Displays Click on Continue The tool will then display a configuration page for the type of display you selected It is recommended that you carefully read th...

Страница 7: ...anufacturer and Model dropdown lists to select the displays you are using for your wall If the wall consists of different displays select each one in turn to configure the type of display The DDCT has...

Страница 8: ...owing page is displayed The DDCT can recommend the best wiring configuration for your system ensuring the load is balanced between the graphics hardware Click on Recommended for the optimal configurat...

Страница 9: ...ite downloads page To manually select the outputs right click on the display group and select Edit you can then select each individual display and allocate your preferred output Right click on a selec...

Страница 10: ...esTab Use templates to assist in the design of specific display wall layouts Open the WallControl 10 Client STEP 8 WALLCONTROL 10 Start All Programs WallControl 10 Server Before opening theWallControl...

Страница 11: ...tains information explaining how multiple sources can be selected how to use and create templates how to save recall and share layout files and manage walls Sources DisplayWall Tab DisplayWall Represe...

Страница 12: ...Off exe program must be running to enable security protection for the application To manually run the SecurityOnOff exe ensure you are logged intoWindows with Administrator Rights Locate and double cl...

Страница 13: ...or omis sions Datapath reserves the right to change specification without prior notice and cannot assume responsibility for the use made of the information supplied All registered trademarks used wit...

Страница 14: ...NOTES Page 14...

Страница 15: ...Page 14...

Страница 16: ...0 1332 294441 sales datapath co uk Datapath North America 2550 Blvd of the Generals Suite 320 Norristown PA 19403 USA 1 484 679 1553 sales datapath co uk Datapath France 33 1 3013 8934 sales fr datap...

Отзывы: