background image


38 

Approved Media 

To achieve optimum print quality and maximum printhead life, Datamax specifies the use of 

DATAMAX

®

 brand 

media.  These supplies are specially formulated for use in our printers; use of non-Datamax supplies may affect the 
print quality, performance, and life of the printer or its components. 


For a current list of approved media for use in direct thermal applications, please contact a Media Representative at 
(407) 523-5650.


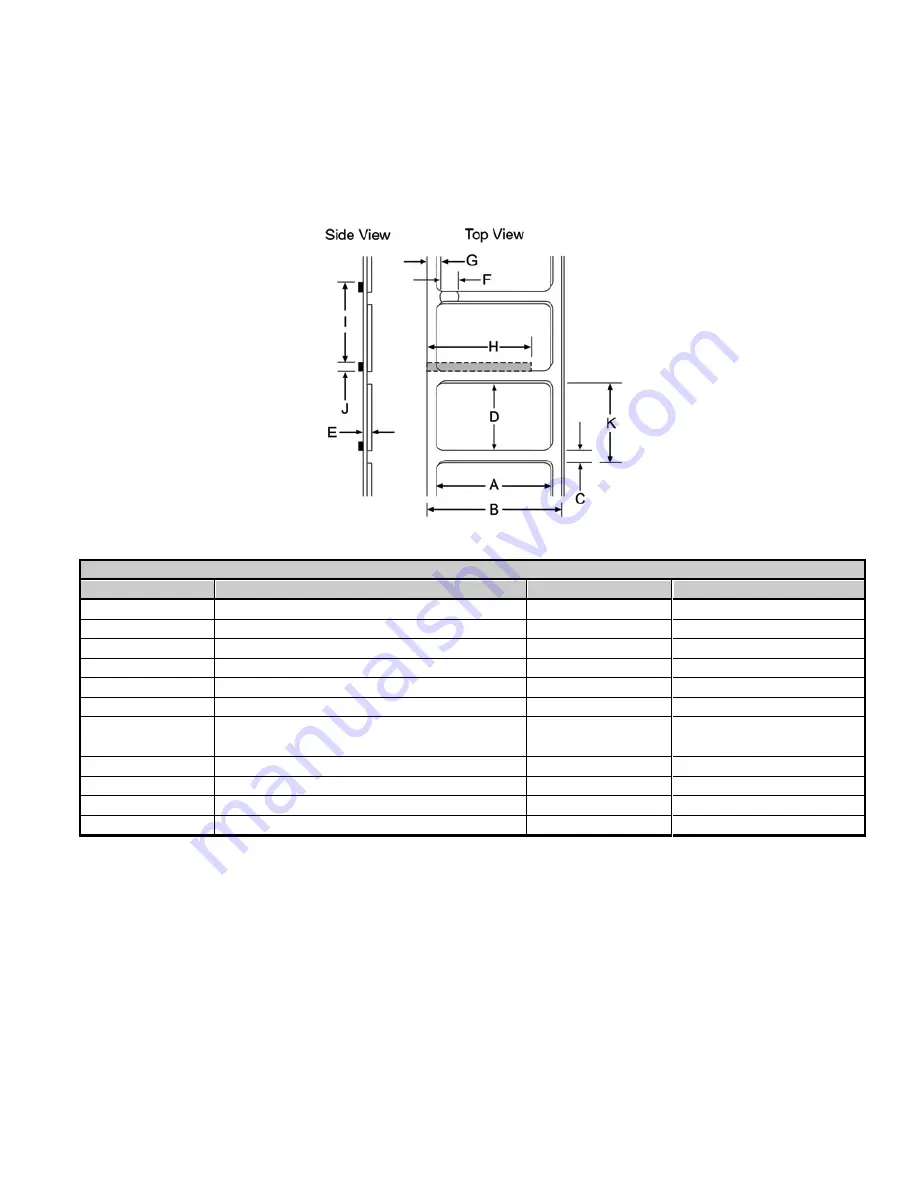
Media Dimensions


Designator


Description


Maximum


Minimum


A


label width


4.12" (104.65mm) 

1.00" (25.4mm)


B


liner width 


4.12" (104.65mm) 

1.00" (25.4mm)


C


gap (or notch) between labels

[2]


.25" (6.35mm)


.100" (2.54mm)


D


label length

[2]


.25" (6.35mm)


E


media thickness


.010" (.254mm)


.0025" (0.0635mm) 

F


notch opening width


.500" (12.7mm)


.200" (5.08mm)


G


distance from the media’s edge to the media 
sensor aperture (left justified)


2.25" (57.15mm) 


.200" (5.08mm)


H


reflective (black) mark width

[1]


4.12" (104.65mm) 

.500" (12.7mm)


I


distance between reflective marks

[2]


.125" (3.18mm) 

J


reflective mark length

[2]


.100" (2.54mm)


K


label repeat distance

[2]


.350" (8.89mm)


[1]The reflective (black) mark must be carbon based, placed on the backside of the stock, and the reflectance shall be 
less than 10% at wavelengths of 950 and 640 nm.


[2] Maximum label length will vary depending on the printers memory configuration. The maximum allowable length of 
the combined label and gap (or mark) measurement cannot exceed 99.99 inches.


Содержание Ex2

Страница 1: ......

Страница 2: ......

Страница 3: ...o simplify operation while its USB RS232 serial and parallel interfaces allow easy connection to your host system This manual provides all the information necessary to operate the printer To print lab...

Страница 4: ...g Power The printer is powered by an external power supply that connects as shown Connect the power cord to the printer first and then plug the other end into a suitable AC outlet Use only the power s...

Страница 5: ...lid data After this connection has been made the printer s power must be cycled Off and On to change the interface connection USB Connection The USB Interface is supported in Windows 95 and greater De...

Страница 6: ...n addition to the port settings the serial interface cable wiring must have specific connections pin outs for proper data exchange between the host and printer The different serial cable pin outs and...

Страница 7: ...rinter and power on the printer Allow 90 seconds from power up for the printer to retrieve an IP address from the server After this time print a Configuration Label to verify the printers current netw...

Страница 8: ...ccessful a new IP address value should be shown This IP address can then be used to browse to the printer s internal web pages for further configuration or used for installing the Windows Driver Using...

Страница 9: ...ions Tab and click the Print Configuration Button to confirm the printer has received the new values 8 Exit the DMXConfig program 9 Power Off the printer and remove the parallel or serial connection C...

Страница 10: ...e values are in range of your network if you are unsure contact your system administrator you can browse directly to the printer s internal web pages by entering this IP address into a web browser 1 C...

Страница 11: ...to your desired values 5 Type the Authentication password sysadm into the box on the bottom of the page and click on Apply to apply the changes The new IP address can then be used to browse to the pr...

Страница 12: ...ecessary to perform this adjustment Note It is important that the Windows Printer Driver Stock setting matches the size of the label you are using See the Windows Driver section 1 Slide the Media Hang...

Страница 13: ...11 3 Feed the media forward into the printer Once the media is detected the printer will grab the media and position it for printing...

Страница 14: ...Open the Peel and Present Door Set the Peel and Present switch to the 1 position 2 Complete the standard media loading as described in the previous section 3 Feed approximately 12 inches of media out...

Страница 15: ...13 5 While pulling firmly on the Media Liner close the Peel and Present Door It is important to keep the Media Liner taught around the Peel Bar...

Страница 16: ...Fan fold External Supply Loading With the Media Hanger Guides in their centered position route the media through the Slot in the Cover over the Hanger Guides and into the properly adjusted media guid...

Страница 17: ...k tab is where the label type is controlled Media Control Label Sensor provides appropriate selections for the label type in use Select Label Sensor Disabled for continuous label media 2 Load labels L...

Страница 18: ...g reflective label media will depending on its reflectance levels may result in a Top of Form fault This is normal printer drivers do not configure the printer until a label is sent to be printed 3 Cr...

Страница 19: ...lashing indicates that operator attention is required In this state the control button will function as follows Printer is Paused Printer resumes normal operation Press and hold for 3 seconds to cance...

Страница 20: ...hold the Control Button 3 Continue to hold the Control Button until the Configuration Label starts to print After the printer has completed printing the Configuration Label the printer will enter Hex...

Страница 21: ...m starts select Windows Printer Drivers from the main menu and then click the Install button The Windows Add Printer Wizard will begin Follow the steps in the wizard to complete the driver installatio...

Страница 22: ...ng matches the size of the label you are using If you cannot find a match for your label click New and enter the dimensions of your label Options Tab Print Speed Printhead Temperature These two settin...

Страница 23: ...onfigurations can be Shared with other Printers and Sent via Email Download Files Formats and Fonts Query Memory Modules Note Be sure to use the DMXConfig utility located on the Accessories CD Rom tha...

Страница 24: ...and clean it thoroughly with solvent and a cotton swab After every roll of media Peel Off Rollers Rotate the peel off rollers and clean it thoroughly with solvent and a cotton swab After every roll of...

Страница 25: ...printhead 1 Unplug the printer 2 Open the cover Press down on the Printhead Latches and raise the Printhead Carrier Allow the printhead to cool before proceeding 3 Using a Cotton Swab moistened not s...

Страница 26: ...quality through the use of the 1 heat and or 2 print speed software controls When adjusting use only the minimum pressure necessary for better imaging To adjust 1 Load the printer with media see Loadi...

Страница 27: ...Unplug the printer from its power source 2 Press down on both Printhead Latches to unlock the Printhead Carrier Raise the Printhead Carrier to its up position 3 Adjust the Media Guides to fit the wid...

Страница 28: ...26 Too Tight Correct Too Loose 4 Close and latch the Printhead Carrier The printer is now ready to be loaded with media see Loading Media...

Страница 29: ...ect on the surface If you have questions contact a qualified technician or Datamax Technical Support before proceeding Allow the printhead to cool before proceeding 1 Unplug the printer Open the cover...

Страница 30: ...Printhead Cable and then remove the Printhead 4 While carefully holding the new Printhead connect the Printhead Cable 5 Position the Printhead onto the Locating Pins in the Printhead Assembly and secu...

Страница 31: ...Printhead Latches and raise the Printhead Carrier 3 Rotate the Platen Roller Latches 90 degrees to their Up position 4 Grasp both of the Platen Roller Latches and pull the Platen Roller out of the pri...

Страница 32: ...ard drive 5 The Status Light will flash as the data is received Following a successful download the printer will perform a cold reset The previous printer setup will not be affected unless substantial...

Страница 33: ...feed to next label Top of form fault detected due to improper Top of Form sensing selection Change sensing appropriate for the media in use with printer driver properties or using Datamax Printer Con...

Страница 34: ...Stock setting is too low Increase OOS Maxvolt using Datamax Printer Configuration Utility DMXConfig Media not auto loading motor makes no attempts to load Media inserted before printer ready Remove m...

Страница 35: ...or printhead cable may be loose unplug the printer then reconnect Nothing happens when trying to print using a software program Ensure that the printer is selected in the applications Print Dialog Win...

Страница 36: ...inting to occur only after the removal of a previously printed label Minimum label length is 0 75 inches 19 mm Designed for ease of operation the Peel and Present Mechanism is automatically detected c...

Страница 37: ...e installer For detailed information concerning a specific option contact your dealer or Datamax Technical Support Experience Level for Options Installation Option Recommended Installer Peel and Prese...

Страница 38: ...orts voltages of 105 to 125 60 Hz p n 50 2034 01 supports voltages of 210 to 250 50 Hz Printing Print Method Direct Thermal Print Speed 2 4 IPS 51 102 mm s Resolution 203 dpi 8 dots mm Tear Bar Tear U...

Страница 39: ...SB RS 232 DB 9 and Centronics Parallel Baud Speed 600 to 38 400 bits per second BPS Handshaking Xon Xoff CTS DTR Parity Even Odd or None Stop Bits 1 or 2 Data Bits 7 or 8 Fonts See Embedded Fonts Bar...

Страница 40: ...h between labels 2 25 6 35mm 100 2 54mm D label length 2 25 6 35mm E media thickness 010 254mm 0025 0 0635mm F notch opening width 500 12 7mm 200 5 08mm G distance from the media s edge to the media s...

Страница 41: ...ace Be sure to use the appropriate fastener and anchor system compatible with the material of the wall you are mounting the printer to eg drywall masonry ect and can support at least 20lbs 9kg Fastene...

Страница 42: ...ctable as Heat Setting in most labeling software programs Increasing this value causes more energy to be transferred to the media resulting in a darker image Conversely if the image is too dark reduce...

Страница 43: ...ount of space when printed Font Valid ASCII Characters decimal Use with Record Structure Type 0 32 127 255 1 32 168 171 172 225 255 2 32 168 171 172 225 255 3 32 35 38 40 58 65 90 128 142 144 146 153...

Страница 44: ...and lower case alphanumeric w descenders and ascenders Font 2 138 character alphanumeric upper and lower case Font 3 62 character alphanumeric uppercase Font 4 62 character alphanumeric uppercase Fon...

Страница 45: ...t Point sizes are selected by the number in the barcode height Larger point sizes can be obtained by increasing the height and width multipliers 48pt and 72pt fonts are generated by doubling the 24pt...

Страница 46: ...10 48 57 Numeric only M m 2 digit UPC addendum 2 Yes 48 57 Numeric only N n 5 digit UPC addendum 5 Yes 48 57 Numeric only O o Code 93 Varies No 35 38 42 58 65 90 97 122 p Postnet Varies Yes 48 57 Num...

Страница 47: ...Barcode C UPC E zero suppression Barcode D Interleaved 2 of 5 Barcode E Code 128 Barcode F EAN 13 Barcode G EAN 8 Barcode H Health Industry Bar Code Code 39 Mod and 43 checksum Barcode I Codabar Barco...

Страница 48: ...ITF SCC 14 I 2 of 5 Shipping Container Code Barcode M 2 Digit UPC addendum Barcode N 5 Digit UPC addendum Barcode O Code 93 Barcode p Postnet Barcode Q SSCC 18 Serial Shipping Container Code Barcode R...

Страница 49: ...47 Barcode S UCC EAN 128 Random Weight Barcode T Telepen Barcode u UPS MaxiCode Barcode v FIM Barcode z PDF417 Bar Code W1c DataMatrix Bar Code W1d QR Code...

Страница 50: ...48 Bar Code W1f Aztec Bar Code W1g USD 8 Code 11 Bar Code W1k RSS Reduced Space Symbology Bar Code W1t TCIF Linked Barcode 3 of 9 TLC39 Bar Code W1z MicroPDF417...

Страница 51: ...ll or box of label or tag media that contains no gap notch or mark to separate individual labels or tags core diameter The inside diameter measurement of the cardboard core at the center of a media ro...

Страница 52: ...el width The left to right measurement of the label as it exits the printer mark Generalized term to indicate the label top of form light media Generalized term for all types of printing stocks includ...

Страница 53: ...f print position roll media A form of media that is wound upon a cardboard core start of print The position on the label where the printing actually begins tag stock A heavy paper or synthetic printin...

Страница 54: ...52 ASCII Chart...

Страница 55: ...53...

Страница 56: ...olid surface To protect your printer from overheating make sure all openings on the printer are not blocked Do not place the printer on or near a heat source Do not use your printer near water or spil...

Страница 57: ...information contained in the non volatile or programmable memory The firmware Software is protected by applicable copyright laws and Licensor retains all rights not expressly granted In no event will...

Страница 58: ...er sole responsibility that this product conforms to the following standards or other normative documents EMC EN 55022 1993 Class A EN 50024 1998 Safety This product complies with the requirements of...

Страница 59: ...lidation of this thermal printhead warranty This warranty does not cover printheads which have been misused altered neglected handled carelessly or damaged due to improper cleaning or unauthorized rep...

Страница 60: ...l damages or lost profits arising out of or relating to Datamax s products or the performance or a breach thereof even if Datamax has been advised of the possibility thereof Datamax s liability if any...

Страница 61: ...very of a Datamax product Please choose a location nearest to you Datamax Corporate Headquarters Orlando FL USA Monday Friday 8 00am 6 00pm EST Tel 407 523 5540 Fax 407 523 5542 Datamax International...

Страница 62: ...SH 1 PK DPO51 2424 30 CCA MAINBOARD 8MB FLASH w LAN 1 PK DPO20 2192 01 PRINTHEAD 1 PK DPO15 3155 01 KIT PLATEN ROLLER 5 PK DPO17 2436 01 SCREW M3 X 8 THRD CUT OVAL 50 PK DPO50 2050 01 POWER SUPPLY 24V...

Отзывы: