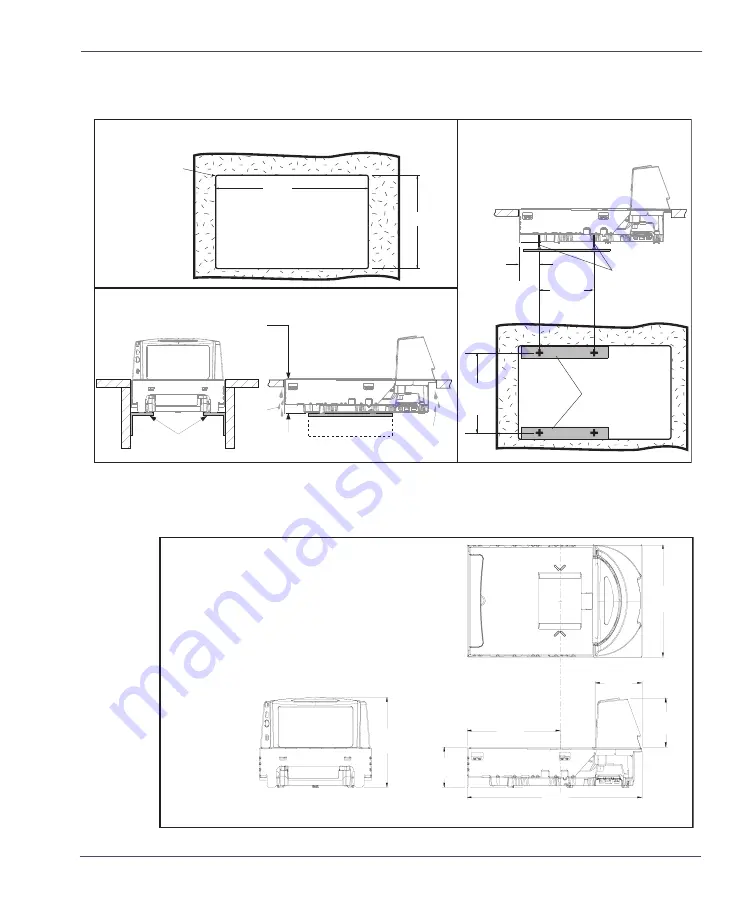
Datalogic MAGELLAN 8300 Скачать руководство пользователя страница 31

Counter Cutout

Technical Guide

2-15

Figure 2-12. Long Shelf Models 8303/8305/8403/8405 

Cutout Dimensions

Figure 2-13. Long Shelf Models 8303/8305/8403/8405 

Scanner Reference Dimensions

Models 8303/8305/8403/8405 (Long Shelf)
Cutout

11.625"

(29.53cm)

Max. Radius = 0.25"

(0.635cm)    4x

17.87"

(45.4cm)

Models 8303/8305/8403/8405 (Long Shelf)
Supports

4.08" (

10.36

cm)

Liquid

Drainage

Liquid

Drainage

Support Rails

Optional Leveling Feet

6.89"

(17.5cm)

1.76"

(4.47cm)

10.83"

(27.5cm)

Shelf/

Support Rails

Leveling

Feet

Models 8303/8305/8403/8405 (Long Shelf)
Scanner Reference Dimensions

9.27"

(23.6cm

± 0.2cm)

9.5"

(24.13cm)

17.75"

(45.1cm ± 0.15cm)

4.59"

(11.7cm)

11.5"

(29.21cm

± 0.1cm)

5.19"

(13.2cm)

4.08"

(10.36cm

± 0.15cm)

Содержание MAGELLAN 8300

Страница 1: ...MagellanTM 8300 8400 Technical Guide...

Страница 2: ...5208449 5210397 5212371 5212372 5214270 5229590 5231293 5232185 5233169 5235168 5237161 5237162 5239165 5247161 5256864 5258604 5258699 5260554 5274219 5296689 5298728 5311000 5327451 5329103 5330370...

Страница 3: ...Product Reference Guide 3...

Страница 4: ......

Страница 5: ...Checkstand Design 2 3 Scanner Installation 2 4 Scanner Maintenance 2 4 Scanner Usage 2 5 Site Preparation Overview 2 5 Ventilation and Spacing 2 7 Power Installation 2 9 Grounding 2 9 Liquid Spills a...

Страница 6: ...est Metric 4 8 Increasing Load Test Phase 2 4 9 Blanking Test 4 10 Decreasing Load Test 4 11 Return to Zero Test 4 11 Chapter 5 Programming 5 1 Entering and Exiting Programming Mode 5 1 Return to Fact...

Страница 7: ...e updates demos and instructions for returning products for repair Reseller Technical Support An excellent source for technical assistance and information is an autho rized Datalogic reseller A resell...

Страница 8: ...r nomenclature are shown in Figure 1 1 Figure 1 1 Scanner Scale Nomenclature Produce Bar in raised position All Weighs Platter Scanner LED Weighing Surface Lean Oversize Produce Here Vertical Window H...

Страница 9: ...s port is Optional Scale Data dual cable scanner scale Drives Remote Display Label Data Scale Data for single cable interfaces Application Download where appropriate Test Port On Screen Programming OS...

Страница 10: ...ow Rated Weight Capacity The scale s operational weight capacity is 15 000 kilograms displayed in 0 005 increments Minimum Increment The minimum weight that can be accurately measured by the scale is...

Страница 11: ...ration Power up Once installed and powered up a warm up time of 15 minutes must be allowed before calibrating or performing weighing operations User Configurable Warm up The user may configure the uni...

Страница 12: ...60 Hz Verify that the power source will sup ply clean electrical power to the equipment that is it must be free of excess electrical noise Operation Storage 40 C 104 F 10 C 50 F Temperature 10 to 40 C...

Страница 13: ...ctions If the cord will not plug into your AC power receptacle the power cord shipped is not compatible with your electrical system Please contact your distributor immediately to receive the necessary...

Страница 14: ...l United States UL 60950 State of California Energy Efficiency Standard Canada CAN CSA 60950 Europe T V EN 60950 Mexico NOM Korea K Mark Argentina IRAM Taiwan BSMI China CCC Japan PSE Australia New Ze...

Страница 15: ...nited States CDRH 21CFR Part 1040 CDRH Class IIa laser device Europe IEC60825 1 2007 EN60825 1 2007 Class 1 Class 1 Weights Measures United States NIST Handbook 44 Dept of Commerce Canada Measurement...

Страница 16: ...1 10 Magellan 8300 8400 NOTES...

Страница 17: ...cut for previously installed scanners such as Datalogic Magel lan scanners or NCR scanner models 7820 24 and 7870 Other mod els are designed for applications with smaller footprint requirements Figur...

Страница 18: ...Model Examples Figure 2 3 Produce Bar and Produce Rail Short Medium Long Model 8301 8401 Model 8302 8402 Model 8303 8403 Scanner ONLY models Scanner Scale models Medium Long Model 8304 8404 Model 8305...

Страница 19: ...man Services have released the reports listed at the end of these recommenda tions These reports contain useful suggestions for ergonomic improve ment of checkstand designs and scanner installation ma...

Страница 20: ...ng surface 34 36 inches 86 4 91 4 cm above the floor Maintain a minimum of five inches 12 7 cm clearance between elbows and work surfaces 10 Provide adjustable keyboard mounting height tilt and horizo...

Страница 21: ...ply slide the item across the scanner s horizontal window with as little orientation motion as necessary Leave items in an upright position do not lift and tilt Learn how the scanner functions and whe...

Страница 22: ...tions Liquid Drainage Should a liquid spill occur ensure that moisture can flow through the checkstand without pooling Leveling Plan ahead and provide screws bolts in the checkstand mounts and a level...

Страница 23: ...earance of 1 5 3 8 cm MUST be provided reference Figure 2 4 Another consideration is that the scan zone must be kept free of obstructions such as enclosures key board mounts etc Figure 2 4 Vertical Cl...

Страница 24: ...provide sufficient air move ment If a ventilation fan is installed one with a removable filter that may be washed or replaced is recommended Figure 2 5 Debris Chutes Ventilation Slots NOTE DO NOT plac...

Страница 25: ...rify the amount of electrical noise interference on the power line ask a qualified electrician to measure the input line voltage Figure 2 6 Input Power Wiring AC DC Power Supply Power Mains Line Neutr...

Страница 26: ...motion The operator simply slides the item from the conveyor belt or diverter area through the scanning area and passes the item to the other hand which in turn bags it or places it on a take away co...

Страница 27: ...operations The scanner should be installed so that leading and trailing edges of the L Platter are flush with the countertop to enhance smooth slide through scanning reference the insert in Figure 2...

Страница 28: ...ion Optional Item Diverter Conveyor Deadplate Scanner Bagging Area Take Away Belt Keyboard Remote Display POS Terminal Printer Check Writing Stand Optional Scan Bag Well Optional 6 3 16 0cm Cash Drawe...

Страница 29: ...s Optional Leveling Feet 11 625 29 53cm min Max Radius 0 25 0 635cm 4x 15 825 40 2cm min Models 8302 8304 8402 8404 Medium Shelf Supports 4 08 103 6mm Liquid Drainage Liquid Drainage Support Rails 6 8...

Страница 30: ...5 1 9cm 0 75 1 9cm 4 0 10 2 cm 0 375 0 95cm Liquid Drainage Liquid Drainage 18 00 45 7cm 16 625 42 23cm Max Radius 0 25 0 635cm 4x 0 75 1 905cm Rail Rail Center Line 0 75 1 905cm 0 375 0 952cm 0 375 0...

Страница 31: ...625 29 53cm Max Radius 0 25 0 635cm 4x 17 87 45 4cm Models 8303 8305 8403 8405 Long Shelf Supports 4 08 10 36cm Liquid Drainage Liquid Drainage Support Rails Optional Leveling Feet 6 89 17 5cm 1 76 4...

Страница 32: ...1 625 29 53cm 0 75 1 905cm Max Radius 0 25 0 635cm 4x 20 00 50 8cm 18 625 47 3cm 0 375 0 952cm 0 375 0 952 If leveling feet are needed use the placement shown here represented with plus signs 3 06 7 7...

Страница 33: ...AS system 6 Functional testing to verify operation when connected to the POS system The following text describes each of these steps Unpacking To unpack the unit Inspect the package for signs of damag...

Страница 34: ...2 22 and remove the protective foam pieces securing the weigh mechanism Set the platter back in place NOTE For added protection during shipment the L Platter is covered with a tight fitting layer of...

Страница 35: ...ayed in the form of to allow visual verification of display function If the diagnostics routine is not completed successfully the scanner will sound a series of tones and the Remote Display will show...

Страница 36: ...er to address the specific viewing needs of both the customer and the cashier Factors to consider when installing this device are Lighting Considerations Viewing Angle Remote Display Cabling Lighting...

Страница 37: ...dis plays are easily readable for customers cashiers of average height display heads should be between 48 to 60 122 to 152 cm from the floor Figure 2 17 Modular Adjustable Remote Scale Display NOTE Ch...

Страница 38: ...he display s should be approximately eye level to the viewer s 2 Use the template provided in Figure 2 20 to mark locations of the mounting screw and cable routing holes The mounting screw holes are o...

Страница 39: ...play can be positioned over the mounting screw holes 6 If present remove the rubber band from the connector end 7 Install mounting screws or bolts to complete the installation of the Remote Scale Disp...

Страница 40: ...9 Remote Scale Display Mounting Figure 2 20 Remote Scale Display Mounting Template 48 60 122 152cm 36 91cm 11 5 29cm 24 61cm Mounting Example optional cable routing Dual Display Heads Single Display H...

Страница 41: ...ale Display see Figure 2 19 and if your installation includes an EAS system refer to that manufacturer s instructions for connection and start up procedures 3 Route the cables up through the cutout an...

Страница 42: ...here appropriate Test Port On Screen Programming OSP Application Download RS 232 Handheld Scanner Input Auxiliary RS 232 Label Data Output Models with scale only Connection to external EAS device Cont...

Страница 43: ...ess to the interior lift handle Grasp the platter in the positions shown in Figure 2 22 and gently lift it from the scanner If the top edge of the platter is blocked you may find it easier to grasp th...

Страница 44: ...is is necessary to provide smooth scanning from either direction Make adjustments as needed to align the plat ter with the counter by moving support rails up or down or con sider installing screws in...

Страница 45: ...error codes on the Remote Display if installed Three error reporting modes are used Power Up Selftest Operational tests and Diagnostic tests These test sequences are explained on the fol lowing pages...

Страница 46: ...s troubleshooting flowcharts to help isolate the problem Diagnostic Procedures Your Point Of Sale POS system may contain many components that operate as a system Since almost all scanner or scale prob...

Страница 47: ...e will appear on the 7 segment display refer to Figure 3 1 Pressing the Volume Tone Push button will cause the scanner to sound a series of beeps corresponding to that error code Table 3 1 on the foll...

Страница 48: ...ctions 8 Remote Display Connect the Remote Display If necessary replace display or cable Alternatively you can disable the Remote Display using the program ming procedures described in Chapter 5 A Con...

Страница 49: ...Error Codes Technical Guide 3 5 Figure 3 1 7 Segment LED Display Seven Segment Display Horizontal Window Vertical Window...

Страница 50: ...sequence Too much motion at power up Check for stable installation Change scale motion filter using the labels found in Chapter 5 restart If prob lem persists scale may require calibra tion E__2 Flas...

Страница 51: ...returned to zero between POS weight requestsa Check debris chutes Verify that the weigh platter moves freely Remove item s from scale Press Scale Zero Push Button for more information If the scale sti...

Страница 52: ...isplay Use the programming bar codes in Chapter 5 to enable operation using a Remote Display Verify that the Remote Display cable is securely attached to the external Remote Display port and reset the...

Страница 53: ...rements Certification of the scanner scale s weighing apparatus is subject to Fed eral State and Local Weights and Measures statutes and is restricted to authorized government agencies and or duly reg...

Страница 54: ...in this chapter for the proper procedures You may be required by state and or local regulations to have procedures other than these performed by a certified technician or verification offi cial Acces...

Страница 55: ...gh platter of the scanner scale with one hand and at the same time press and release the Zero Push Button on the operator s panel The Yellow LED should turn Off and the Remote Display should not displ...

Страница 56: ...ace the entire weight set including the case on the weighing sur face of the scale The display should show an underscore and three hyphens which is the overweight indication 5 Remove all weight from t...

Страница 57: ...age ESCL empty scale 5 Reinstall the weigh platter 6 Press the Zero Push Button The Yellow LED will go out for approximately 10 seconds or less and the Remote Display will alternately display and unti...

Страница 58: ...repeat this sequence until reset Remove all weight from the Weigh Platter and repeat the procedure starting with step 7 11 Press the Zero Push Button again to permanently store the calibra tion data a...

Страница 59: ...his test checks Scale operation for increasing loads from 0 100 kg and 7 50 kg 1 Check that the display reads 0 000 kg when at rest with nothing on the weighing surface The Yellow LED is steadily lit...

Страница 60: ...nsure that items placed anywhere on the weigh ing surface of the scanner scale are weighed properly Refer to Figure 4 2 when performing this test 1 Place and remove in succession a 5 0 kilogram load o...

Страница 61: ...center of the weighing sur face and check that the display reads between 12 490 kg and 12 510 kg 3 Place an additional 2 50 kilograms in the center of the weighing sur face and check that the display...

Страница 62: ...the unit 1 Place weights that total the upper limit plus 0 82 kilograms on the weigh platter For example If the upper limit is set at 15 kilograms place weights equaling 15 82 kilograms 2 Verify that...

Страница 63: ...urn to Zero Test This test ensures that after all other tests have been completed success fully the scanner scale returns to zero Without any weight on the weigh platter verify that the scale reads 0...

Страница 64: ...4 12 Magellan 8300 8400 NOTES...

Страница 65: ...Technical Guide 5 1 Chapter 5 Programming Entering and Exiting Programming Mode Use the bar code label below to enter and exit switch into and out of Programming Mode SWITCH LABEL...

Страница 66: ...t known faulty or suspect RETURN TO FACTORY SETTINGS CAUTION Use this bar code with caution since it will reset ALL features that may have been programmed since the scanner s installation NOTE DO NOT...

Страница 67: ...e that the scanner reads only the bar code you intend to scan 3 Complete the programming sequence by scanning the SWITCH bar code SCALE DISABLE SCALE ENABLE NOTE Recalibration recertification may be r...

Страница 68: ...s from the POS plus scale will require re zeroing if a non zero weight is left on for more than two minutes or if the scale is below zero Non Zero for Two Minutes Re zeroing is required if weight does...

Страница 69: ...o cover any unused bar codes on this and the facing page to ensure that the scanner reads only the bar code you intend to scan SCALE ENFORCED ZERO RETURN NON ZERO FOR 2 MINUTES OR BELOW ZERO SCALE ENF...

Страница 70: ...Scale Enforced Zero Return continued Remember to cover any unused bar codes on this and the facing page to ensure that the scanner reads only the bar code you intend to scan SCALE ENFORCED ZERO RETURN...

Страница 71: ...cale Interface Type 1 Scan the SWITCH bar code 2 Scan your selection from the bar codes below You ll need to cover any unused bar codes on this and the facing page to ensure that the scanner reads onl...

Страница 72: ...n 8300 8400 Scale Interface Type continued Remember to cover any unused bar codes on this and the facing page to ensure that the scanner reads only the bar code you intend to scan SCALE INTERFACE TYPE...

Страница 73: ...e 1 Scan the SWITCH bar code 2 Scan your selection from the two bar codes below You ll need to cover any unused bar codes on this and the facing page to ensure that the scanner reads only the bar code...

Страница 74: ...page to ensure that the scanner reads only the bar code you intend to scan 3 Scan the appropriate digits from the keypad in Appendix A that rep resent the desired delay The selectable range is 0 100 w...

Страница 75: ...DISPLAY DISABLE REMOTE DISPLAY ENABLE NOTE Recalibration recertification may be required when adding a Remote Display Consult your local Weights and Measures authority If this feature is enabled the s...

Страница 76: ...ess a scanner s interface identification number place the scanner in Scanner Diagnostic Mode and view the 7 segment FRU display RS 232 Standard 05 RS 232 Wincor Nixdorf 12 RS 232 Single Cable 20 IBM U...

Страница 77: ...Type programming bar code must be scanned first before the scanner can be used with a POS system NOTE If the scanner s interface type must be changed always be sure that interface configuration is th...

Страница 78: ...NOTE Once the correct interface has been set it will be necessary to proceed to the appropriate pages in this manual that select parameters and options for that interface For example if RS 232 is sel...

Страница 79: ...o ensure that the scanner reads only the bar code you intend to scan INTERFACE TYPE RS 232 WINCOR NIXDORF CAUTION Great care should be taken to select the correct interface type since you can cause da...

Страница 80: ...RS 232 SINGLE CABLE CAUTION Great care should be taken to select the correct interface type since you can cause damage to the scanner and or POS terminal by attempting to change to an incompatible int...

Страница 81: ...ERFACE TYPE IBM USB CAUTION Great care should be taken to select the correct interface type since you can cause damage to the scanner and or POS terminal by attempting to change to an incompatible int...

Страница 82: ...IBM Port 17 CAUTION Great care should be taken to select the correct interface type since you can cause damage to the scanner and or POS terminal by attempting to change to an incompatible interface A...

Страница 83: ...Interface Related Features Technical Guide 5 19 NOTES...

Страница 84: ...5 20 Magellan 8300 8400 NOTES...

Страница 85: ...to enter numbers and characters as you would select digits characters from a keypad Scan your selection from the bar codes below You ll need to cover any unused bar codes on this and the facing page t...

Страница 86: ...r numbers and characters as you would select digits characters from a keypad Scan your selection from the bar codes below You ll need to cover any unused bar codes on this and the facing page to ensur...

Страница 87: ...numbers and characters as you would select digits characters from a keypad Scan your selection from the bar codes below You ll need to cover any unused bar codes on this and the facing page to ensure...

Страница 88: ...r numbers and characters as you would select digits characters from a keypad Scan your selection from the bar codes below You ll need to cover any unused bar codes on this and the facing page to ensur...

Страница 89: ...numbers and characters as you would select digits characters from a keypad Scan your selection from the bar codes below You ll need to cover any unused bar codes on this and the facing page to ensure...

Страница 90: ...r numbers and characters as you would select digits characters from a keypad Scan your selection from the bar codes below You ll need to cover any unused bar codes on this and the facing page to ensur...

Страница 91: ...numbers and characters as you would select digits characters from a keypad Scan your selection from the bar codes below You ll need to cover any unused bar codes on this and the facing page to ensure...

Страница 92: ...r numbers and characters as you would select digits characters from a keypad Scan your selection from the bar codes below You ll need to cover any unused bar codes on this and the facing page to ensur...

Страница 93: ...SI DLE DC1 DC2 DC3 DC4 NAK SYN ETB CAN EM SUB ESC FS GS RS US 00 01 02 03 04 05 06 07 08 09 0A 0B 0C 0D 0E 0F 10 11 12 13 14 15 16 17 18 19 1A 1B 1C 1D 1E 1F SP 0 1 2 3 4 5 6 7 8 9 20 21 22 23 24 25...

Страница 94: ...Datalogic Scanning KK Telephone 81 0 3 3491 6761 japan scanning datalogic com Latin America Datalogic Scanning Inc Telephone 305 591 3222 latinamerica scanning datalogic com Singapore Datalogic Scann...

Отзывы: