background image

B-7

User’s Guide for Select™ Platinum Series™ Printers

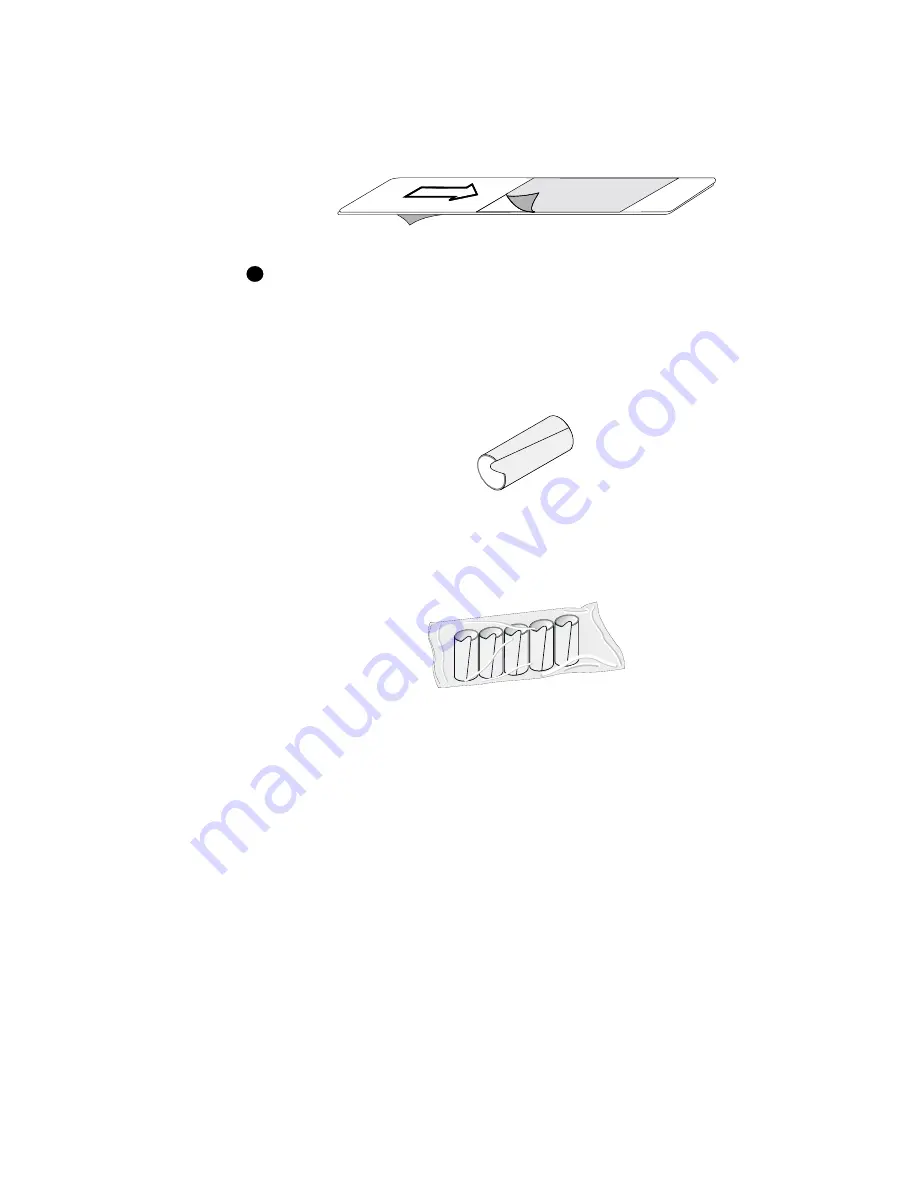
Printer cleaning cards are sold in packages of 10. The package part number is 
557297-001. Printer cleaning cards are also sold as part of cleaning kits, described 
below.

Figure B-3: Printer cleaning card

If the printer does not have a magnetic strip module, you can use cleaning card 

part number 548714-001.

Replaceable cleaning sleeve

Use a replaceable cleaning sleeve on the continuous cleaning roller. Change the 
replaceable cleaning sleeve before you run a printer cleaning card.

Figure B-4: Replaceable cleaning sleeve

The replaceable cleaning sleeve is sold in packages of 5. The package part number is 
549716-001. The replaceable cleaning sleeve is also available as part of a cleaning 
kit, described below.

Figure B-5: Package of replaceable cleaning sleeves

i

Содержание ImageCard Select

Страница 1: ...ImageCard Color Printers UltraGrafix Monochrome Printers May 2003 Part No 539123 101 User s Guide for Select Printers ...

Страница 2: ...ledgments Trademark service mark and copyright acknowledgments are listed in Safety and compliance on page A 1 Proprietary Notice All drawings and information herein are the property of DataCard Corporation Copyright 2003 DataCard Corporation All rights reserved Revision Log User s Guide for Select Platinum Series Printers Datacard 11111 Bren Road West Minnetonka MN 55343 9015 www datacard com 952...

Страница 3: ... for Properties Printing Preferences and Default Document Properties 3 1 Properties for Windows Me 98 3 2 Properties Printing Preferences for Windows 2000 XP 3 4 Properties and Default Document Properties for Windows NT 3 7 Using the Printer Toolbox 3 9 Opening and using the Printer Toolbox 3 11 Viewing Printer Toolbox information 3 12 Chapter 4 Maintaining the printer 4 1 Running a cleaning cycle...

Страница 4: ...tion sequence 6 5 Chapter 7 Install the printer 7 1 Unpacking the printer 7 2 Who to call for assistance 7 3 Connecting cables 7 3 Connecting an optional smart card cable 7 6 Preparing the printer for driver installation 7 8 Installing the printer driver 7 8 Installation choices 7 9 Changing required printer settings 7 18 Printing sample cards 7 19 Setup tips 7 19 Changing optional settings 7 20 S...

Страница 5: ... B 12 Cleaning roller spindle B 12 Data cable B 12 Power cable B 13 Smart card cable B 14 Replacement keys for optional locks B 14 Related publications B 14 Appendix C PC port settings C 1 PC port settings for all operating systems C 2 PC settings for Windows 2000 XP NT 4 0 C 5 Setting parallel port values C 5 Setting a smart card serial port Windows 2000 XP and NT C 6 PC settings for Windows Me a...

Страница 6: ...vi User s Guide for Select Platinum Series Printers ...

Страница 7: ...Printers 1Overview This chapter presents the following The purpose of this manual Who should use this manual The Datacard Select Platinum Series photo ID printer including a description of the printer the models available and their components ...

Страница 8: ...te a personal computer PC Experience with Microsoft Windows 2000 Windows XP Windows 98 Windows Me or Windows NT Ability to load supplies Ability to perform simple troubleshooting using written and graphical instructions For the skills needed for installation see Installation audience on page 6 2 About the Select printer The Select photo ID printer includes the printer and a printer driver which ru...

Страница 9: ...vanced Imaging Technology Print ribbon Platinum Series print ribbon must be used in the Select Platinum Series printer Printer unit The printer includes enhancements to provide optimal color printing Printer driver The printer driver includes color settings Using the Printer Toolbox on page 3 10 provides more information about color settings Printer models Several models of the printer are availab...

Страница 10: ...x on the printer label Contactless RF coupler SC680 on the printer label Proximity coupler SC x where x represents the brand of coupler Both contact and contactless couplers SC4 6 or SC4 SC x on the printer label Contact station SCCS on the printer label with external coupler A custom smart card application can use the module to initialize and program the smart card chip on a card Table 1 1 lists ...

Страница 11: ...lex housing Top cover The cover protects the internal parts of the printer from dust and debris It also lessens the sound from the printer Status light The status light indicates that the printer power is on is processing data is ready to receive data or is in an error condition Card cartridge The card cartridge holds blank cards to print It holds about 100 cards with a nominal thickness of 0 030 ...

Страница 12: ...ave been processed Both completed cards and rejected cards go to the card output stacker Ready button The Ready button allows you to pause the printer while printing a card to clear an error condition to cancel a print job and delete all data for the job or to create a printer test card Inside the printer Open the cover to find the following on the inside of the printer Figure 1 4 Internal parts o...

Страница 13: ... ribbon to the card The printhead cartridge is operator replaceable Printer label The printer label includes the printer serial number and information about optional components of the printer Print ribbon cartridge The print ribbon cartridge holds the print ribbon Card advance knob The card advance knob turns to move a card along the card transport track If a card remains in the printer use this k...

Страница 14: ...y one data port to use ECP parallel port Use the ECP parallel port to connect the printer s data cable to the PC if the printer was ordered with a parallel cable USB data port Use the USB data port to connect the printer s data cable to the PC if the printer was ordered with a USB cable Power switch Use the Power switch to power on or power off the printer Power receptacle This is the receptacle f...

Страница 15: ...authorized dealer distributor or value added reseller contact them for assistance A value added reseller provides the Select printer as part of an overall system If any contents of the box are missing contact your Datacard authorized dealer distributor or reseller If you purchased your printer directly from Datacard contact Datacard Contact the Datacard Customer Care Center at 1 800 328 3996 for s...

Страница 16: ...1 10 Overview User s Guide for Select Platinum Series Printers ...

Страница 17: ... success Loading cards Loading print ribbon Powering on the printer and PC The ready button and status light on the printer Making cards Removing cards Responding to messages Powering off the printer and PC Begin with the printer set up and the printer driver installed If the printer is not set up see Before you install on page 6 1 and Install the printer on page 7 1 to set up the printer and inst...

Страница 18: ...ate bar codes at least 0 25 inch 6 3 mm from other printing and from the edge of the card Make sure the color used to print the bar code works in your bar code readers Infrared readers require that the K panel be used to print the bar code Do not print closer than 0 1 inch 2 5 mm from a signature panel magnetic stripe or smart card chip Avoid placing a photo directly on the other side of a signatu...

Страница 19: ...rd cartridge unlock the cartridge before removing it 1 Pull up on the lower edge of the card cartridge step 1 in Figure 2 1 Lift the card cartridge up and out of the printer step 2 in Figure 2 1 Figure 2 1 Remove the card cartridge Do not touch the surface of cards before printing them Oils on hands can cause discolored printing Handle cards by the edges or wear gloves to protect cards 2 Fan cards...

Страница 20: ...is up and toward the open end of the card cartridge Figure 2 3 Load cards into the card cartridge Do not run the printer for an extended time without cards in the card cartridge Load more cards as soon as you are prompted 4 Replace the card cartridge in the cavity step 1 in Figure 2 4 Push the bottom of the card cartridge toward the printer until it clicks into place step 2 in Figure 2 4 Figure 2 ...

Страница 21: ...t be used The type of ribbon in the printer must match the print ribbon setting in the driver To order new ribbon contact your service provider See Supplies and cards on page B 1 for information about ribbons available Remove the print ribbon cartridge If the printer has a locking cover unlock the cover before opening it 1 Lift the top cover as shown in Figure 2 5 Figure 2 5 Open the cover 2 Press...

Страница 22: ...e used ribbon and the used ribbon spools from the ribbon cartridge shafts The print ribbon has a negative image of the information printed on the card Dispose of print ribbon according to your policy for protecting the data that might be visible on it 2 Unwrap the new print ribbon 3 Slide the full supply roll onto the left ribbon cartridge shaft see Figure 2 8 4 Slide the empty take up ribbon spoo...

Страница 23: ... printer and attached PC Power on the printer and PC If the printer is connected over a network using a print server make sure the driver is installed and configured on the PC before using it 1 Make sure cards and all other supplies are loaded See other sections of this chapter for more information 2 Remove any printed or rejected cards from the output stacker See Removing cards on page 2 12 for m...

Страница 24: ...en while the printer is paused with jobs in the queue The status light is amber when the printer is paused with no jobs in the print queue If the printer is paused and a message box is displayed on the PC use the buttons on the message box to clear the message If you press the Ready button to clear a message the current print job is cancelled If you press the Ready button to clear a pause conditio...

Страница 25: ...green The printer is busy printing cards Steady amber The printer is paused without an error If the light remains steady amber during power up the printer has a problem that requires service Blinking amber The printer has issued a message See the PC for the message If the light blinks amber but no message appears on the PC the following might have occurred You used the Power on Ready sequence to p...

Страница 26: ...pplication send cards to the printer usually use the Print button The printer driver receives data for each card prepares the card for printing and sends each card to the printer in the order received The printer driver keeps cards in a queue if the printer is busy For a directly networked printer the print server manages jobs from any PCs that send jobs to the printer Developers can write card cr...

Страница 27: ...6 To encode magnetic stripe data do one of the following Also on the front of the card enter the information to be encoded on the magnetic stripe and format the text using one of the following fonts Track 1 Magnetic Stripe Track 2 Magnetic Stripe Track 3 Magnetic Stripe Track NTT Magnetic Stripe use only on a PC running a Japanese language Windows operating system If your application does not allo...

Страница 28: ... policy for handling the confidential data that might be on the card Used print ribbon contains negative images of data printed on cards Be sure to handle used print ribbon according to your policy for handling the confidential data that might be on the card Removing cards The card output stacker holds both completed cards and rejected cards Remove completed cards from the output stacker to distri...

Страница 29: ...ic stripe use a card with a magnetic stripe and make sure the stripe is oriented correctly Messages issued by the printer at startup and some communication messages can be displayed on more than one directly networked PC with a SmartDriver installed In most cases a message appears on the PC that sent the card job that has a problem Messages include a Help button where information about recovering ...

Страница 30: ...he printer might be ejected The message box can have one or more of these buttons Retry Clears the card from the printer The driver sends the card or cards to the printer again If the problem is corrected normal operation resumes Cancel Clears the card from the printer The card is not sent to print again If the problem is corrected normal operation resumes OK Used for a message that occurs when no...

Страница 31: ...w your policy to secure unprinted card stock supplies and printed cards 4 Close PC applications and power off other equipment including the PC following your established procedure If you store the printer for several months remove supplies before storing it Supplies to remove include cards print ribbon and the replaceable cleaning sleeve i ...

Страница 32: ...2 16 Using the printer User s Guide for Select Platinum Series Printers ...

Страница 33: ...he printer driver This chapter provides information to help you use the printer driver for the Datacard Select Platinum Series photo ID printer effectively and efficiently It describes How to work with printer settings and data How to use the Printer Toolbox ...

Страница 34: ...ter driver uses default settings for the printer Make sure that driver settings match printer features and supplies used For settings that affect the printer such as print ribbon type make sure that the printer and PC are connected so the value you select is sent to the printer and saved For printers used over a network see the e Guide for Select Platinum Series Printers For printers connected ove...

Страница 35: ...ser with Allow permission for Print Manage Printer and Manage Documents on Windows 2000 or XP should use the Properties or Printing Preferences dialog boxes A user with administrator rights also can use these dialog boxes On the client PC when a printer is shared a user with Print permission can use these dialog boxes Properties for Windows Me 98 The Properties dialog box includes the following se...

Страница 36: ...lp button and then click a setting 6 If you make changes click Apply to save the settings Click OK to close the dialog box If you do not want to make changes click Cancel to close the Properties dialog box Properties Printing Preferences for Windows 2000 XP The Printing Preferences dialog box includes the following settings or data Card design settings such as landscape or portrait orientation Pri...

Страница 37: ... or detailed conceptual information Use the Properties dialog box Make sure the printer power is on and the printer is connected to the PC 1 Select Start from the Windows 2000 or XP taskbar 2 From the Windows Start menu select Settings and then Printers 2000 or Printers and Faxes XP The Printers and Faxes window appears 3 Click once on the SmartDriver icon 4 Select File from the Printers menu bar ...

Страница 38: ...the Printers menu bar and then select Printing Preferences The Printing Preferences dialog box appears Figure 3 3 Printing Preferences dialog box Windows 2000 and XP 5 If the setting you want to change appears select the setting 6 If the setting you want to change does not appear click the Advanced button to display the Advanced Options dialog box Figure 3 4 Click the plus sign if needed to see al...

Страница 39: ...ies Printers To view help for settings click on the What s This help button and then click any setting in the Printer Features list A list of settings is displayed Select the setting for which you want help 7 If you make changes click OK on each dialog box to save the settings and close the dialog box Properties and Default Document Properties for Windows NT Settings that control the printing and ...

Страница 40: ...g The SmartDriver provides help for the Default Document Properties dialog box and Windows NT provides help for the Properties dialog box Help provides information about specific settings of the printer driver Help does not include step by step procedures or detailed conceptual information Use the Properties dialog box Make sure the printer power is on and the printer is connected to the PC 1 Sele...

Страница 41: ...skbar 2 From the Windows NT Start menu select Settings and then Printers The Printers window appears 3 Click once on the SmartDriver icon 4 Select File from the Printers menu bar and then select Document Defaults The SmartDriver Default Document Properties dialog box appears If you have the Printer Toolbox open you can click the Default Document Properties button on the Status page to open the Def...

Страница 42: ... Toolbox icon The Printer Toolbox starts as part of Windows startup and is displayed by default If you exited the Printer Toolbox it starts again after a card is printed or after the Properties Printing Preferences or Default Document Properties dialog box is opened The Printer icon shows the state of communication between the printer and driver listed in the table below E E Icon Description Indic...

Страница 43: ...lass The Printer Toolbox is in advanced setup mode Use advanced setup when changing printing intensity or the position of printing The printer icon is white includes a PC and has a green stripe on top The Printer Toolbox is running on a client PC using printer sharing over a network The Printer Toolbox displays the client status and provides access to color settings The printer icon is white with ...

Страница 44: ... status If the printer is directly connected to this PC the second line displays any messages If the printer is shared through a network this line indicates where to find information about messages This line is blank on a locally connected PC when there are no errors or when any message has been cleared and processing resumes The third line displays information about how the printer and PC are con...

Страница 45: ...u select Exit You should exit the Printer Toolbox when you receive instructions to do so You cannot exit from the Printer Toolbox while printing a card The Printer Toolbox automatically restarts when you print a card or when you open Properties Document Default Properties or Printing Preferences If you need to restart the Printer Toolbox open Properties as described in Working with Properties and ...

Страница 46: ...ive PC and that you suspend communication at other PCs connected to the printer Color settings The Color Settings tab is available from the Printer Toolbox at any time Color settings see Figure 3 9 are one of the features of Advanced Imaging Technology For directly networked and shared PCs color settings affect cards sent from the PC Figure 3 9 Color Settings page and preview E ...

Страница 47: ...d Select Platinum Series photo ID printer for optimal performance It describes How to run a cleaning cycle including the cleaning card and cleaning roller How to use the magnetic stripe cleaning card How to clean the rollers in the printer How to use the duplex cleaning card How to clean the printhead How to replace the printhead cartridge ...

Страница 48: ...terval you determine You might want to run a cleaning cycle more often if The cards especially magnetic stripe cards or cards with signature panels have particles on them A monochrome ribbon is used The printer is operated in a relatively dirty environment Printed cards have defects in the printing because of residue on the cards Using the printer cleaning card Use the printer cleaning card when p...

Страница 49: ... back and forth to clean the print area 5 The cleaning card is ejected into the output stacker under the card cartridge 6 Discard the used printer cleaning card 7 Replace the card cartridge Push the bottom of the card cartridge until it clicks into place The printer module is cleaned and the printer is ready to resume normal operation If the printer has a locking card cartridge lock the cartridge ...

Страница 50: ...wing arm Lift the swing arm until it is fully open step 2 in Figure 4 3 Figure 4 3 Open the swing arm 3 Remove the print ribbon cartridge 4 Lift the continuous cleaning roller unit out of the printer step 1 in Figure 4 4 Figure 4 4 Lift the roller out of the printer 5 Slide the used sleeve off the cleaning roller spindle step 2 in Figure 4 4 Discard the used sleeve 1 2 2 1 ...

Страница 51: ...y 8 Continue to hold the spindle by the ends Replace the spindle with sleeve in the printer step 3 in Figure 4 5 9 Replace the print ribbon cartridge 10 Close the swing arm pressing it down until the push latch clicks into place 11 Close the printer top cover Using the magnetic stripe cleaning card The printer s magnetic stripe module should be cleaned when the printer has displayed several magnet...

Страница 52: ...Click the Clean Mag Stripe button in the Clean area The printer automatically runs the magnetic stripe cleaning process and ejects the card in the output stacker when it is complete 4 Remove the used magnetic stripe cleaning card The card can be used again Cleaning the printer rollers The printer rollers move the card during printing or cleaning operations Clean the rollers once a week or when pro...

Страница 53: ...ars Do not insert a cleaning card The driver sends a command to the printer to run the printer cleaning card The printer moves rollers when it attempts to pick the card d Slowly move the pen on the pick roller e Lightly wipe any dirt from the end of the cleaning pen onto a clean cloth or paper Move the cleaning pen to another area of the roller f Repeat steps c through e until no more dirt appears...

Страница 54: ...cleaning pen onto a clean cloth or paper Move the cleaning pen to another area of the roller f Repeat steps c through e for the roller at location 1 until no more dirt appears on the pen or cloth g Move the cleaning pen to location 2 in Figure 4 8 Repeat steps c through f h If the printer has a magnetic stripe module move the cleaning pen to location 3 in Figure 4 8 Repeat steps c through f i Repl...

Страница 55: ...7 Print a card to verify the quality of printing You can print a printer test card a sample card or a card using your card creation application Using the duplex cleaning card If your printer includes a duplex module use the duplex cleaning card to maintain card quality and reduce the likelihood of jammed cards in the duplex module Use the duplex cleaning card once a month or when problems occur su...

Страница 56: ...output stacker when it is complete 6 Remove the used cleaning card and discard it 7 Replace the card cartridge Push the bottom of the card cartridge until it clicks into place If the printer has a locking card cartridge lock the cartridge after replacing it The duplex module is clean and the printer is ready to resume normal operation Cleaning tips Follow these tips to clean your printer effective...

Страница 57: ... on printed cards Clean the printhead only when needed such as The printhead has been accidently touched such as when changing supplies or clearing a card jam You have replaced the printhead Your observe problems with card appearance as described in Troubleshooting on page 5 1 Do not touch the printing edge of the printhead cartridge with your fingers The oils on your fingers can reduce print qual...

Страница 58: ... card If card quality is still inadequate see Problems with card appearance on page 5 8 Replacing the printhead cartridge The printer uses an operator replaceable printhead cartridge For more information about printhead cartridges see Supplies and cards on page B 1 Remove the printhead cartridge Do not touch the printing edge of the printhead cartridge If you do clean it using the cleaning pen as ...

Страница 59: ...s Push the black locking tabs to the side Remove the gray connector of the printhead data cable from the printhead cartridge see Figure 4 14 Pull firmly on the white connector of the printhead power cable to remove it from the printhead cartridge You can gently pull on the wires attached to the plug if needed to remove the cable Figure 4 14 Printhead cables and connectors 7 Remove the ground cable...

Страница 60: ...see Figure 4 14 Make sure the locking tabs are in place Do not press on the wires of the printhead cables 3 If the printhead has a ground cable slide the ground cable connector onto the ground tab of the swing arm see Figure 4 15 4 Align the printhead cartridge pins with the printhead cartridge slots on the swing arm see Figure 4 16 5 Slide the new printhead cartridge onto the swing arm so the pin...

Страница 61: ...is in place 7 Clean the printhead Move the cleaning pen back and forth along the length of the printhead edge See Figure 4 12 on page 4 12 Be sure to completely clean the rounded edge of the printhead 8 Close the swing arm pressing it down until the push latch clicks into place 9 Close the printer cover 10 Power on the printer 11 Print a card to verify the quality of printing You can print a sampl...

Страница 62: ...4 16 Maintaining the printer User s Guide for Select Platinum Series Printers ...

Страница 63: ...roubleshoot the Datacard Select Platinum Series photo ID printer and how to obtain service It explains What to do if you think the printer is not working How to make test cards Problems you might see in the appearance of cards How to obtain service How to package the printer to return for service ...

Страница 64: ...ce this information will help your service representative address your concerns Troubleshooting guide Use the following to help you locate information about different types of problems Problem Location Printer beeps without a message displayed on the PC See Responding to messages on page 2 13 Installation problems See Install the printer on page 7 1 Appearance of printed cards See Problems with ca...

Страница 65: ...d creation application to print a card See Making cards on page 2 10 If the card creation application does not print the card as expected but the test card and sample card print the card creation application is likely not set or operating properly Making and evaluating test cards You can make the following types of test cards Printer test cards verify the function of the printer You print them usi...

Страница 66: ...button 1 and then power on the printer 2 as shown in Figure 5 1 Hold the Ready button until the printer sounds three tones usually 5 to 10 seconds Figure 5 1 Press and hold Ready button 1 and then Press Power switch 2 4 Release the Ready button You hear the internal components initialize Allow 30 to 60 seconds for the printer to begin printing the test card The status light will flash green while ...

Страница 67: ...des a duplex module If a magnetic stripe module is installed in the printer and enabled the following data is encoded on the card See Magnetic stripe encoding on page D 1 for more information about magnetic stripe tracks The tracks available depend on the type of module installed The magnetic stripe data on the printer test card is generated by the printer and does not test driver to printer commu...

Страница 68: ...dows creates a test page image The card will print when the PC and printer are connected and the printer and driver are working together After you select the Print Test Page button Windows displays a wizard asking if the page printed correctly Click Yes on this dialog box to end the Wizard The Setup tips on page 7 19 provide the information you need to address problems with PC to printer communica...

Страница 69: ...fy that the printer encodes a card correctly If the printer is set to print a custom magnetic stripe format it will not print this test card successfully The driver will display a message indicating that the data does not meet the requirements for the magnetic stripe track or that it cannot read the data Print a magnetic stripe test card The printer must be connected to the PC with the driver inst...

Страница 70: ...oded data should match the data printed on the test card Problems with card appearance Problems with card appearance can be the result of the following Image capture tools such as the camera Card creation application which displays the image Limitations in technology such as differences between how an image looks on the monitor and how it looks after it is printed Printer maintenance or PC setting...

Страница 71: ...t quality problems What you see Possible causes Solutions One or more unprinted lines run the entire length of the card The printhead might be dirty or damaged Clean the printhead See Chapter 4 Run a test card See this chapter If cleaning does not solve the problem replace the printhead See Chapter 4 Part of the printed card is blank Cards might not meet specifications Cards might be dirty The pri...

Страница 72: ...printed on the card or the printing is very light The ribbon is loaded incorrectly The printhead cartridge power cable might be loose The printhead cable or printhead cartridge might be damaged Remove and replace the ribbon See Chapter 2 Power off the printer Make sure the printhead power cable is securely connected See Chapter 4 Replace the printhead See Chapter 4 If the problem persists contact ...

Страница 73: ...B Clean the printhead See Chapter 4 If the problem persists contact your service representative All card data is positioned unevenly on the card The card registration might be incorrect Set the position of printing See the e Guide If the problem persists contact your service representative Card is printed upside down the image is rotated 180 degrees The card creation application has rotated the ca...

Страница 74: ... and use a different supply of cards See Appendix B Clean the printhead See Chapter 4 Use only Datacard Platinum Series ribbon in the Select printer If the problem persists contact your service representative Part of the printed image is discolored Cards might have fingerprints or other dirt on them The cards might be contaminated or otherwise not meet specifications The rollers might be dirty A s...

Страница 75: ...leaning sleeve and then clean the rollers See Chapter 4 The printed card shows wavy lines along the length of the card woodgrain The print ribbon is not loaded correctly The printhead is not aligned correctly Load the print ribbon again Make sure the cartridge is firmly seated See Chapter 2 Contact your service representative The card shows irregular lighter or darker spots The printhead is not al...

Страница 76: ...t specifications Check the card transport track for jams Check the duplex module if present for jams Clear any card jams Run a printer cleaning cycle then clean the rollers See Chapter 4 Obtain and use a different supply of cards See Appendix B If the problem persists contact your service representative Black and white images are poorly dithered The image capture system needs adjustment Brightness...

Страница 77: ...cycle Clean the rollers See Chapter 4 Store supplies in a clean environment Keep supplies in their packaging until loaded in the cartridge The topcoat shows bands across the width of the card The printhead intensity is too low The printhead is not aligned correctly Increase the printhead intensity setting for topcoat See the e Guide Contact your service representative The topcoat shows lines along...

Страница 78: ...for service if A troubleshooting process instructs you to call service A troubleshooting process does not produce the expected result You experience a problem repeatedly Packing the printer for shipping When service asks you return the printer to a service center for repair pack the printer for shipping You might also need to pack the printer to send it to another location Pack the printer 1 Turn ...

Страница 79: ...ecure the print ribbon cartridge Leave the print ribbon cartridge in place or apply packing tape Avoid applying tape to labels in the printer 6 Make sure the card cartridge is firmly seated 7 Close the cover 8 Use the original shipping carton plastic bag and foam shipping supports 9 Place the plastic bag around the printer If you are transporting the printer to another location for use put the dat...

Страница 80: ...sure to pack the User s Guide printer driver CD ROM the warranty and the declaration of conformity in the accessories bag 13 Place the accessories bag in the shipping carton next to the printer step 3 in Figure 5 5 14 Close the shipping carton step 4 in Figure 5 5 15 Secure the carton with shipping tape Be sure to wrap around the shipping carton several times to secure it 16 Put a shipping label o...

Страница 81: ...r presents the following Skills that installers need Physical electrical and other requirements for the site Requirements for the PC used with the Datacard Select Platinum Series photo ID printer The preferred sequence for installing this printer as part of an identification system ...

Страница 82: ...pplies consider the following general requirements Keep all dust dirt food liquids etc away from the Select printer at all times Keep the top cover closed at all times except when changing supplies fixing problems or performing maintenance Do not use supplies or cards that have been dropped on the floor or have otherwise become contaminated Keep paper and foreign materials off the Select printer P...

Страница 83: ...m the printer before storing Electrical requirements The Select printer requires the following electrical conditions for optimal performance 100 230 VAC 10 at 50 60 Hz The Select printer automatically adjusts to any power within this range Single phase 3 wire grounded receptacle only The rated input current for the Select printer is 1 4 amps at 100 VAC applied Physical requirements The Select prin...

Страница 84: ...pace for preparing card data Additional components such as Diagnostics might require more space Datacard recommends at least 100 MB of hard disk space before installing the printer driver The PC including processor speed memory operating system applications running and available hard disk space can have a dramatic effect on card processing speed The operating system or applications can require mor...

Страница 85: ...methods A network connection to support printer sharing or direct networking Have a CD ROM drive to install the printer driver Have one of the following operating systems Windows Me recommended The Windows Me printer driver is also designed to work on Windows 98 or Windows 98 Second Edition Windows XP with service pack 1 recommended Windows 2000 with service pack 3 Windows NT 4 0 with service pack...

Страница 86: ...6 6 Before you install User s Guide for Select Platinum Series Printers ...

Страница 87: ...cribes how to install and set up the Datacard Select Platinum Series photo ID printer It describes Unpacking the printer Connecting the cables Preparing for printer driver installation Installing the printer driver Changing required and optional settings Setup tips Printing sample cards ...

Страница 88: ...p 1 in Figure 7 1 Figure 7 1 Unpack the printer 4 Remove the Quick Install Chart and the accessories bag steps 2 and 3 in Figure 7 1 The options included with the printer are checked on the chart The printer weighs 21 to 26 5 pounds 9 7 to 11 9 kg Use proper lifting techniques Make sure you have enough people to lift the printer comfortably 5 Lift off the front and back shipping supports step 4 in...

Страница 89: ...seat it 10 Remove the printhead packing tape a Lift the top cover Figure 7 2 Remove internal packaging b Lift an edge of the packing tape and pull it off the swing arm and chassis Figure 7 2 Discard the tape Who to call for assistance If you work with a Datacard authorized dealer distributor or value added reseller contact your reseller for assistance A value added reseller provides the Select pri...

Страница 90: ... and using the printer The printer panel has several ports and some printers with smart card modules have ports installed in optional locations Figure 7 3 shows the printer ports Figure 7 3 Ports on the printer The data cable can be a USB cable or a parallel port cable Use only one data cable to connect the printer and PC Connect a parallel port data cable When using a parallel port data cable mak...

Страница 91: ... known as a pass through or piggy back plug The printer and printer driver cannot communicate reliably through such a plug Install an additional parallel port in the PC if needed Connect a USB data cable The USB cable must be a type CM 30V cable up to a maximum of 6 5 feet or 2 meters long A longer cable might result in electrical interference 1 Attach the flat end of the USB cable to the USB port...

Страница 92: ...isy chaining If you need to connect two Datacard printers to a PC with one USB port obtain a USB hub to which both printers can be connected Connecting an optional smart card cable The ports available on the printer Figure 7 3 on page 7 4 and the model information on the label Figure 1 2 on page 1 3 are keys to what modules are installed If no smart card ports are installed in the printer no cable...

Страница 93: ...al port Figure 7 6 if a contact smart card module or a contact station is installed in the printer The smart card serial cable must be a shielded DB9 serial cable up to a maximum of 9 8 feet or 3 meters long 2 Connect a serial cable to the inside smart card serial port Figure 7 6 if a contact module is installed in the printer Figure 7 6 Connect the smart card serial cable 3 Use two smart card ser...

Страница 94: ...fter connecting the printer and PC and before installing the driver do the following Load cards in the card cartridge See Loading cards on page 2 3 Install the continuous cleaning roller in the printer See Replacing the cleaning roller sleeve on page 4 3 There is no used sleeve to remove Install the print ribbon See Loading the print ribbon on page 2 5 When installing a new printer there is no use...

Страница 95: ...folder of the driver CD ROM or through the e Guide icon on the desktop for information on these installation alternatives You can also directly connect the printer to a network using a print server See the SmartDriver Direct Network Guide for more information See the e Guide for Select Platinum Series Printers for information on printer pooling on the Windows 2000 and XP operating systems Find the...

Страница 96: ... are checked on the Add Printer Wizard For Windows 2000 check Local printer and Automatically detect and install For Windows XP check Install the software automatically recommended 13 Click Next The PC searches the CD ROM for files to install For Windows XP go to step 16 14 Make sure that Search for a suitable driver is selected and then click Next 15 Make sure that CD ROM drives is selected and t...

Страница 97: ...w the Release Notes optional and install information 22 From the User Information page click View Release Notes if you want to view detailed information about the printer driver installed The WordPad application opens and displays the release notes Click the Close or Exit button when you are done viewing release notes 23 From the User Information page click e Guide for Select Platinum Series Print...

Страница 98: ...erify driver installation See Printing sample cards on page 7 19 Install the printer driver to a parallel port on Windows ME 98 or NT 1 Close all applications Do not close Windows 2 Make sure the printer is connected to the PC 3 Make sure the printer is powered on For Windows NT log in as the Administrator when you install the printer driver 4 With Windows running insert the CD ROM in the PC s dri...

Страница 99: ...tion 9 Choose the e Guides to install You can choose the Magna e Guide the Select e Guide ImageCard IV e Guide or the SP35 e Guide Install the Select e Guide You can install additional e Guides if you are likely to use more than one type of printer with this PC Click Next to install the e Guide s you selected 10 Use the default name for the printer or enter a name of your choice Click Next 11 Sele...

Страница 100: ... powered on 3 Connect the printer to the PC using the USB data cable The operating system detects the printer and displays the Found New Hardware Wizard 4 With Windows running insert the CD ROM in the PC s drive On Windows XP the Windows Add New Hardware Wizard should read the CD ROM and suppress the Datacard Group installation program Use the Add New Hardware wizard to run the driver installation...

Страница 101: ...2 Start the driver installation program to install information Remove the CD ROM from the PC drive and then insert it again The Datacard Group installation program appears If the Datacard Group installation program does not start locate the Demo32 exe file in the base directory of the CD ROM 13 Click User Information to view the Release Notes optional and install information 14 From the User Infor...

Страница 102: ...With Windows running insert the CD ROM in the PC s drive The Windows Add New Hardware wizard should read the CD ROM and suppress the Datacard Group installation program Use the Add New Hardware wizard to run the driver installation process Do not use the Datacard Group installation program if it starts automatically If you are using diskettes extract the files to the PC s hard drive 5 On Windows M...

Страница 103: ...stall additional e Guides if you are likely to use a different type of printer attached to this PC Click Next to install the e Guide s you selected 12 The installation program copies files to the PC and updates entries to enable the printer 13 The installation program detects whether the Adobe Acrobat Reader program is installed on the PC If it is not the installation program asks if you want to i...

Страница 104: ...perties dialog box using the Printers window so the settings apply to all applications Select whether to print on both sides duplex printing Select and apply this setting before making other changes Select the print ribbon type This setting is optional for a locally attached printer This setting must be selected for a printer used over a network See Print ribbons on page B 2 for information on sup...

Страница 105: ...full color 4 Compare the cards you printed with the cards shipped with the printer 5 When you have printed the card and are satisfied that it matches the factory printed card you can minimize the Printer Toolbox 6 Use the card to evaluate how well the printer is operating If you have just completed installation use the comparison to complete the Installation Report and mail or fax the report to Da...

Страница 106: ...default interval of cleaning after every 2500 cards or select a longer or shorter interval If you choose a value of 0 the printer driver will not prompt for cleaning Make sure you clean the printer regularly such as every time you change ribbon or each work day For networked printing the user who prints the most cards should set the cleaning interval set the cleaning interval to 0 on other PCs Dit...

Страница 107: ...to open the Users and Groups dialog box b Click on the name and click Add Repeat for each name to add c When done adding names click OK The Users and Groups dialog box closes 6 In the Names list select the name for which you want to specify permissions 7 From the Permissions list select the access For a local user of a local printer and for a user of a directly networked printer To enable printing...

Страница 108: ...ss For a local user of a local printer or for a user of a directly networked printer For a user connected to a directly networked printer select Full Control For a local user of a printer select Full Control For a user who should not print on the printer select No Access Other user permissions such as the Print permission are not supported For a user of a shared printer For a user of the printer o...

Страница 109: ... required to take whatever measures are necessary to correct the problem Notice for Canada This digital apparatus does not exceed the Class A limits for radio noise for digital apparatus set out in the Radio Interference Regulations of the Canadian Department of Communications Le présent appareil numérique n émet pas de bruits radioélectriques dépassant les limites applicables aux appareils numéri...

Страница 110: ...d without the written permission of Datacard You may not operate the printer after modifying the coupler or its method of operation Liability statement This Datacard product has been built to the high standards of DataCard Corporation doing business as Datacard Group Please note and heed the WARNING and CAUTION labels that have been placed on the equipment for your safety Please do not attempt to ...

Страница 111: ...ergency Know the location of fire extinguishers and how to use them ABC type extinguishers may be used on electrical fires Know local procedures for first aid and emergency assistance at the customer facility Use adequate lighting at the equipment Maintain the recommended range of temperature and humidity in equipment area Safe human interface Use proper lifting techniques when moving or installin...

Страница 112: ...A 4 User s Guide for Select Platinum Series Printers ...

Страница 113: ...used with the Datacard Select Platinum Series photo ID printer It includes Personalization supplies including print ribbons Cards to print Cleaning supplies including cleaning cards replaceable cleaning roller sleeve and the printhead cleaning pen Printer driver CD ROM Printer components including cables supply cartridges and the replaceable printhead cartridge ...

Страница 114: ...ers you can use the following single color monochrome print ribbons i Ribbon type Part number Panel description Colors Printed One panel set prints YMCKT 549081 204 Three colors true black and topcoat Full color true black and topcoat One side of a card YMCKTKT 549081 206 Three colors true black topcoat true black and topcoat Full color true black and topcoat Front full color true black topcoat Ba...

Страница 115: ...nlight and heat sources with a temperature between 32 F and 77 F or between 0 C and 25 C A humidity range from 40 to 60 non condensing is recommended Supply rolls should be at room temperature when they are installed in the printer and used If supplies are stored in a cooler environment than the printer allow supplies to reach room temperature before using If the printer will not be used for an ex...

Страница 116: ...ace is not flat enough to print The printing surface of the StickiCard white side meets the material requirements for use in the printer When using StickiCards follow these guidelines Store cards in a cool place such as a refrigerator to avoid adhesive migration Fan cards before loading them in the card cartridge Clean the printer s card tracks often to remove any adhesive residue The printhead cl...

Страница 117: ...ard printing or damage the printer See Problems with card appearance on page 5 8 to address card appearance problems with pre printed cards If a previously printed card has been printed with topcoat the card cannot be printed a second time Card quality guidelines Your cards must meet the following card quality guidelines for the Select printer to print high quality graphics on them successfully Ca...

Страница 118: ...c stripe on another card Make sure that cards with magnetic stripes are stored away from magnets and other magnetic objects Card storage specifications The cards should be stored in a cool dry and dark place Excessive light can cause yellowing of cards on exposed edges Keep cards in their original packaging Cards should be at room temperature when they are installed in the printer and used If card...

Страница 119: ...le you can use cleaning card part number 548714 001 Replaceable cleaning sleeve Use a replaceable cleaning sleeve on the continuous cleaning roller Change the replaceable cleaning sleeve before you run a printer cleaning card Figure B 4 Replaceable cleaning sleeve The replaceable cleaning sleeve is sold in packages of 5 The package part number is 549716 001 The replaceable cleaning sleeve is also ...

Страница 120: ...n once every 2000 cards Figure B 7 Magnetic stripe cleaning card Duplex cleaning card Use the duplex cleaning card if the printer has automatic two sided printing duplex module The duplex cleaning card number is 557668 001 Figure B 8 Duplex cleaning card Printer features Part number For printers with magnetic stripe modules The magnetic stripe cleaning card is required to clean the magnetic stripe...

Страница 121: ...ion for Windows 2000 and XP that meets Microsoft Plug and Play requirements Use the Add Printer wizard Printer driver for Windows Me and 98 D Me 98 SETUP EXE Custom installation for Windows Me and Windows 98 Use Demo32 exe Printer driver for Windows NT D Nt SETUP EXE Custom installation for Windows NT 4 0 Use Demo32 exe Network port monitor installation D XP 2000 Net Port Mon Install SETUP EXE Net...

Страница 122: ...installation D Adobe ARvvvENU EXE and files with other language designations such as jpn Installation program for Adobe Acrobat Reader Version 5 00 The Reader version 3 or higher is required to view the e Guides part of the help system SmartDriver Diagnostics Utility D Support Diagnostics SD_Diagnosticsvvv EXE Installation program for the SmartDriver Diagnostics Utility used to identify or fix pri...

Страница 123: ...acement parts This section describes the printer parts you can order Printhead cartridge The Select printer has a replaceable printhead cartridge The printhead is subject to wear or damage and has a direct impact on print quality The following printheads are available Figure B 9 Replaceable printhead cartridge Do not touch the printing edge of the printhead in the printhead cartridge If you do cle...

Страница 124: ... number 549311 999 If you have a locking card cartridge the part number is 549311 998 Figure B 11 Card cartridge Cleaning roller spindle The cleaning roller spindle holds the replaceable cleaning sleeve The part number is 549130 001 Figure B 12 Cleaning roller spindle Data cable The Select printer uses a data cable to connect the printer to the PC The data cable can be a parallel port cable or a U...

Страница 125: ...e Power cable The Select printer uses one of the following power cords U S power cable part number 804517 001 Figure B 15 U S power cable European power cable part number 806842 001 Australian power cable part number 806842 002 United Kingdom power cable part number 806842 003 Danish power cable part number 806842 004 Indian power cable part number 806842 005 Israeli power cable part number 806842...

Страница 126: ...ublications This section describes publications for the Datacard Select Platinum Series photo ID printer User s Guide for Select Platinum Series Printers Part Number 539123 101 This manual provides basic information about using the printer and driver and how to care for the printer The index of this manual includes entries for both the User s Guide and the e Guide Quick Install Chart for the Selec...

Страница 127: ...acard Web site ImageCard Select with Advanced Imaging Technology Service Manual Part Number 539142 001 This manual is delivered on CD ROM and provides information to service providers who maintain or repair the Select printer SmartDriver Direct Network Guide Part Number 539171 001 This manual is part of the Direct Network Kit 550749 001 and is available on the Datacard Web site ...

Страница 128: ...B 16 User s Guide for Select Platinum Series Printers ...

Страница 129: ...rd Select Platinum Series photo ID printer is installed It describes Configuring the ECP parallel port Setting port values Configuring the optional smart card serial port This appendix includes a section for settings that are handled the same way in all operating systems and also includes sections for each PC operating system supported by the printer driver ...

Страница 130: ...make sure you check the setting for the parallel port to which the printer is attached LPT1 or LPT2 An ECP port is required for the printer to operate at its maximum processing speed The printer will operate in compatible or IBM AT mode however the printer might not operate as fast or communication messages might appear 5 Save the setting and exit Setup following the instructions in the Setup scre...

Страница 131: ...for the second printer the Resources settings list should show Direct Memory Access and its channel setting Figure C 1 Printer Port LPT Properties dialog box If the Resources tab shows conflicts choose another configuration or change the settings for the port following port instructions 8 Click OK on the Printer Port LPT2 Properties dialog box and on the System Properties dialog box to save settin...

Страница 132: ...button On Windows 2000 and Windows XP right click USB Root Hub and then choose Properties from the pop up menu The USB Root Hub Properties dialog box appears 6 Make sure that the device is enabled For Windows 2000 Me and 98 make sure that Disable in this hardware profile is not chosen On Windows XP make sure that Use this device enable is chosen from the Device Usage drop down menu 7 Click OK to c...

Страница 133: ...owing for PCs running Windows 2000 XP or NT 4 0 Setting parallel port values Setting USB port values Setting serial port values Setting parallel port values Port values include the port to which the printer is assigned the communication mode for the port and printer spooling Set parallel port values for Windows 2000 XP NT 1 From the Windows taskbar choose Start Settings and then Printers Printers ...

Страница 134: ...choose the Properties button The Printer Port LPT1 Properties dialog box appears see Figure C 1 14 Click the Port Settings tab 15 In the Filter Resource Method box choose Use any interrupt assigned to the port 16 Click OK on the Printer Port LPT1 Properties dialog box and on the System Properties dialog box to save settings and close the dialog boxes Setting a smart card serial port Windows 2000 X...

Страница 135: ...s more than one serial port make sure you view the settings for the serial port to which the smart card module is attached Figure C 4 Settings dialog box 4 Choose the following settings 5 When the settings are correct click OK to save settings and close the dialog box Setting Value Baud rate 9600 Data bits 8 Parity None Stop bits 1 Flow control None i ...

Страница 136: ... the Communications Port to open the Communications Port Properties dialog box Figure C 5 Figure C 5 Communications Port Properties dialog box 5 Choose the Port Settings tab If the PC has more than one serial port make sure you view the settings for the serial port to which the smart card module is attached 6 Choose the following settings 7 When the settings are correct click OK to save settings a...

Страница 137: ...ose the Details tab and view the port in the Print to the Following Port list Make sure this is the ECP parallel port 5 Click Spool Settings to display the Spool Settings dialog 6 Make sure that Enable Bidirectional Support is checked Also make sure that Spool Print Jobs so Program Finishes Printing Faster is checked 7 Choose OK to save the settings and close the Spool Settings dialog 8 Choose OK ...

Страница 138: ... dialog box and make the changes take effect Setting a smart card port for Windows Me 98 For some smart card applications you connect the PC to the serial port on the Select printer The PC should be set to match the printer serial port settings This section describes how to set the PC serial port in the Windows 98 and Windows Me operating systems These settings apply to serial ports for both conta...

Страница 139: ...e Plus sign next to Ports COM LPT to display a list of ports 5 From the Ports list choose the port such as COM1 or COM2 Figure C 6 6 Choose the Properties button to display the port settings If the PC has more than one serial port make sure you view the settings for the serial port to which the smart card module is attached i ...

Страница 140: ...e C 7 Settings dialog box 7 Choose the Port Settings tab 8 Choose the following settings 9 When the settings are correct click OK to save settings and close the dialog box Setting Value Bits per second 9600 Data bits 8 Parity None Stop bits 1 Flow control None ...

Страница 141: ...t data with each card or whether to set values in the printer If you are using a custom format you might want to set values in the printer and choose Use printer settings in the Properties Printing Preferences or Default Document Properties dialog box Determine the coercivity to use Usually the coercivity is a system wide decision magnetic stripe readers which will read the cards encoded by the pr...

Страница 142: ...Escape Codes Printer IAT No NTT J single track ID Works Driver NTT Coercivity Magnetic Stripe Fonts includes Preface Printer NTT Coercivity Triple IATA IAT three track ID Works Driver Use printer settings Yes Magnetic Stripe Fonts includes Preface Printer Use printer settings Yes Some Escape Code formats Printer Use printer settings Yes Proprietary IAT three track ID Works Printer Use printer sett...

Страница 143: ...magnetic stripe fonts for formatting magnetic stripe data Magnetic stripe escapes are most commonly used for the IAT format which encodes IATA International Air Transport Association data on Track 1 ABA American Banker s Association data on Track 2 and TTS Thrift Third Shift data on Track 3 Other card printer manufacturers sometimes refer to this format as ISO format Using information in this sect...

Страница 144: ... use When you enable Mag Stripe Escape Compatibility the SmartDriver will recognize any of the escape character sequences listed on page D 5 Using magnetic stripe escapes To use magnetic stripe escapes do the following Use an application in which you can enter and save text and then edit it after saving Before the magnetic stripe data provide the escape sequence such as 1 or 1 The rest of the line...

Страница 145: ...documentation for the non Datacard printer Printer Manufacturer Encoding Format Syntax Example Eltron IAT ISO track data 1ENCODING WITH ESCAPES 21234567890 31234567890 Atlantek IAT ISO track data 1 ENCODING WITH ESCAPES 2 1234567890 3 1234567890 Fargo IAT ISO track Start Sentinel Data End Sentinel 1 ENCODING WITH ESCAPES 2 1234567890 3 1234567890 Datacard HiFX IAT ISO track Start Sentinel Data End...

Страница 146: ...imum field length for IATA format is 76 characters IATA allows spaces upper case alphabetic characters numeric characters and the following special characters _ ABA American Bankers Association The maximum field length for ABA format is 37 characters ABA allows numeric characters and the following special characters TTS Thrift Third Standard The maximum field length for TTS format is 104 character...

Страница 147: ...orted Windows operating system NTT also supports 55 Katakana characters The special characters include _ and the following Japanese language special characters a Japanese edition of a supported Windows operating system is required The 55 Katakana characters include the following 45 Katakana characters and the following 10 Katakana characters Each time you start using Japanese language characters o...

Страница 148: ...entinel ES ASCII character 63 63 63 127 None Lowest ASCII Character space 32 0 48 0 48 1 0 Highest ASCII Character _ 95 63 63 126 255 Character level parity VRC Odd Odd Odd Even None Cumulative parity LRC Even Even Even Even None Density in bits per inch 210 75 210 210 210 Data bits per character 6 4 4 7 8 Maximum number of encodable characters not including start and end sentinel or LRC 76 37 104...

Страница 149: ...7 3 card advance knob 1 7 appearance problems 4 11 application 2 10 6 5 completed 2 12 composite B 4 contactless specifications B 4 design 2 2 2 10 3 2 5 3 duplex cleaning 4 9 exception 1 5 factory printed 7 19 handling 2 3 B 6 incomplete 2 12 loading 2 3 magnetic stripe orientation 2 4 magnetic stripe test 5 7 making 2 10 material B 4 orientation 2 4 3 2 3 4 3 7 pre punched B 4 printer test 5 5 p...

Страница 150: ... data cable 7 3 B 12 data port types 1 8 Datacard Web site 7 9 B 11 D 1 Default Document Properties Windows NT 3 8 dimensions 6 3 direct networking 7 9 B 15 driver See printer driver 6 4 duplex module about 1 4 cleaning card 4 9 location 1 5 E ECP parallel port 1 8 7 5 C 2 e Guide CD ROM location B 9 fixing problems 2 14 icon 1 2 electrical requirements 6 3 electrostatic discharge ESD strap B 11 E...

Страница 151: ...gnetic stripe character sets D 6 coercivity D 1 default settings D 8 escapes 2 11 D 3 fonts 2 11 setup D 1 test card 5 7 test card data 5 5 track formats D 1 magnetic stripe module about 1 4 cleaning 4 5 load cards 2 4 making cards 2 10 manual feed knob 1 7 messages buttons 2 14 help 2 13 number 2 13 status light 2 9 understanding 2 13 N network guide B 15 installation 7 9 permissions 7 22 Printer...

Страница 152: ...21 beeping 5 2 cleaning 4 2 clearance 6 4 components B 11 configuration 1 7 connecting smart card 7 6 dimensions 6 3 firmware version 3 12 icon 3 1 3 5 ImageCard 1 3 label 1 3 1 7 models 1 3 optional modules 1 4 package for shipping 5 16 pause 2 9 Platinum series 1 1 pooling 7 9 power on 2 7 problems 2 13 recommended supplies B 2 serial number 1 3 setting permissions 7 21 sharing 7 9 status 3 11 t...

Страница 153: ... 2 1 3 monochrome 1 2 1 3 B 3 text 2 11 used cards B 5 Printing Preferences user permissions 3 2 Windows 2000 and XP 3 5 problems card quality 2 2 4 11 discolored printing 2 3 fixing 2 13 5 3 isolating 5 3 repeated card jams 4 6 program card creation 2 10 6 5 PC to format cards 2 10 printer driver 6 4 Properties Windows 2000 and XP 3 4 Windows Me and 98 3 3 Windows NT 3 7 Windows permissions 3 2 p...

Страница 154: ...le 1 5 module location 1 5 port 7 6 proximity 1 4 proximity cards B 4 RF 1 4 B 4 serial cable B 14 serial port 1 9 SmartDriver see printer driver 3 1 Software Developer s Kit 2 10 B 10 B 14 D 1 Start menu 7 13 status light about 1 5 blink amber without message 2 13 description 2 9 Status Monitor see Printer Toolbox 3 9 StickiCards B 4 storage cards B 6 conditions 6 2 supplies 6 2 B 3 supplies auth...

Страница 155: ...river Diagnostics B 10 W weight 6 3 who to call for assistance 1 9 7 3 Windows supported operating systems 6 5 test page 5 6 5 7 Windows 2000 and XP PC settings C 2 C 5 permissions 7 18 7 21 printer pooling 7 9 Printing Preferences 3 5 Properties 3 4 Service Pack 6 5 USB port 6 5 C 4 Windows Me and 98 PC settings C 2 C 9 Properties 3 3 USB port 6 5 Windows NT Default Document Properties 3 8 PC set...

Отзывы: