background image


16 


DT-NTSC-32 Manual 

3.2.3 System 

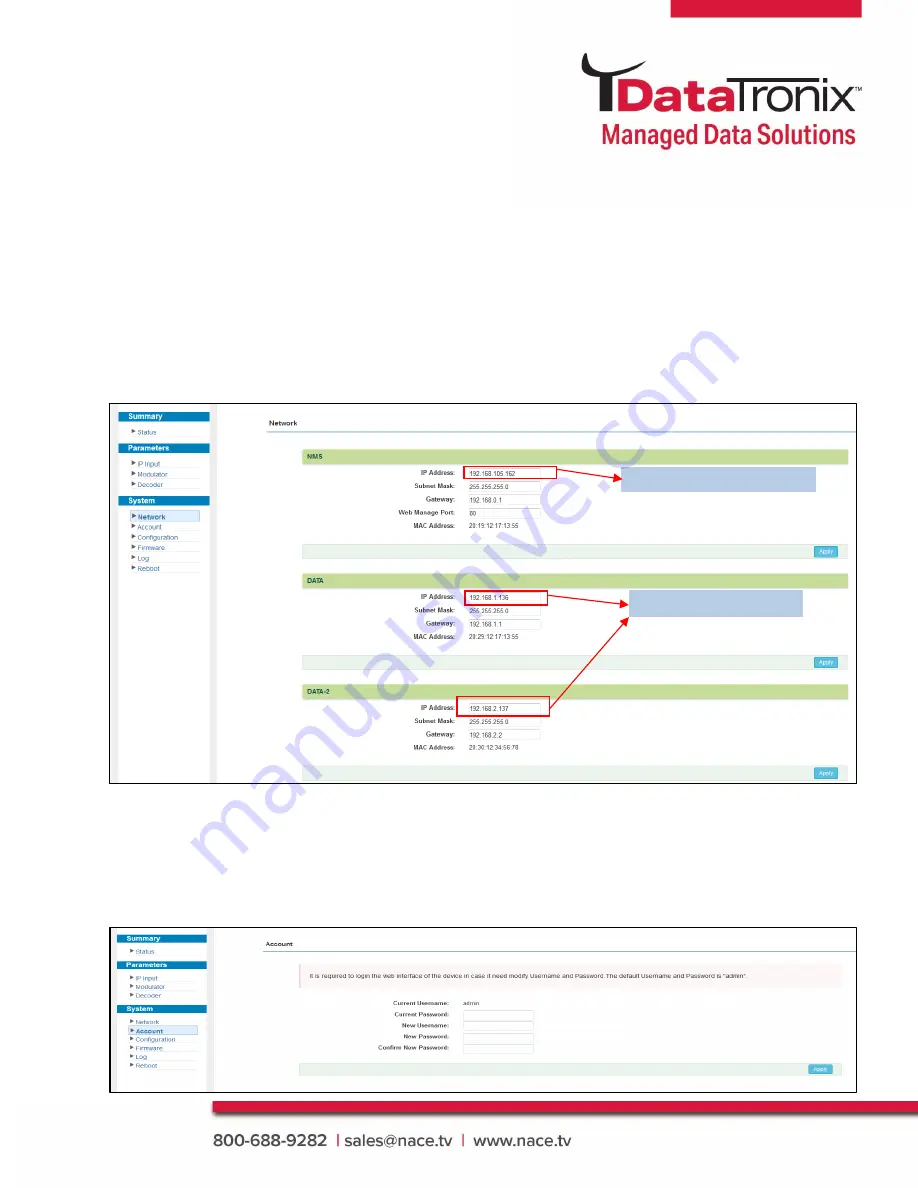
System → Network:


Allows network parameters to be defined.. as shown in Figure -6 

Figure-6 


System → Account:


Allows the user to set the login Username and password for the web NMS as shown in Figure-7 

Figure-7 


Set data port IP address 


To modify IP input address


Содержание DT-NTSC-32

Страница 1: ...Manual DT NTSC 32 User Manual ...

Страница 2: ...on off as it may cause damages to the semiconductor chipsets Keep proper direction of the power cord when plugging into or out of a power socket Connect the grounding pole and signal cable before connecting the power cord Do not touch the power socket with wet hands to avoid electric shock Remove all jewelry such as rings necklaces watches bracelets etc before operating this device Failure to do s...

Страница 3: ...ation Guide 7 2 1 Acquisition Check 7 2 2 Installation Preparation 7 2 2 2 Environment Requirement 8 2 2 3 Grounding Requirement 8 2 2 4 Frame Grounding 9 2 2 5 Device Grounding 9 2 3 Wire s Connection 9 2 3 1 Power cord connection 9 Chapter 3 Web NMS Management 10 3 1 Login 11 3 2 Operation 11 3 2 1 Summary 11 3 2 2 Parameters 12 15 3 2 3 System 16 19 Chapter 4 Troubleshooting 20 Chapter 5 Packin...

Страница 4: ... perfect for the following use cases Low income properties wanting free off airTV service in NTSC analog can use the DataTronix DT ATSC IP 8V2 to receive and convert the off air signals to IP then use the DT NTSC 32 to modulate them onto NTSC analog TV channels Properties receiving satellite TV with a DIRECTV COM3000 can connect the DT NTSC 32 to modulate 32 satellite channels onto NTSC analog TV ...

Страница 5: ...r internal combining 60 dB SNR after internal combining 53 dB Sampling frequency 48 44 1 32 Output Volume Adjustment 0 100 Image Resolution Output 480i 576i OSD logo JPG BMP PNG CAPTION support multiple languages scrolling direction and speed customized Modulation Parameters Number of Channels up to 32 Connectors 75Ω F jack Frequency Range 43 25 951 25MHz Digital Modulation Output Level Maximum 11...

Страница 6: ...nce and Illustration Front panel Illustration Rear Panel Illustration No Description 1 NMS network management port 2 Power Indicator 3 Grounding 4 AC Power Socket 5 Power switch 6 Data Input 7 RF output port 8 RF Test 2 1 3 4 6 7 5 8 ...

Страница 7: ...2 2 Installation Preparation When installing the device please follow the below steps The details of installation will be described in this chapter Users can also refer to the rear panel chart during the installation The main steps of the installation include 1 Checking for possible damage during the transportation and missing contents 2 Preparing relevant environment for installation 3 Installing...

Страница 8: ...d be 3 93 4 92 Ft 1 2 1 5m and the distance against the wall should be no less than 2 62 Ft 0 8m Machine Hall Floor Electric Isolation Dust Free Volume resistivity of ground anti static material 1 x 10⁷ 1 x 10¹⁰ Grounding current limiting resistance 3 28 Ft 1M Floor bearing should be greater than 1186 51 lb yd2 450Kg Environment Temperature 41 104 F 5 40 C sustainable 32 113 F 0 45 C short time in...

Страница 9: ... The area of the conduction between grounding wire and grounding strip should be no less than 4 AWG 25mm2 2 2 5 Device Grounding Connecting the device s grounding rod to the frame s grounding pole with copper wire 2 3 Wire s Connection 2 3 1 Power cord connection The power socket is located on the right of the rear panel as is the power switch Plug one end of the power cord to the socket and inser...

Страница 10: ... and users can connect the device and web GUI through this IP address 1 Connect the PC and the device with a network cable 2 Launch the web browser and input the device IP address in the browser s address bar and press enter 3 It displays the Login interface as Figure 1 Input the Username and Password Both the default Username and Password are admin And then click Login to start the device setting...

Страница 11: ...11 DT NTSC 32 Manual 3 2 Operation 3 2 1 Summary Once logged in you will see the Summary Interface screen as shown in Figure 2 Figure 2 ...

Страница 12: ...utput TS channels Click to add IP input and then select one channel to parse It will display the interface where users can choose the programs to output Figure 3 To add input channel which come from Data1 or Data 2 or Data Module front panel To edit the input channel To delete the input channel To delete all inputs channel Output Area Input Area ...

Страница 13: ...t one input program first and click this button to transfer the selected program to the right box to output 4 Similarly users can cancel the multiplexed programs from the right box 5 To select all the input programs 6 To select all the output programs 7 To parse programs time limitation of parsing input programs 1 2 3 4 5 6 7 ...

Страница 14: ...14 DT NTSC 32 Manual Parameters Modulator Clicking Modulator will display the interface as shown in Figure 4 Allows the user to make changes to the RF output by frequency Figure 4 NTSC standard ...

Страница 15: ...15 DT NTSC 32 Manual Parameters Decoder This function allows the user to monitor the status of decoding It displays the interface as shown in Figure 5 Figure 5 ...

Страница 16: ...etwork Allows network parameters to be defined as shown in Figure 6 Figure 6 System Account Allows the user to set the login Username and password for the web NMS as shown in Figure 7 Figure 7 Set data port IP address To modify IP input address ...

Страница 17: ...er defined actions such as restore backup and Factory Default as shown in Figure 8 System Closed captioning CC Closed captioning CC can be enabled by selecting IP input and navigating to the corresponding input as seen in Figure 9 Figure 9 Select areas ...

Страница 18: ... System Firmware Firmware updates are done by clicking on Firmware as seen in Figure 10 Figure 10 System Log Click Log allows the user to view log entries as seen in Figure 11 Figure 11 To select Kernel log and System Log ...

Страница 19: ...19 DT NTSC 32 Manual System Reboot Click Reboot it displays the screen as Figure 12 where to check the Reboot Figure 12 ...

Страница 20: ...e is between 32 113 F 0 to 45 C 2 Make sure there is good ventilation for the heat sink on the rear panel 3 Check AC voltage input and be sure the power supply is correct before switching on device 4 Check the RF output level range 5 Checking all signal cables have been properly connected 6 Frequent switching on off of the device is prohibited the interval between every power cycle on off must be ...

Страница 21: ...me as Company takes receipt of the hardware Upon receipt the Company will promptly repair or replace the defective unit and then return said unit to Original Purchaser shipping prepaid The Company may use reconditioned or like new parts or units at its sole option when repairing any hardware Repaired products shall carry the same amount of outstanding warranty as from original purchase Any claim u...

Страница 22: ... to the enforceability of provisions excluding or limiting liability for incidental or consequential damages You should check the laws of your local jurisdiction to find out whether the above exclusion applies to you This warranty allocates risks of product failure between Original Purchaser and the Company The Company s hardware pricing reflects this allocation of risk and the limitations of liab...

Отзывы: