TEMPERATURE SETTINGS GUIDE
temperature settings guide ∙ bydash.com ∙ 9
8 ∙ bydash.com ∙ using your skillet
USING YOUR SKILLET
Note: When using your Rapid Skillet for the first time, you will need to attach
the Knob to the Glass Lid with a Phillips-head screwdriver.
1.
Set the Base on a clean, stable, and dry surface.
2.
Unwind the power cord to the preferred length. Inspect the cord for any
sign of damage or significant wear.
3.
Plug the Control Probe Connector into the Socket located on the Base of
the Skillet. Be sure to properly align the Connector’s single prong with the
middle hole before pushing the Control Probe in.
4.
Make sure the Temperature Control Dial located on the Control Probe is
set to Off and then plug your Skillet into an outlet or power supply.
5.
Turn the Temperature Control Dial clockwise to Low. It is strongly
recommended that you do not begin cooking on a high temperature as
this will most likely cause food to splatter or even burn when placed in the
Non-stick Pan.
6.
Put your ingredients into the Non-stick Pan. Allow to cook for several
minutes. Increase the heat until you reach the temperature appropriate for
your recipe (see the Temperature Settings Guide on page 9).
7.
When you are finished cooking with your Rapid Skillet, turn the
Temperature Control Dial to Off. Wait for your Rapid Skillet to cool before
cleaning.
Clean the Rapid Skillet and all of its components prior to assembly and use.
DO NOT
use the Skillet near water or other liquids with wet hands or while
standing on a wet surface. Make sure the Handles are securely fastened to the
Base prior to each use. Do not touch the Base or Non-stick Pan without heat
protective cooking gloves while the Skillet is in use.
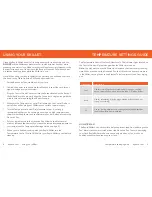
The Temperature Control Dial has 3 Heat Levels. The Indicator Light located on
the Control Probe will glow orange when the Skillet is turned on.
Note:
You may want to use the Glass Lid to increase the Heat Level or cooking
time. When placed over the Non-stick Pan, the Lid locks the heat and moisture
in the Skillet, causing foods to cook faster. This also prevents food from drying
out.
Heat Level
Description
Low
Use for simmering sauces or stews, poaching eggs, cooking
bacon, caramelizing onions, reheating food, or melting butter.
Med
Use for scrambling or frying eggs, making grilled cheese, stir
frying, or sautéing.
Hi
Use for boiling water or soup, searing meat, making pancakes,
cooking hamburgers or meatballs.
NON-STICK PAN
The Rapid Skillet’s non-stick surface helps to prevent food from adhering to the
Pan. Metal utensils may scratch or dent the Non-stick Pan. To avoid damaging
your Dash Rapid Skillet, make sure to use only wooden, nylon, or silicone
cooking utensils when preparing your food.

