DAPAudio K-115A Скачать руководство пользователя страница 9


Maintenance 
 

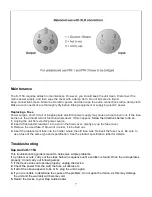
The K-115A requires almost no maintenance. However, you should keep the unit clean. Disconnect the 
mains power supply, and then wipe the cover with a damp cloth. Do not immerse in liquid.  
Keep connections clean. Disconnect electric power, and then wipe the audio connections with a damp cloth. 
Make sure connections are thoroughly dry before linking equipment or supplying electric power. 
 

Replacing a Fuse 

Power surges, short-circuit or inappropriate electrical power supply may cause a fuse to burn out. If the fuse 
burns out, the product will not function whatsoever. If this happens, 

follow the directions below to do so.


1.

 Unplug the unit from electric power source. 

2.

 Insert a flat-head screwdriver into a slot in the fuse cover. Gently pry up the fuse cover. 

3.

 Remove the used fuse. If brown or unclear, it is burned out. 

4.

 Insert the replacement fuse into the holder where the old fuse was. Reinsert the fuse cover. Be sure to  

    use a fuse of the same type and specification. See the product specification label for details.


Troubleshooting 


Dap Audio K-115A  

This troubleshooting guide is meant to help solve simple problems.  
If a problem occurs, carry out the steps below in sequence until a solution is found. Once the unit operates 
properly, do not carry out following steps. 

1.

 If the device does not operate properly, unplug the device. 

2.

 Check the power from the wall, the fuse, all cables etc. 

3.

 If all of the above appears to be O.K., plug the unit in again.


4.

 If you are unable to determine the cause of the problem, do not open the device, as this may damage    

    the unit and the warranty will become void.


5. 

Return the device to your Dap Audio dealer. 

Содержание K-115A

Страница 1: ...K 115A ORDERCODE D3563...

Страница 2: ...Audio for more excellent audio products We design and manufacture professional audio equipment for the entertainment industry New products are being launched regularly We work hard to keep you our cu...

Страница 3: ...15A Product Guide Warning Safety instructions Operating Determinations Description Features Overview Front side Overview Back side Installation Set Up and Operation Connection Cables Maintenance Repla...

Страница 4: ...ions with the mains with particular caution Never remove warning or informative labels from the unit Never use anything to cover the ground contact Do not insert objects into air vents Do not connect...

Страница 5: ...ding frequency ranges instead This way you avoid causing the next piece of equipment in your sound path to overdrive You also preserve valuable dynamic reserve headroom For replacement use fuses of sa...

Страница 6: ...m Jack connector High level fader Low level fader Master volume fader with Clip LED at the front 3 flyingpoints M 8 mounting eye optional ordercode D8414 Roadproof housing made of plastics Built in st...

Страница 7: ...oam and plastic padding is removed Connect all cables Always disconnect from electric mains power supply before cleaning or servicing Damages caused by non observance are not subject to warranty Set U...

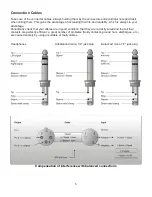
Страница 8: ...always to your advantage Periodically check that your cables are in good condition that they are correctly wired and that all their contacts are perfectly efficient a great number of problems faulty c...

Страница 9: ...the fuse cover Gently pry up the fuse cover 3 Remove the used fuse If brown or unclear it is burned out 4 Insert the replacement fuse into the holder where the old fuse was Reinsert the fuse cover Be...

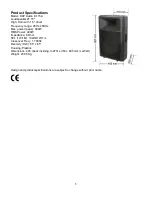
Страница 10: ...nge 45Hz 20KHz Max power peak 800W RMS Power 400W Impedance 8 Ohm SPL 1W 1M 102dB 1W 1m Crossover Freq 1 700Hz Diversity HxV 65 x 65 Housing Plastics Dimensions 445 back inclining to 270 x 350 x 685 m...

Страница 11: ...2006 DapAudio...
Отзывы: