background image


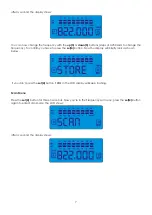
after a second the display shows: 


You can now change the frequency with the 

up(3)

 or 

down(5)

 buttons (steps of 0.250 MHz to change the 

frequency). To confirm you have to press the 

set(4) 

button. Now the display will briefly look as shown 

below. 


 If you don’t press the 

set(4) 

button, FREQ in the LCD display will keep flashing. 


Scan Menu 


Press the 

set(4) 

button for three 3 seconds. Now you’re in the Frequency set menu, press the 

set(4)

 button 

again to enter Scan Mode, the LCD shows: 


after a second the display shows: 


Содержание ER-1193B

Страница 1: ...ER 1193B ORDERCODE D145073B ORDERCODE D145082B Highlite International B V Vestastraat 2 6468 EX Kerkrade The Netherlands...

Страница 2: ...AP Audio for more excellent audio products We design and manufacture professional audio equipment for the entertainment industry New products are being launched regularly We work hard to keep you our...

Страница 3: ...Operating Determinations 4 Return Procedure 4 Claims 4 Description of the device 5 Features 5 Overview 5 Installation 6 Set Up and Operation 6 Menu Options 6 Frequency Set Menu 6 Scan Menu 7 Approval...

Страница 4: ...consult your dealer and do not use the system To maintain perfect condition and to ensure a safe operation it is absolutely necessary for the user to follow the safety instructions and warning notes...

Страница 5: ...he returned goods or any responsibility Call Highlite 0031 455667723 or mail aftersales highlite nl and request an RMA prior to shipping the device Be prepared to provide the model number serial numbe...

Страница 6: ...ink PLL synthesized technology for multi channels Compact half rack metal housing for space saving Overview Fig 1 1 Volume Control 2 Display 3 Up Button 4 Set Button 5 Down Button 6 Power On Off Switc...

Страница 7: ...ty Set Up and Operation Before plugging the unit in always make sure that the power supply matches the product specification voltage Do not attempt to operate a 120V specification product on 230V powe...

Страница 8: ...rm you have to press the set 4 button Now the display will briefly look as shown below If you don t press the set 4 button FREQ in the LCD display will keep flashing Scan Menu Press the set 4 button f...

Страница 9: ...the system finds a wireless transmitter with sufficient signal strength If a signal of sufficient strength is found the display will show STORE as shown below Press the set 4 button to store the freq...

Страница 10: ...al services and telecommunications BIPT www bipt be Czech Republic Czech Telecommunication Office www ctu cz Denmark National Telecom Agency www tst dk Finnland Finnish Communications Regulatory Autho...

Страница 11: ...1 2 2 The product shall be marked with the CE conformity marking and our Notified Body number as shown on the right 1856 Th f i b d d i ifi d b T V Rh i l d N ifi d B d Supplementary Information I her...

Страница 12: ...e product shall be marked with the CE conformity marking and our Notified Body number as shown on the right 1856 Th f i b d d i ifi d b T V Rh i l d N ifi d B d Supplementary Information I hereby decl...

Страница 13: ...s and twists when coiling them This gives the advantage of increasing their life and reliability Periodically check your cables A great number of problems faulty contacts ground hum discharges etc are...

Страница 14: ...onnections are thoroughly dry before linking equipment or supplying electric power Troubleshooting DAP Audio ER 1193B This troubleshooting guide is meant to help solve simple problems If a problem occ...

Страница 15: ...S N Ratio 100 dB Display LCD Display Contents Frequency Antenna A B Mute display RF AF Lever Meter battery fuel gauge Controls Power On Off Frequency Up down Frequency Scan Audio Level Audio Output Le...

Страница 16: ......

Отзывы: