background image


20 


Ordercode: D1133 

DVMP-250 


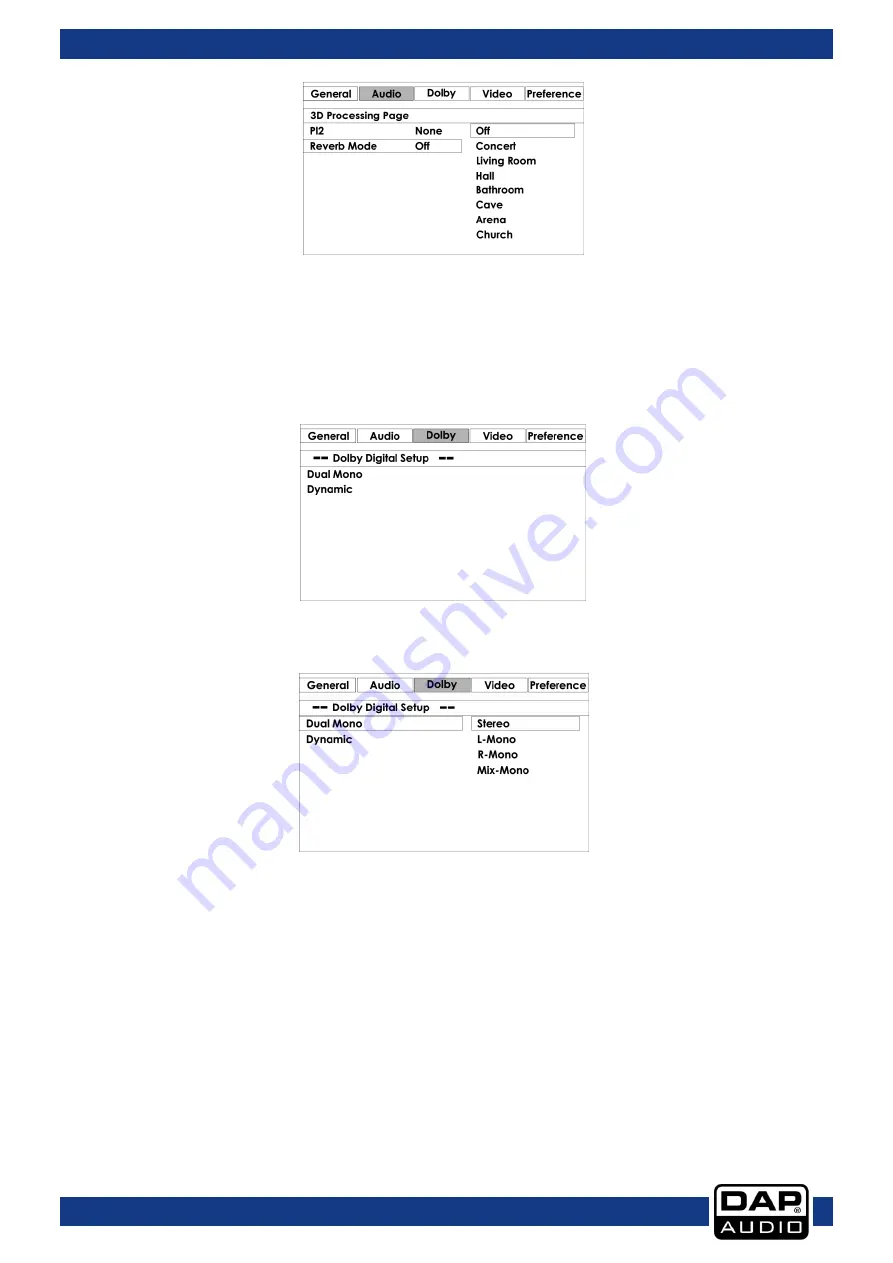
This menu allows you to setup a preset reverb algorithm. Concert, Living Room, Hall, Bathroom, Cave, 
Arena, Church or switch the reverb effect off. 
 
Use the 

cursor (42/44/46/59)

 buttons to select and change parameters and push the 

OK (58)

 button to 

confirm. 
 

C.   Dolby Setup 


This menu is used for setting up Dolby functions and includes: 

01)  Dual mono mode 


Here you can choose between stereo, left mono channel, right mono channel or mixed mono.  
Select the mode of your preference using the 

cursor (42/44/46/59) buttons

 and confirm your choice by 

pushing the 

OK (58)

 button. 


Содержание DVMP-250

Страница 1: ...DVMP 250 V1 Highlite International B V Vestastraat 2 6468 EX Kerkrade the Netherlands Ordercode D1133 MANUAL ENGLISH ...

Страница 2: ...11 06 Fast Forward Reverse 11 07 Video Mode 11 08 Step 11 09 Repeat 11 10 Loop play 11 11 Slow 11 12 Program 12 13 Zoom 12 14 Volume and Mute 12 15 Menu 12 16 Subtitles 12 17 Angle 12 Before switching off the power 13 System Setup 14 A General 14 B Audio Setup 17 C Dolby Setup 20 D Video Setup 21 E Preference 24 Setup examples 26 Connection of a television set 26 Connection of a television set usi...

Страница 3: ... packing Your shipment includes DAP DVMP 250 User manual IR remote control Safety Instructions Every person involved with the installation operation and maintenance of this system has to be qualified follow the instructions of this manual Before the initial start up please make sure that there is no damage caused by transportation Should there be any consult your dealer and do not use the system T...

Страница 4: ...me Please turn off the power switch when changing the power cord or signal cable or select the input mode switch Avoid ground loops Always be sure to connect the power amps and the mixing console to the same electrical circuit to ensure the same phase If system is dropped or struck disconnect mains power supply immediately Have a qualified engineer inspect for safety before operating If the system...

Страница 5: ... packing or double boxing is always a safe method to use Note If you are given an RMA number please include the following information on a piece of paper inside the box 01 Your name 02 Your address 03 Your phone number 04 A brief description of the symptoms Claims The client has the obligation to check the delivered goods immediately upon delivery for any short comings and or visible defects or pe...

Страница 6: ...audio DVMP 250 is a 2U Karaoke DVD player Supports all common audio video formats Contains S Video TV Component Video VGA HDMI and BNC video outputs Balanced XLR audio outputs 19 Rack mounts included Headphones 6 3 mm jack output IR Remote control included Overview Fig 01 ...

Страница 7: ...tton Fast forward button Flat button Previous button Time button Phone input Sharp button Level control Repeat button SD port Video button USB A port Next button Backside Fig 03 HDMI out Digital audio optical out Audio stereo RCA unbalanced out VGA out Digital audio RCA coax out Audio stereo XLR balanced out Composite RCA video out Video BNC out Component RCA video out IEC Power connector 100 240V...

Страница 8: ... Flat button key control R L button Cursor up button Return button Setup button Next button Cursor left button Previous button Time button Video out button Cursor down button Prog Button Stop button Vol button Play pause button Vol button Fast reverse button Zoom button Fast forward button Angle button Repeat button Clear button Title button Mute button Direct access buttons Copy button Slow butto...

Страница 9: ...t minimum setting before connecting the headphones Be aware of the fact that listening to loud sound pressure levels over a longer period of time leads to hearing damage 10 Level control This button is used to adjust the volume level of the phone 09 output 11 SD port Use this port to connect an SD card 12 USB port Use this port to connect a USB flash drive 13 60 R L button This button allows you t...

Страница 10: ...ctor the other end to the mains and turn on the power 01 switch to operate the unit 37 A B button Push this button once to set the start point Repeat A will appear on screen Push again to set the endpoint of a loop Repeat B will appear on screen As soon as the endpoint is set loop play will start Push for the third time to exit loop play 38 Nor button This button allows you to return to normal pit...

Страница 11: ...y Set Up and Operation Before plugging the unit in always make sure that the power supply matches the product specification voltage The power supply is printed on the back of the device Do not attempt to operate a 120V specification product on 230V power or vice versa Connections 01 Turn off the Power 01 switch 02 Connect the DVMP 250 to your amplifier using the proper cables CAUTION Be sure that ...

Страница 12: ...ity of resuming from the same spot e g DVDs and music CDs Push play pause 16 48 to resume playback from where it stopped or from the beginning depending on a DVD Push the stop 47 button twice to stop playback completely 05 Previous and next During playback push previous 08 63 to return to the start of a track Push previous 08 63 again to go back to a previous track Every time you push the next 24 ...

Страница 13: ...hing the Stop 47 button twice pre stop and stop 13 Zoom Push the zoom 68 button to zoom the picture in out The size of the picture changes every time the button is pushed 14 Volume and Mute Push the vol 66 button to increase the volume level and the vol 67 button to decrease the volume level Pushing the mute 71 button will mute the audio signal Push again to cancel the mute function 15 Menu Push t...

Страница 14: ...reated cloths to clean discs Always handle discs carefully to prevent damaging the surface in particular when removing a disc from its case or returning it Do not bend discs Do not put DVDs near heat sources Do not enlarge the hole in the center of a disc Do not write on the label printed side with a hard tipped implement such as pencil or ball point Condensation will form if a disc is brought int...

Страница 15: ... can use the cursor 42 44 46 59 buttons to navigate and select desired items When you have selected an item push the OK 58 button to confirm the entry A General This menu includes 01 TV Display Use the cursor 42 44 46 59 buttons to select the format of the TV which the DVD player is connected to You have three options 4 3 PS Pan Scan for a normal TV 4 3 LB Letterbox for a normal TV 16 9 Wide scree...

Страница 16: ...ction will allow the 4 3 format to fill out the entire screen However a part of the picture will be cut off on both sides 02 Angle Mark Use the cursor 42 44 46 59 buttons to switch the Angle Mark function On or Off 03 OSD Language This function allows you to select a language for the setup menu and for the screen display You can choose between English and Chinese in this software version Select th...

Страница 17: ...e the cursor 42 44 46 59 buttons to set up the HDCD Only works with HDCD media Depending on the CD sound quality there are three options which you can choose from Off When this option is selected you can play normal CDs 1X When this option is selected you can play 44 1K CDs 2X When this option is selected you can play 88 2K CDs ...

Страница 18: ...I receiver through stereo RCA cables V irtual Surr ound With this option the DVMP 250 widens the sound with a conventional two speaker setup 5 1 CH Dolby 5 1 sound Front Speaker It allows you to setup your DVMP 250 for either large or small speakers Center Speaker This menu is only accessible if you have selected 5 1 CH mode and allows you to set your system up for a large or small center speaker ...

Страница 19: ... is connected to a digital surround receiver You can select SPDIF Off Closes the digital outputs SPDIFF Raw Opens digital outputs for the pure non modulated digital signal SPDIF Pcm Stands for Pulse Code Modulation It may be necessary to activate this function if the digital surround receiver cannot recognize the sound format Select the sound format of your preference using the cursor 42 44 46 59 ...

Страница 20: ...t EQ Type You can choose between Rock Pop Live Dance Techno Classic Soft or switch the EQ off Bass Boost On or off Super Bass On or off Treble Boost On or off Use the cursor 42 44 46 59 buttons to select and change parameters and push the OK 58 button to confirm 05 3D Process Use the cursor 42 44 46 59 buttons to select 3D Process and push the OK 58 button to open the 3D Process setup page ...

Страница 21: ...4 46 59 buttons to select and change parameters and push the OK 58 button to confirm C Dolby Setup This menu is used for setting up Dolby functions and includes 01 Dual mono mode Here you can choose between stereo left mono channel right mono channel or mixed mono Select the mode of your preference using the cursor 42 44 46 59 buttons and confirm your choice by pushing the OK 58 button ...

Страница 22: ...nction to reduce the sound effects volume without changing the original tone Use the cursor 42 44 46 59 buttons to adjust the dynamic range between off and full D Video Setup This menu is used for setting up Video functions and includes 01 Component Use the cursor 42 44 46 59 buttons to select YUV VGA S Video ...

Страница 23: ... Use the cursor 42 44 46 59 buttons to adjust sharpness between Medium Low and High Push the OK 58 button to store Brightness Use the cursor 42 44 46 59 buttons to adjust brightness between 20 and 20 Push the OK 58 button to store Contrast Use the cursor 42 44 46 59 buttons to adjust contrast between 16 and 16 Push the OK 58 button to store Gamma Use the cursor 42 44 46 59 buttons to adjust gamma ...

Страница 24: ...buttons to select either 0T or 1T Push the OK 58 button to store 04 HDMI Use the cursor 42 44 46 59 buttons to select HDMI Setup and push the OK 58 button to open the HDMI Setup menu In the HDMI setup menu you are able to select HDMI Switch HDMI On or Off Resolution Adjust the resolution You are able to select 720P60 1080160 1080p 60Hz 5761 576P27 720P50 1080150 or 1080p 50Hz Use the cursor 42 44 ...

Страница 25: ...Subtitle This menu item is not functional in this software version Use the title 52 button 04 Disc Menu This function allows you to select a language for the setup menu You can choose between English French Spanish Chinese Japanese Korean Russian and Thai in this version Select the language of your preference using the cursor 42 44 46 59 buttons and confirm your choice by pushing the OK 58 button ...

Страница 26: ...word Use the cursor 42 44 46 59 buttons to select Password and push the OK 58 button to open the Password Setup menu This menu allows you to set up a password 07 Default Use the cursor 42 44 46 59 buttons to select reset Confirm your selection by pushing the OK 58 button Now the DVMP 250 s default settings will be restored ...

Страница 27: ...f a television set using an A V cable If your TV set has an S video input the DVD player can be connected with an S video cable If the TV set has no S video input use an A V cable Do not use both cables at the same time Connection of an audio system and TV set using the component outputs ...

Страница 28: ... Disconnect electric power and then wipe the audio connections with a damp cloth Make sure connections are thoroughly dry before linking equipment or supplying electric power Troubleshooting DAP Audio CD Player DVMP 250 This troubleshooting guide is meant to help solve simple problems If a problem occurs carry out the steps below in sequence until a solution is found Once the unit operates properl...

Страница 29: ...nced XLR Digital audio outputs BNC Optical Headphones output 6 3 mm stereo jack Video outputs S Video TV Component Video VGA HDMI BNC Accepted media DVD VCD CD CDR MP3 MP4 RM USB SD Frequency response 20Hz 20kHz Dimensions 482 x 224 x 89 mm LxWxH 19 x 2 HE Weight 2 7 Kg Remote control batteries AAA 2x 1 5V Design and product specifications are subject to change without prior notice Website www Dap...

Страница 30: ...29 Ordercode D1133 DVMP 250 Notes ...

Страница 31: ...30 Ordercode D1133 DVMP 250 ...

Страница 32: ... 2014 DAP Audio ...

Отзывы: