background image


6. Pausing 

• Press the PLAY/PAUSE button to switch between play and pause. 
• The play indicator flashes when the pause mode is set. 
• Playback resumes when the PLAY/PAUSE button is pressed again. 

 
7. Setting a Cue Point 

• Press the PLAY/PAUSE button to switch between play and pause. 
• The play indicator flashes when the pause mode is set.


• Turn the Shuttle wheel to go to your desired CUE point. 
• Press the PLAY/PAUSE button again and your CUE point has been stored and the CD will continu.


8. Cueing 

• "Cueing" is the action of preparing for playback. 
• Press CUE button, the player will enter CUE-Mode, the playback returns to cue point and enter pause  
   condition, the CUE indicator lights up and the PLAY indicator flashes. When PLAY/PAUSE button is  
   pressed, play starts from the cue point. 
• When the track search operation is completed after pressing the SKIP buttons, the player automatically  
   finds the position at which the sound starts and cues there (Auto Cue). 
• If the CUE button is pressed after the search operation or the scanning operation, the playback returns  
   to the cue point and enters pause condition. 
 
NOTE: During cue mode, if the CUE button is pressed and hold, playback will start from the cue point,  
              when the button is released, the player will return to the cue mode automatically, it allows you to  
              check the cue point. 
 

9. Time Display 

      Press TIME button to select time display mode: 
      1. Elapsed time of a track (ELAPSED). 
      2. Remaining time of a track (REMAIN). 
      3. Remaining time of the disc (TOTAL REMAIN). 
 

10. Changing Pitch of the song  

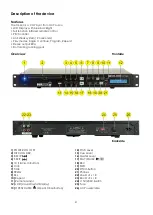
      Use the pitch level control (

14

) slider to adjust the BPM. 


11. Program Play  

      1. Press the PROGRAM button, the player will enter the program mode and the CD will stop rotating. 
      2. Select the desired track by pressing the SKIP button, then press the PROGRAM button again. The  
          selected track will be added to the program sequence. 
      3. Repeat step 2. A maximum of 20 tracks can be programmed. 
      4. Press the PLAY/PAUSE button to start the program play from the first selection. 
      5. Press the program button again during program play to stop playing. 
      6. Press and hold the program button more than 2 seconds to cancel the program mode and erase  
          all the current program contents. 
 

12. Repeat 

      1. Press the Repeat-button once to repeat the current track. 
      2. Press the button again to repeat the whole disc. 
      3. Press the button a third time, to exit the Repeat Mode. 


Содержание DS-600

Страница 1: ...DS 600 ORDERCODE D1125...

Страница 2: ...Audio for more excellent audio products We design and manufacture professional audio equipment for the entertainment industry New products are being launched regularly We work hard to keep you our cu...

Страница 3: ...view Frontside Backside Installation Set Up and Operation Functions Operations Opening and closing of the disc holder Loading CD s Selecting Tracks Starting Playback Stop Playback Pausing Setting a Cu...

Страница 4: ...connections with the mains with particular caution Never remove warning or informative labels from the unit Never use anything to cover the ground contact Never leave any cables lying around Do not in...

Страница 5: ...bly in the original packing material and return it to your Dap Audio dealer for service Repairs servicing and electric connection must be carried out by a qualified technician For replacement use fuse...

Страница 6: ...t Stereo output RCA Slot loading running gear Overview Frontside Backside 1 POWER ON OFF 14 Pitch Level 2 DISC HOLDER 15 Cue Level 3 B SKIP 16 Master Level 4 F SKIP 17 PLAY PAUSE 5 10 Track 10 Button...

Страница 7: ...0V specification product on 230V power or vice versa Fig 1 Fig 2 CAUTION The player will work normally when the unit is mounted with the front panel at 15 degrees of the vertical plane If the unit is...

Страница 8: ...button to repeat one track or all tracks of the CD 11 REMOTE SENSOR This sensor receives the information of the remote control Don t place any object or sticker in front of the sensor 12 LCD 13 OPEN C...

Страница 9: ...when the power is off as this may result in malfunction and damages the player 3 Selecting Tracks Press the SKIP button to move to a higher or lower track Hold the SKIP button to change tracks contin...

Страница 10: ...rs pause condition NOTE During cue mode if the CUE button is pressed and hold playback will start from the cue point when the button is released the player will return to the cue mode automatically it...

Страница 11: ...dryer etc 2 Precaution on storage After playing a disc always unload it from the player Always store the disc in the jewel case to protect from dirt or damage Do not place discs in the following area...

Страница 12: ...l Anti shock system 20 seconds Play modes Single Continue Program Repeat Stereo output RCA Slot loading running gear Frequency response 20 Hz 20 kHz S N Ratio 80 dB Total Harmonic distortion 0 1 Dimen...

Страница 13: ...2008 DapAudio...
Отзывы: