background image


General information 


Introduction 

This section includes general information on the unit and the service manual. 


Target group 

The service manual’s target group is the service engineers that maintain the unit. 


Not included in 
the manual 

The following is not included in this manual, but described separately: 

  The transport, mounting and installation guide 

  The user’s guide for control, if such is delivered 

  Technical information, including electrical documentation 


Copyright 

Copying of this service manual, or part of it, is forbidden without prior written permission 
from Dantherm Air Handling. 


Reservations 

Dantherm Air Handling reserves the right to make changes and improvements to the 
product and the service manual at any time without prior notice or obligation. 


EC-Declaration of 
Conformity 

Dantherm Air Handling A/S declares that the DanX units comply with the following 
directives:  

98/37/EEC 

Directive on machine safety 

73/23/EEC 

Low voltage directive 

89/336/EEC EMC 

directive 

and are produced in accordance with the following standards:  

EN 292-1 

Machine safety 

EN 292-2 

Machine safety 

EN 60 204-1 

Electrical equipment for machinery, part 1 – General 

 requirements 

We do not allow use of the units until the machine into which the parts are to be 
incorporated has been declared to be in full accordance with the relevant directives. 


Other  
declarations 

Russia:  


Recycling 

The unit is designed to last for many years. When the time comes for the unit to be 
recycled, the unit should be recycled according to national rules and procedures to 
protect the environment. 


029884 •

 Ver

s

ion

 1

.1 • 

20.0

4

.200

7  

Содержание DanX 12/24

Страница 1: ...DanX Service manual EN No 029884 rev 1 2 15 10 2007...

Страница 2: ...hold for trykfejl og ndringer Dantherm can accept no responsibility for possible errors and changes Irrt mer und nderungen vorbehalten Dantherm n assume aucune responsabilit pour erreurs et modificati...

Страница 3: ...engineers If such precautions are neglected persons or equipment may be injured or damaged Not included This manual does not include information about Transport mounting installation start and commis...

Страница 4: ...set the frost thermostat 9 How to adjust fan belts 10 How to adjust the number of fan rotations 11 Service guide 13 Planning of service inspections overview 14 Preventive maintenance 16 How to service...

Страница 5: ...the service manual at any time without prior notice or obligation EC Declaration of Conformity Dantherm Air Handling A S declares that the DanX units comply with the following directives 98 37 EEC Dir...

Страница 6: ...e unit is delivered with control from Dantherm Air Handling A S Note Not all DanX units are delivered with thermostats and pressure switches Contents This section deals with the following items Item S...

Страница 7: ...eset Do as follows to reset the high pressure switch Step Action 1 Open the door to the compressors and locate the high pressure switch on the cold conductor 2 Press the red button to reset the high p...

Страница 8: ...er than the pre set temperature e g 40 C If the unit is delivered with control from Dantherm Air Handling the release of the fire thermostat will switch off the ventilation unit Procedure Do as follow...

Страница 9: ...the water valve opens and the circulation pump that may be connected accessory will start running If the unit is delivered with control from Dantherm Air Handling Procedure Do as follows to reset the...

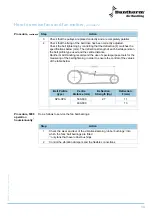
Страница 10: ...accordance with the mm indications of the table last column The deflection strength of each belt is dependent on the profile type and the distance between the centres Use the drawing and the table to...

Страница 11: ...the number of motor rotations and the relation between the diameters of the two pulleys Dependent on the motor size the pulleys have 1 2 or 3 grooves Illustration Taperlock pulley Part function This...

Страница 12: ...f flow a pressure difference will be created between the two measuring points The negative pressure in the inlet cone of the fan is getting bigger than on the suction side of the fan Flow and pressure...

Страница 13: ...ls in section Planning of service inspections overview page 14 Guarantee The factory guarantee is only valid when the preventive maintenance is in accordance with the guidelines of this section Writte...

Страница 14: ...18 5000 operation hours annually Check the following parts after 5000 operation hours and at least once annually to ensure optimum operation Component Service Ref Fan The ball bearings of large fans a...

Страница 15: ...he coils Clean the condensate tray the outlet and the drain trap Check the condensation amount Page 31 Fan Check the fan wheel Check the vibration dampers and the flexible connections Page 18 Air dist...

Страница 16: ...ntenance on the various unit parts within the stipulated intervals Read more about intervals in section Planning of service inspections overview page 14 Guarantee The factory guarantee is only valid w...

Страница 17: ...before service Illustration The cabinet Procedure Do as follows to service the cabinet Step Action 1 Use a dry cloth to clean the cabinet Note it may be necessary to use water and detergent 2 Lubrica...

Страница 18: ...driven fans Direct driven fans Plug fans Procedure Do as follows to service the fan Step Action 1 Check and clean if necessary the fan wheels for dust that may cause unbalance and vibrations If necess...

Страница 19: ...d the centre distance Dantherm Air Handling recommend the use of special purpose tools for the measuring of the belt tightening in order to ensure the control of the values of the table below Belt Pro...

Страница 20: ...damper which is described separately under Accessories See How to service dampers page 32 Warning Do not forget to disconnect all current to the unit and its parts before service Take care when clean...

Страница 21: ...e edges of the rotary heat exchanger 3 Wash with fat dissolving detergent to remove fat or dirt on the edges of the heat exchanger 4 If necessary clean the heat exchanger by compressed air Use a vacuu...

Страница 22: ...on the surface Special conditions Where a unit is used in connection with exhaust e g from a kitchen with fatty air exhaust hood filters etc must be cleaned every day to ensure optimum performance and...

Страница 23: ...Water and dirt is removed from the opposite side of the exchanger Procedure service The cross flow heat exchanger is serviced as described below Step Action 1 Check that the edges of the heat exchange...

Страница 24: ...preventive maintenance is consequently important Procedure Do as follows to service the run around heat exchanger Step Action 1 Check the coils for dust or dirt If necessary clean the alu slats by a...

Страница 25: ...continued Step Action 6 Clean the condensate tray the drain and the drain trap from the drip tray under the cooling coil 7 Check and clean the eliminator plate if the unit is equipped with one Use com...

Страница 26: ...heck the coils for dust or dirt If necessary clean the alu slats by a soft brush and a vacuum cleaner Alternatively you may blow compressed air through the coil against the normal air direction 2 Stra...

Страница 27: ...viation is to be expected because of different temperatures inside the unit or change to summer winter operation or defrosting mode 2 Check that there is perceptible cooling over the evaporator and he...

Страница 28: ...through the filter decides the intervals Use the following methods to decide whether a filter needs to be replaced A filter guard if fitted will give a signal when the filter needs to be replaced A d...

Страница 29: ...new bag filters against the gaskets inside the unit Procedure panel filter Do as follows to replace the panel filter Step Action 1 Pull out the filter frame 2 Replace the panel filter 3 Clean the fra...

Страница 30: ...Illustration The heating coil Procedure Do as follows to service the heating coils Step Action 1 Check the coils for dust or dirt If necessary clean the alu slats by a soft brush or a vacuum cleaner...

Страница 31: ...coils during cleaning Illustration A cooling coil Procedure Do as follows to service the cooling coils Step Action 1 Carefully clean the coils using a high pressure cleaner with atomizer or compressed...

Страница 32: ...not need lubrication Illustration Dampers Bypass damper Louver damper Procedure Do as follows to service the dampers Step Action 1 Clean the damper louvers 2 Check that the rubber gaskets are fixed an...

Страница 33: ...ailable before start Brush or vacuum cleaner Warning Do not forget to disconnect all current to the unit and the unit parts before service Illustration The air distributor Procedure The air distributo...

Страница 34: ...e correct part The serial number is indicated on the name plate of the unit Contact information Contact the After Sales Support Department at Dantherm Air Handling A S Tove I Kristensen 45 9614 4762 S...

Страница 35: ...ng A S offers to do the preventive maintenance on the units so that they at all times will operate according to factory standards Corrective and emergency repair In case of malfunctions of the product...

Страница 36: ...re thermostat 8 frost thermostat 9 G general information 5 guarantee 13 16 H heat pump 26 heating coil 30 high pressure switch 7 HP switch 7 P panel filter 28 planning of service inspections 14 plug f...

Отзывы: