FLS 3D
Industrivej 24C
DK-3550 Slangerup
Denmark
Tel. +45 4737 3800
Fax: +45 4737 3809
www.daniamant.com
FLS 3D Manual Version 1
Daniamant A/S
13
Keypad Installation
The waterproof keypad plugs into the visual processor as explained on the previous page.
The keypad should be mounted as near as possible to the display which the EchoPilot 3D is being
shown.
The keypad has been designed for panel mounting. It is provided with a stainless-steel mounting
bracket, two plastic m6 studs and two m6 plastic nuts.
Once you have decided on the best position for the keypad (making sure that the cable reaches
the visual processor), cut out a rectangular hole measuring 103mm x 161mm. Place the keypad
into the cut out with the m6 studs already screwed into the threaded holes in the back of the
keypad (you may also wish to seal with a small amount of suitable sealant). Place the stainless-
steel bracket on the studs and tighten with the plastic nuts. Do not over tighten the mounting nuts.
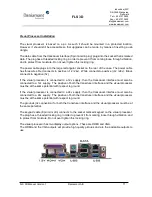
Wiring Overview


