background image

  
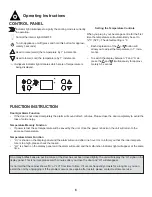
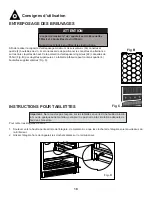
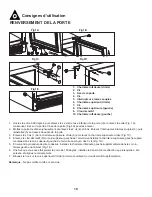
 Consignes d’utilisation  

CARACTÉRISTIQUES

  
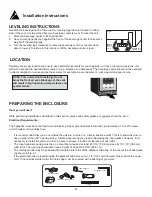
 Consignes d’installation 

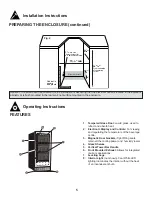
16

15 

1

/

16

po 

min

1


1

/

2

po

3

/

16

po

34


9

/

16


po

6

po

23

1

/

16

po

min

*Si la prise mutale n’est 
pas dans l’ouverture 
d’installation

Comptoir 
au plancher

Equerre 

armoire et 

plomberie

Electrique Access


Fig E

Important : Le requirement de profondeur pour l’installation suppose que la prise murale est localisée dans une autre 
armoire ou est monté dans le mur, pas monté sur la surface dedans l’ouverture.

7

5

1

3

2

6

4

1.  Portes en verre trempé : 

Verre à faible émissivité, 

utilisé à ré

fl

 échir et absorber la chaleur.

2.  Controls électroniques : 

Contrôle de la température 

de l’unité.

3.  Joint étanche magnétique : 

Le joint étanche permet 

de conserver le niveau de température et d’humidité 
à l’intérieur du cabinet.

4.  Étagères en verre
5. Poignée
6.  Échappement sur le devant : 

Pour des applications 

intégrées cabinet.

7.  Pieds de nivellement
8. Lumière 

intérieures 

(non illustré) : S’allume lor-

squ’on ouvre la porte du cabinet.

Содержание Silhouette PROFESSIONAL DBC031D3BSSPR

Страница 1: ...ore first use of this product PRÉCAUTION Veuillez lire attentivement les consignes de sécurité et les instructions d utilisation avant l utilisation initiale de ce produit Danby Products Limited Guelph Ontario Canada N1H 6Z9 Danby Products Inc Findlay Ohio USA 45840 1 844 455 6097 CARE GUIDE ÈTAIRE 02 02 Ê DBC031D3BSSPR 2015 07 16 ...

Страница 2: ...épond adéquatement à tous vos besoins de divertissement Notre prioritéétant de vous satisfaire si vous avez des questions oudes préoccupations relativement à votre nouvelleacquisition veuillezcommuniquer avec notre Centre de service à la clientèle au numéro sans frais 1 844 455 6097 NO DEVUELVA ESTA UNIDAD AL VENDEDOR SIN ANTES RECIBIR INSTRUCCIONES ADICIONALES Estimado cliente Esperamos que su ap...

Страница 3: ...ce produit TABLE DES MATIÈRES BEVERAGE CENTRE Owner s Use and Care Guide 1 11 Safety Instructions Before Use Installation Instructions Features Operating Instructions Care and Maintenance Troubleshooting Warranty CENTRE DE BREUVAGES Guide d utiliser et soin propriètaire 12 22 Consignes de sécurité Avant l utilisation Notice d installation Caractéristiques Consinges d utilisation Soins et entretien...

Страница 4: ...ccess self service tools FAQs and more Should you need additional assistance please call 1 844 455 6097 Note You will need the below information to obtain service under warranty To receive service you must provide the original receipt Model Number Serial Number Date of Purchase NEED HELP Before you call for service here are a few things you can do to help us serve you better Read this Owner s Manu...

Страница 5: ... near a swimming pool or near a sink Do not use corrosive chemicals or vapors in this appliance Use this appliance only for its intended use as described in this manual Store beverages in sealed containers only See door surface cleaning instructions in the Care and Maintenance section of this manual Do not cover or block any openings on the appliance Do not store perishable food items such as but ...

Страница 6: ...ns described in this section gloves and goggles or safety glasses should be worn Two people should be used when moving the beverage centre Remove interior and exterior packaging prior to installation Before connecting the appliance to a power source let it stand upright for approximately 6 hours this will reduce the possibility of a malfunction in the cooling system from handling during transporta...

Страница 7: ...tructions PREPARING THE ENCLOSURE Tools you will need While performing installations described in this section gloves and safety glasses or goggles should be worn Electrical Requirements The appliance must be connected to an individual properly grounded electrical outlet protected by a 15 or 20 ampere circuit breaker or time delay fuse It is recommended that you do not install the unit into a corn...

Страница 8: ...ed in the adjacent cabinetry or is flush mounted in the rear wall not surface mounted in the enclosure 1 Tempered Glass Door Low E glass used to reflect and absorb heat 2 Electronic Display and Controls For viewing and regulating the temperature of the beverage centre 3 Magnetic Door Gaskets Tight fitting seals retain all the cooling power and humidity levels 4 Glass Shelves 5 Vertical Tower Bar H...

Страница 9: ...losed completely the alarm will sound after 5 minutes Please close the door completely to avoid the loss of cold energy Temperature Memory Function If power is lost the set temperature will be saved by the unit Once the power is back on the unit will return to the same set temperature Temperature Alarm Function HI is shown on the display panel and the alarm will sound after one hour It is to infor...

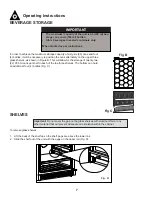
Страница 10: ...hold an additional four 4 bottles Fig C IMPORTANT The maximum capacity of the unit is 66 355 ml bev erage cans and 4 750 ml bottles Store beverages in sealed containers only When stocked as per instructions SHELVES To remove glass shelves 1 Lift the back of the shelf up so the shelf pegs are above the lower rail 2 Slide the shelf out of the unit with the pegs on the upper rail Fig D Important Do n...

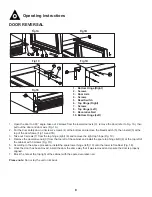
Страница 11: ...tch 5 then install 5 at the top of the door frame Fig 1A and 1B 3 Take out 3 screws 7 from the top hinge right 6 and remove the right top hinge Fig 1C 4 Remove the decorative nail 9 from the top left of the cabinet and install the spare top hinge left 8 at the top left of the cabinet with 3 screws Fig 1D 5 According to the above procedure install the spare lower hinge left 10 onto the lower left c...

Страница 12: ...stable leg up to the base to avoid damage Tape the door shut Be sure the appliance stays secure in the upright position during transportation Also protect the outside of the appli ance with a blanket or similar item 9 Cleaning the Inside Walls floor inside window and shelves Some water deposits and dust can be removed with a dry paper towel others may require a damp cloth Cleaning the Outside Oute...

Страница 13: ...n the doors only as needed and for short periods of time Verify there is nothing blocking the front mounted exhausting vent Limit the quantity of warm bev erages being introduced to the cabinet at the same time Attempt to stagger the load introduction if possible Alarm beeping and HI is displayed on the control panel Recently added a large quantity of warm bottles or cans to the cabinet The door i...

Страница 14: ...horized Danby Service Depot as service must only be performed by a technician qualified and certified for warranty service by Danby Transpor tation charges to and from the service location are not protected by this warranty and are the responsi bility of the purchaser During the first twenty four 24 months any functional parts of this product found to be defective will be repaired or replaced at w...

Страница 15: ...s plaît appelez 1 844 455 6097 S il vous plaît ayez votre facture d achat le numéro de modèle et le numéro de série près durant l appel Remarque Ces renseignements seront nécessaires si votre appareil a besoin d entretien ou pour les demandes de renseignements généraux Pour bénéficier d une opération de maintenance ou de dépannage le reçu original sera exigé Numéro de modèle Numéro de serie Date d...

Страница 16: ...iture dans votre centre de breuvages Par exemple les viandes et les produits laitiers Cet appareil est conçu pour un usage domestique à l intérieur seulement N entreposez ni n utilisez pas cet appareil à l extérieur Cet appareil ne devrait être réparé que par du personnel qualifié Pour tout examen réparation ou réglage contactez votre centre de service le plus rapproché Cet appareil n a pas été co...

Страница 17: ...ieur et extérieur avant l installation Avant de brancher l appareil à une prise électrique laissez le debout pendant approximativement 6 heures cela permet de réduire les risque d un mauvais fonctionnement éventuel du circuit de refroidissement en raison de sa manutention pendant le transport Placez votre l appareil sur un sol suffisamment solide pour le supporter lorsqu il est plein Pour mettre v...

Страница 18: ...de plancher plane et avoir au 58 6 cm 23 1 16 po de pro fondeur par 38 6 cm 38 6 po min de largeur L ouverture doit également avoir une hauteur d au moins 86 8 cm 34 9 16 po La prise électrique peut être placée de l intérieur sur l un des côtés des armoires adjacentes ou à l arrière dans la zone en gris tel qu illustré sur la figure 2 Si la prise électrique se trouve dans l armoire adjacente perce...

Страница 19: ...e armoire ou est monté dans le mur pas monté sur la surface dedans l ouverture 7 5 1 3 2 6 4 1 Portes en verre trempé Verre à faible émissivité utilisé à réfléchir et absorber la chaleur 2 Controls électroniques Contrôle de la température de l unité 3 Joint étanche magnétique Le joint étanche permet de conserver le niveau de température et d humidité à l intérieur du cabinet 4 Étagères en verre 5 ...

Страница 20: ...rte Si vous oubliez de fermer la porte ou celle ci n est pas bien fermée l alarme retentit au bout de 5 minutes Veuillez fermer complètement la porte et éviter que le froid s échappe Fonction de mémorisation de la température La température réglée est sauvegardée par l appareil en cas de perte de courant lorsque le courant revient l appareil revient à la même température Fonction d alarme de tempé...

Страница 21: ...ère hors de l appareil les crochets étants sur le rail supérieur ATTENTION La capacité maximale de l appareil est de 66 canettes 355ml et 4 bouteilles de vin 750ml Quand il est stocké en utilisant les instructions Afin de réaliser la capacité d entreposage maximum de soixante six 66 canettes et quatre 4 bouteilles de vin il sera nécessaire de positionner les canettes en alternance sur les trois cl...

Страница 22: ...éinstallez 5 en dessus du cadre de la porte 3 Enlevez les 3 vis 7 de la charnière supérieure droite 6 et enlevez la charnière supérieure droite Fig 1C 4 Enlevez le clou décoratif 9 du coin supérieur gauche de l armoire et installez la charnière supérieure gauche supplé mentaire dans le coin supérieur gauche de l armoire au moyen des 3 vis Fig 1D 5 En suivant la procédure décrite ci dessus installe...

Страница 23: ... et éviter tout dommage Maintenez la porte fermée avec du ruban cache Assurez vous que le centre de breuvages reste bien en position verticale pendant son transport Protégez aussi l extérieur du l appareil avec une couverture ou l équivalent 20 Comment nettoyer l intérieur Parois plancher intérieur de la visière et tablettes Cetraines éclaboussures d eau et poussières peuvent être essuyées avec de...

Страница 24: ...te seulement quand nécessaire Vérifiez qu il n y a rien qui bloque l échappement sur le devant Limitez la quantité de bouteilles ou canettes qui son stockées dans le cabinet en même temps L alarme émet un bip et on peut lire HI sur le tableau d affichage Une grande quantité de bouteilles à la température de la pièce a été récemment introduite dans le caisson de l appareil La porte n est pas fermée...

Страница 25: ...pour effectuer un entretien couvert par la garantie de Danby Les frais de transport entre votre domicile et le lieu de l entretien ne sont pas couverts par la présente garantie et doivent être acquittés par l acheteur Pendant les premiers vingt quatre 24 mois toutes les pièces fonctionnelles de ce produit qui s avèrent défectueuses seront réparées ou remplacées selon le choix du garant sans frais ...

Страница 26: ..._________________ __________________________________________________________________________________________ __________________________________________________________________________________________ __________________________________________________________________________________________ __________________________________________________________________________________________ __________________...

Страница 27: ..._________________ __________________________________________________________________________________________ __________________________________________________________________________________________ __________________________________________________________________________________________ __________________________________________________________________________________________ __________________...

Страница 28: ...r nearest service depot To request service and or the location of the service depot nearest you call toll free When requesting service or ordering parts always provide the follow ing information 3URGXFW 7 SH 0RGHO 1XPEHU 3DUW HVFULSWLRQ 3DUW 1XPEHU Le numéro de modèle se trouve sur la plaque d information sur la paroi arrière de l appareil Toutes les pièces de recharge ou commandes speciales sont ...

Отзывы: