background image

5

INSTALLATION INSTRUCTIONS

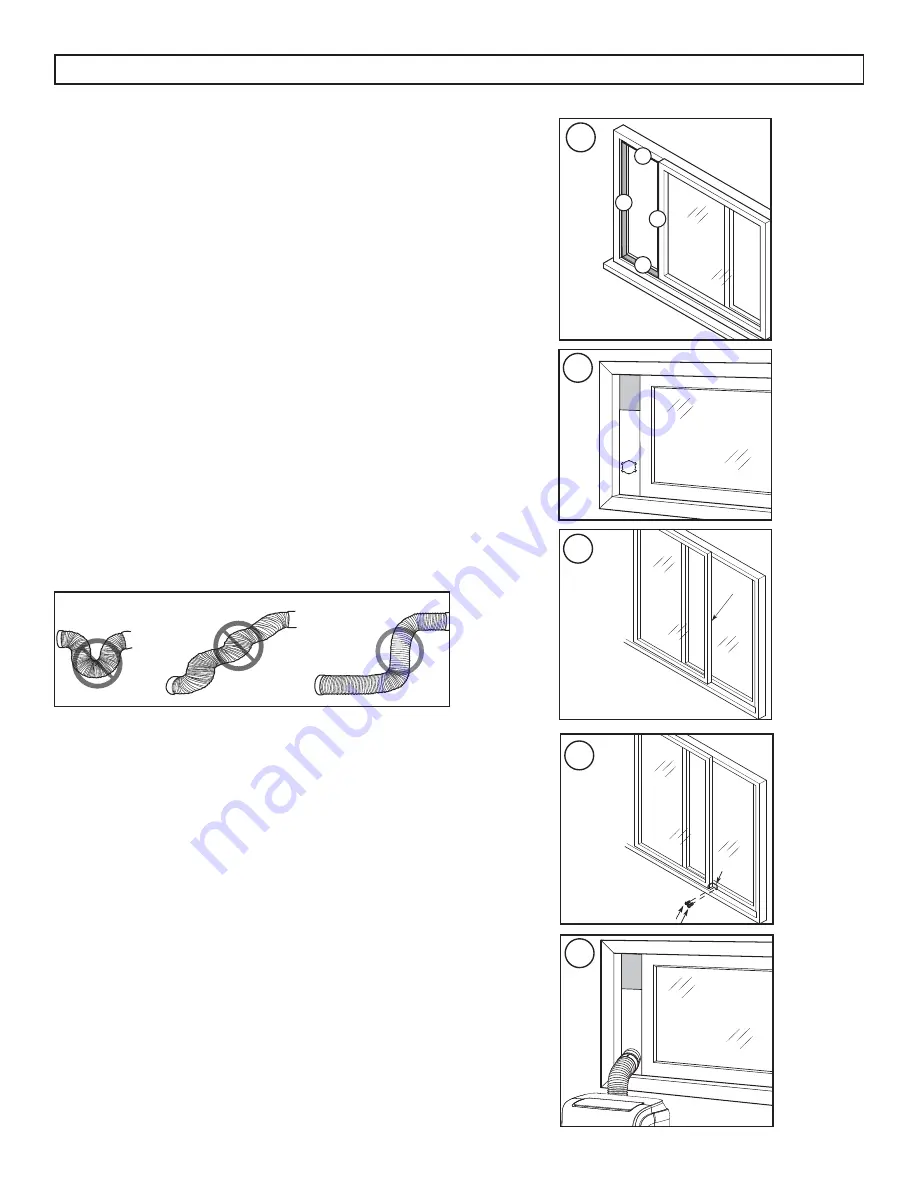
Sliding Window Installation

1.  Cut the adhesive foam seals A and B to the 

correct length for the window. Attach them to the 

window sash and frame as shown.

2.  Insert the assembled window slider kit into the 

window opening.

3.  Cut the non-adhesive foal seal C to match 

the width of the window. Insert the foam seal 

between the glass and the window frame to 

prevent air and insects from getting into the 

room.

4.  Install the security bracket in the window frame 

with the two provided screws.

5.  Attach the window slider adapter to the hole in 

the window slider kit.

B

B

A

A

1

2

3

4

5

Note:

 Do not over extend or bend the hose as this 

will impede air fl ow.

Содержание DPA100EAUWDB

Страница 1: ...R S MANUAL MANUEL DU PROPRI TAIRE MANUAL DEL PROPIETARIO PORTABLE AIR CONDITIONER Owner s Manual 1 12 CLIMATISEUR PORTABLE Manuel du propri taire 13 24 AIRE ACONDICIONADO PORT TIL Manual del propietar...

Страница 2: ...ide the original purchase receipt to validate your warranty and receive service Model Number _________________________________________________ Serial Number ___________________________________________...

Страница 3: ...stand upright for 6 hours before plugging in to avoid damage to internal components Keep the appliance away from walls furniture and curtains with a clearance of at least 30 cm 12 inches on all sides...

Страница 4: ...n the sliders at the correct length 5 If the window opening is less than the minimum length of a single slider use the slider that has the hole in it and cut it to the correct length Make sure not to...

Страница 5: ...2 Insert the assembled window slider kit into the window opening 3 Cut the non adhesive foal seal C to match the width of the window Insert the foam seal between the glass and the window frame to pre...

Страница 6: ...ndow opening 3 Cut the non adhesive foal seal C to match the width of the window Insert the foam seal between the glass and the window frame to prevent air and insects from getting into the room 4 Ins...

Страница 7: ...it and all included accessories Make sure the appliance is level to minimize noise and vibration The appliance must be installed near a grounded receptacle and the over ow drain outlet on the rear of...

Страница 8: ...cale is set to C or F 3 Timer Indicator Illuminates if the timer is activated 4 Fan Speed Display Shows the current fan speed setting low med high 5 Mode Display Shows the current mode cool dry fan RE...

Страница 9: ...ING INSTRUCTIONS Timer Function To set the turn off timer Ensure the appliance is turned on Press the timer button the time on the display will ash Press the timer button to select the desired amount...

Страница 10: ...light the air conditioner may not function properly Use curtains to prevent the sunlight from falling on the receiver Do not allow the remote control to get wet Do not expose the remote control to dir...

Страница 11: ...nstall them 6 Store the appliance in a cool dark place Prolonged exposure to direct sunlight or extreme heat can shorten the lifespan of the appliance DISPOSAL This appliance should not be treated as...

Страница 12: ...nerates uses and can radiate radio frequency energy and if not installed and used in accordance with the instructions may cause harmful interference to radio communications However there is no guarant...

Страница 13: ...ce depot Any appliance requiring service outside the limited boundaries of In Home Service will be the consumer s responsibility to transport at their own expense to the original point of purchase or...

Страница 14: ...e re u d achat original pour valider votre garantie et recevoir le service Num ro de mod le _____________________________________________ Num ro de serie ______________________________________________...

Страница 15: ...u debout pendant 6 heures avant de brancher pour viter d endommager les composants internes Gardez l appareil l cart des murs des meubles et des rideaux avec un jeu d au moins 30 cm 12 pouces sur tous...

Страница 16: ...USSE DE FEN TRE 1 Fixez l adaptateur de sortie d air et l adaptateur de glissi re de fen tre sur l extr mit du tuyau d chappement 2 Ins rez l adaptateur de sortie d air dans la rainure inf rieure de l...

Страница 17: ...de curseur de fen tre assembl dans l ouverture de la fen tre 3 Couper le joint d tanch it du p tre non adh sif C pour correspondre la largeur de la fen tre Ins rez le joint en mousse entre le verre e...

Страница 18: ...3 Couper le joint d tanch it du p tre non adh sif C pour correspondre la largeur de la fen tre Ins rez le joint en mousse entre le verre et le cadre de la fen tre pour viter que l air et les insectes...

Страница 19: ...eur sur un plancher lisse et plat qui est assez solide pour le supporter et tous les accessoires inclus Assurez vous que l appareil est niveau pour minimiser les bruits et les vibrations L appareil do...

Страница 20: ...n fonction de la temp rature r gl e de la temp rature ambiante et de l humidit ambiante 21 PANNEAU DE CONTR LE 1 Bouton de persienne Appuyez sur pour d marrer la fonction d oscillation automatique Lor...

Страница 21: ...de d sactivation peuvent tre utilis es en m me temps en r glant d abord l une puis l autre Les deux voyants s allument et l af chage d compte jusqu l appareil soit en teignant ou en allumant quelle qu...

Страница 22: ...lation automatique est activ appuyer nouveau pour arr ter la persienne l angle d sir 6 Bouton LED Appuyez sur pour allumer ou teindre l af chage LED 7 Bouton d arr t automatique Appuyez sur pour r gle...

Страница 23: ...FCC Ces limites sont con ues pour fournir une protection raisonnable contre les interf rences nuisibles dans une installation r sidentielle Cet quipement g n re utilise et peut mettre de l nergie radi...

Страница 24: ...t restaur e 2 Vidange continu En mode sec vous pouvez con gurer l option de vidange continue a n que l appareil vidange automatiquement l eau collect e Retirez le tuyau d chappement en mode sec il n e...

Страница 25: ...onctionner l appareil sur le mode Ventilateur pendant une demi journ e dans une pi ce chaude pour s cher l int rieur de l appareil et emp cher la formation de moisissure 3 teignez l appareil et d bran...

Страница 26: ...t sales Les sons de gargouille sont normaux c est le uide frigorig ne qui se d place l int rieur de l appareil Odeurs Formation de moisissure sur des surfaces int rieures humides Placer un comprim d a...

Страница 27: ...emiers vingt quatre 24 mois toutes les pi ces fonctionnelles de ce produit qui s av rent d fectueuses seront r par es ou remplac es selon le choix du garant sans frais l acheteur initial Danby se r se...

Страница 28: ...n para obtener un servicio bajo garant a Debe proporcionar el recibo de compra original para validar su garant a y recibir servicio N mero de modelo _____________________________________________ N mer...

Страница 29: ...onentes internos Mantenga el aparato alejado de paredes muebles y cortinas con un espacio de al menos 30 cm 12 pulgadas por todos lados INSTRUCCIONES DE CONEXION A TIERRA Este aparato debe estar conec...

Страница 30: ...A 1 Conecte el adaptador de salida de aire y el adaptador deslizante de la ventana en cualquier extremo de la manguera de escape 2 Inserte el adaptador de salida de aire en la ranura inferior de la sa...

Страница 31: ...ntana ensamblada en la abertura de la ventana 3 Corte el sello de potro no adhesivo C para que coincida con el ancho de la ventana Inserte el sello de espuma entre el vidrio y el marco de la ventana p...

Страница 32: ...el sello de potro no adhesivo C para que coincida con el ancho de la ventana Inserte el sello de espuma entre el vidrio y el marco de la ventana para evitar que el aire y los insectos entren en la ha...

Страница 33: ...so liso y nivelado que sea lo su cientemente fuerte para soportarla y todos los accesorios incluidos Aseg rese de que el aparato est nivelado para minimizar el ruido y las vibraciones El electrodom st...

Страница 34: ...nte y la humedad ambiental 35 PANEL DE CONTROL 1 Bot n de oscilaci n Presione para iniciar la funci n de oscilaci n autom tica Cuando se activa la oscilaci n autom tica presione de nuevo para detener...

Страница 35: ...ague los temporizadores de encendido y apagado se pueden utilizar al mismo tiempo ajustando primero uno y luego el otro Ambas luces indicadoras se iluminar n y la pantalla contar hasta que el aparato...

Страница 36: ...detener la persiana en el ngulo deseado 6 Bot n LED Presione para encender o apagar la pantalla LED 7 Bot n de apagado del temporizador Presione para con gurar el temporizador de apagado autom tico 8...

Страница 37: ...eto a las siguientes condiciones 1 Este dispositivo no puede causar interferencias perjudiciales 2 Este dispositivo debe aceptar cualquier interferencia recibida incluida la interferencia que pueda ca...

Страница 38: ...Durante el modo seco es posible que desee con gurar la opci n de drenaje continuo para que el dispositivo autom ticamente drene el agua recogida Retire la manguera de escape durante el modo seco no es...

Страница 39: ...nar el aparato en modo ventilador durante medio d a en una habitaci n caliente para secar el interior del aparato y evitar la formaci n de moho 3 Apague el aparato y desench felo enrolle el cable y f...

Страница 40: ...ado Los ltros de aire est n sucios Sonidos de gorjeo son normales este es el refrigerante que se mueve dentro del aparato Olores Formaci n del molde en super cies mojadas internas Coloque un comprimid...

Страница 41: ...del rea limitada de Servicio en Domicilio el cliente ser responsable por transportar dicho artefacto hasta el Taller de Servicio Autorizado mas cercano Si el electrodom stico est instalado en un lugar...

Страница 42: ...MODEL MOD LE MODELO Printed in China Imprim en Chine Impreso en China Danby Products Limited Guelph ON Canada N1H 6Z9 Danby Products Inc Findlay Ohio USA 45840 DPA120BEUWDB...

Отзывы: