background image

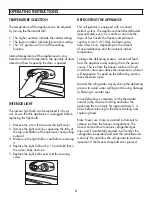
TEMPERATURE SELECTION

The temperature of the appliance can be adjusted 
by turning the thermostat dial. 

•  The higher numbers indicate the coldest setting.
•  The lower numbers indicate the warmest setting.
•  The “O” position will turn off the cooling 

function.

Internal temperature of the appliance can vary 
based on ambient temperature, the quantity of items 
stored and how frequently the door is opened.

3

OPERATING INSTRUCTIONS

DEFROSTING THE APPLIANCE

This refrigerator is equipped with a manual 
defrost system. The appliance should be defrosted 
approximately every six months or any time the 
layer of frost inside the freezer compartment 
reaches 6 mm (1/4”) thick. Defrosting may 
take a few hours, depending on the amount 
of accumulated ice and the ambient indoor 
temperature.

To begin the defrosting process, remove all food 
from the appliance and unplug it from the power 
source. The ice from the freezer section will melt 
and drain into a pan above the compressor where it 
will evaporate. To speed up the defrosting process, 
leave the doors open.

Monitor the refrigerator closely during the defrosting 
process to avoid water spilling and causing damage 
to fl ooring or counter tops.

Once defrosting is complete, set the thermostat 
control to the maximum setting and allow the 
appliance the run empty for approximately 2 - 3 
hours before returning to the desired setting and 
replacing food.

Note: Never use sharp or pointed instruments to 
remove ice from the freezer compartment. The 
freezer compartment contains refrigerated gas 
lines and if accidentally pierced it will render the 
refrigerator inoperable and void the manufacturers 
warranty. Do not allow the refrigerator to continue 
operation if the freezer compartment is pierced.

INTERIOR LIGHT

The interior light bulb can be replaced if it burns 
out. Ensure that the appliance is unplugged before 
replacing the light bulb.

1.  Remove the screw that secures the light cover.
2.  Remove the light cover by squeezing the tabs at 

the top and bottom of the light cover and pulling 
outward.

3.  Make sure the light bulb is cool before removing 

it.

4.  Replace the light bulb with a 10 watt bulb that is 

the same shape and size.

5.  Replace the light bulb cover and the securing 

screw.

Содержание DCR031B1WDD-RF

Страница 1: ...au Canada ou aux tats Unis Impreso en Canad o EE UU Trademark of Danby Products Marque de commerce de Danby Products Marca registrada de Danby Products www Danby com Printed in Canada or USA 2022 10 2...

Страница 2: ...to operate the appliance by a person responsible for their safety Important Safety Information READ AND FOLLOW ALL SAFETY INSTRUCTIONS SAVE THESE INSTRUCTIONS This appliance is intended to be used in...

Страница 3: ...top of the appliance and all adjacent walls This appliance is intended for free standing installation only and is not intended to be built into a cabinet or counter Building in this appliance can cau...

Страница 4: ...sting process leave the doors open Monitor the refrigerator closely during the defrosting process to avoid water spilling and causing damage to ooring or counter tops Once defrosting is complete set t...

Страница 5: ...emove the lower hinge from the cabinet The lower hinge must be turned over before being reinstalled 5 Install the lower hinge on the left side of the cabinet Install the refrigerator door and central...

Страница 6: ...ents Note Wait 3 to 5 minutes before attempting to restart the refrigerator if operation has been interrupted CARE MAINTENANCE VACATION Short vacations Leave the appliance operating during vacations o...

Страница 7: ...e the watts and amps used This information can be found on the rating plate located on the back of the cabinet How much does it cost to run the refrigerator Please refer to the energy guide Can I use...

Страница 8: ...ly to the person to whom the unit was originally sold by Danby Products Limited Canada or Danby Products Inc U S A hereafter Danby or by an authorized distributor of Danby and is non transferable TERM...

Страница 9: ...supervision ou de formation pour faire fonctionner l appareil par une personne responsable de leur s curit Consignes de s curit importantes LIRE ET SUIVRE TOUTES LES INSTRUCTIONS DE S CURIT GARDEZ CES...

Страница 10: ...parois adjacentes Cet appareil est destin uniquement une installation autonome et ne doit pas tre int gr dans une armoire ou un compteur La construction de cet appareil peut provoquer un dysfonctionne...

Страница 11: ...ge laisser les portes ouvertes Surveillez attentivement le r frig rateur pendant le processus de d givrage a n d viter le d versement d eau et d endommager le rev tement de sol ou les comptoirs Une fo...

Страница 12: ...harni re inf rieure de l armoire La charni re inf rieure doit tre retourn e avant d tre r install e 5 Installez la charni re inf rieure sur le c t gauche de l armoire Installez la porte du r frig rate...

Страница 13: ...z 3 5 minutes avant d essayer de red marrer le r frig rateur si l op ration a t interrompue VACANCES Courtes vacances Laissez le unit fonctionner pendant les vacances durant moins de trois semaines Lo...

Страница 14: ...s utilis s Ces informations se trouvent sur la plaque signal tique situ e l arri re de l armoire Combien co te le fonctionnement du r frig rateur Veuillez vous r f rer au guide de l nergie Puis je uti...

Страница 15: ...sente il n existe aucune autre garantie condition ou repr sentation qu elle soit exprim e ou tacite de fa on manifeste ou intentionnelle par Danby ou ses distributeurs agr s De m me sont exclues tout...

Страница 16: ...na persona responsable de su la seguridad Importantes Instrucciones de Seguridad LEA Y SIGA TODAS LAS INSTRUCCIONES DE SEGURIDAD GUARDE ESTAS INSTRUCCIONES Este dispositivo est destinado a ser utiliza...

Страница 17: ...das las paredes adyacentes Este aparato est dise ado para instalaci n independiente y no est dise ado para ser instalado en un gabinete o mostrador La construcci n en este aparato puede causar un mal...

Страница 18: ...ngelaci n deje las puertas abiertas Vigile el refrigerador de cerca durante el proceso de descongelaci n para evitar derrames de agua y causar da os al suelo oa las encimeras Una vez completada la des...

Страница 19: ...ajustables Retire la bisagra inferior del gabinete La bisagra inferior debe girarse antes de volver a instalarla 5 Instale la bisagra inferior en el lado izquierdo del gabinete Instale la puerta del...

Страница 20: ...a Espere de 3 a 5 minutos antes de intentar reiniciar el refrigerador si se ha interrumpido la operaci n VACACIONES Vacaciones cortas Deje el aparato en funcionamiento durante las vacaciones de menos...

Страница 21: ...atios y amperios utilizados Esta informaci n se puede encontrar en la placa de caracter sticas ubicada en la parte posterior del gabinete Cu nto cuesta hacer funcionar el refrigerador Consulte la gu a...

Страница 22: ...ea limitada de Servicio en Domicilio el cliente ser responsable por transportar dicho artefacto hasta el Taller de Servicio Autorizado mas cercano Si el electrodom stico est instalado en un lugar que...

Отзывы: