background image

1.  This room air conditioner is designed to fi t easily into a single or double hung window. However, since window designs 

vary, it may be necessary to make some modifi cations for safe, proper installation.

2.  Make sure window and frame are structurally sound and free from dry and rotted wood.

3.  For maximum effi ciency, install the air conditioner on a side of the house or building which favours more shade than 

sunlight. If the unit is in direct sunlight, it is advisable to provide an awning over the unit.

4. Provide 

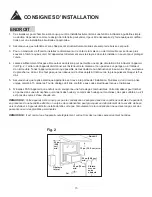
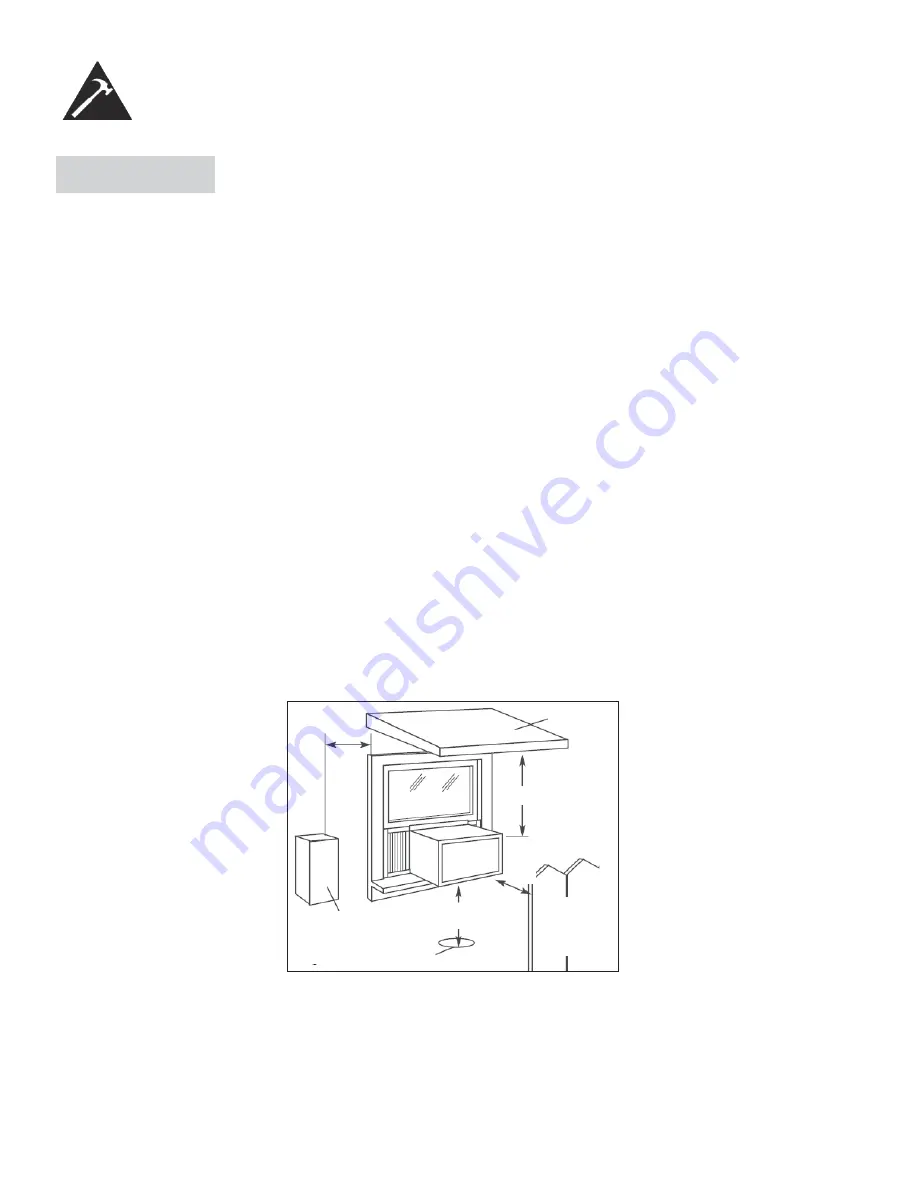
suffi cient clearance around the cabinet to allow for ample air circulation through the unit 

(See Fig. 2)

. The 

rear of the unit should be outdoors.  It should not be in a garage, or inside a building. Keep unit as far away as possi-
ble from obstacles/obstructions and at least 30” above the fl oor or ground. Curtains and other objects within the room 
should be prevented from blocking the air fl ow.

5.  Be certain that the proper electrical outlet is within reach of the installation. Use only a single outlet circuit rated at 15 

amps. All wiring should be in accordance with local and national electrical codes.

6.  DO NOT install unit where leakage of combustible gas is suspected. Your air conditioner may fail to operate in air 

containing oils (including machine oils), sulfi de gas, near hot springs, etc.

NOTE: Your unit is designed to evaporate condensation under normal conditions. However, under extreme humidity con-
ditions, excess condensation may cause basepan to overfl ow to the outside. The unit should be installed where conden-
sation run-off cannot drip on pedestrians or neighbouring properties.

NOTE: It is normal for your unit to drip a small amount of water, especially on excessively humid days.

5

INSTALLATION INSTRUCTIONS

LOCATION

Awning

Fence,
wall, or
other
obstacle

Ground

Side 
Obstruction

20 in. 
(50.8 cm) 

Min

30 in. (76.2 cm)

Min

Min

12 in. (30.5 cm) Min

20 in. 
(50.8 cm) 

Fig. 2

Содержание DAC050MCB1GDB

Страница 1: ...ENTRETIEN GU A DE UTILIZACI N Y CUIDADO PARA EL PROPIETARIO MODEL MOD LE MODELO DANBY PRODUCTS LIMITED ONTARIO CANADA N1H 6Z9 DANBY PRODUCTS INC FINDLAY OHIO USA 45840 2015 01 13 AIR CONDITONER CLIMAT...

Страница 2: ...ns que votre produit Danby r pond tous vos besoins Votre satisfaction est notre priorit Veuillez nous contacter au num ro gratuit de service apr s vente si vous avez des questions quelconques propos d...

Страница 3: ...is factory equipped with a power supply cord that has a three pronged grounded plug It must be plugged into a mating grounding type receptacle in accordance with the National Electrical Code and appli...

Страница 4: ...ario Bienvenido Informaci n importante sobre seguridad Caracter sticas Instrucciones de instalaci n Instrucciones de funcionamiento Cuidado y mantenimiento Soluci n sugerida Garant a CONTENTS Model Mo...

Страница 5: ...must provide the original receipt NOTE THIS UNIT IS NOT DESIGNED FOR THROUGH THE WALL INSTALLATION Model No Serial No Date Purchased NEED HELP Before you call for service here are a few things you can...

Страница 6: ...circuit 4 For your safety and protection this unit is grounded through the powercord plug when plugged into a matching wall outlet If you are not sure whether your wall outlet is properly grounded pl...

Страница 7: ...ality 3 Use drapes curtains or shades to keep direct sunlight from penetrating and heating the room but do not allow drapes or curtains to obstruct the air flow around the unit 4 Start your air condit...

Страница 8: ...nstalling or servicing NOTE Your Room Air Conditioner is designed for easy installation in a single or double hung window This unit is NOT designed for vertical slider type windows and or through the...

Страница 9: ...within the room should be prevented from blocking the air flow 5 Be certain that the proper electrical outlet is within reach of the installation Use only a single outlet circuit rated at 15 amps All...

Страница 10: ...ing bracket on top positioned in front of the upper window sash The bottom of the cabinet should be positioned on the recessed portion of the window frame Pull the window down until it rests just behi...

Страница 11: ...from the cabinet s edge WINDOW approximately 5 8 to 3 4 Fig 7 FAN SPEEDS LOW FAN will circulate air at minimum speed without cooling HIGH FAN will circulate air at maximum speed without cooling SELEC...

Страница 12: ...ttachment 2 Wash the filter in lukewarm water below 40 C 104 F To get best results wash with soapy water or a neutral clean ing agent 3 Rinse the filter with clean water and dry thoroughly before re i...

Страница 13: ...ripping outside Hot and humid weather Condensation run off is normal under these conditions Water dripping inside Unit is not properly angled to allow water to drain outside It is an extremely humid d...

Страница 14: ...Canada N1H 6Z9 Telephone 519 837 0920 FAX 519 837 0449 Danby Products Inc PO Box 669 Findlay Ohio U S A 45840 Telephone 419 425 8627 FAX 419 425 8629 04 09 1 800 263 2629 Warranty Service In home Duri...

Страница 15: ...in d entretien ou pour les demandes de renseignements g n raux Pour b n ficier d une op ration de maintenance ou d pannage le re u original sera exig REMARQUE CET APPAREIL N A PAS T CON U POUR UNE INS...

Страница 16: ...et appareil est mis la masse par la fiche du cordon d alimentation lorsqu elle est branch e dans une prise murale qui lui correspond Si vous n tes pas certain que votre prise de courant murale est mis...

Страница 17: ...tent dans l air Conserver le filtre air propre en tout temps 3 Utiliser des draperies des rideaux ou des stores pour pr venir la p n tration et le r chauffement de la pi ce par les rayons directs du s...

Страница 18: ...dre l installation ou le service Comme le compresseur se trouve du c t des commandes de l unit c t gauche ce c t est plus lourd et plus difficile manipuler Un soutien inappropri du c t des commandes d...

Страница 19: ...rideaux ou d autres objets l int rieur de la pi ce puissent bloquer le flux d air 5 Assurez vous que la prise lectrique appropri e se trouve la port e de l installation N utilisez qu un circuit prise...

Страница 20: ...sitionn l avant du cadre sup rieur de la fen tre Le bas du caisson doit tre positionn dans le bas du cadre de la fen tre Tirez la fen tre vers le bas jusqu ce qu elle repose juste derri re le rebord f...

Страница 21: ...tervalle H devrait tre environ 5 8 3 4 pouces Fig 7 VITESSE DU VENTILATEUR BAS l air circule une vitesse minimum sans refroidissement HAUT l air circule une vitesse maximum sans refroidissement FONCTI...

Страница 22: ...ti de de moins de 40 C 104 F Pour obtenir de meilleurs r sultants lavez avec une eau savonneuse ou un agent neutre de nettoyage 3 Rincez le filtre avec de l eau propre et s chez le fond avant de le r...

Страница 23: ...ment de la condensation est normal quand le temps est chaud et humide Ajoutez un tube flexible pour r acheminer l coulement de l eau De l eau s goutte l int rieur L appareil n est pas inclin ad quatem...

Страница 24: ...00 263 2629 Warranty Service In home Pendant les premiers douze 12 mois toutes pi ces fonctionnelles de ce produit qui s av rent d fectueuses seront r par es ou remplac es selon le choix du garant san...

Страница 25: ...s Para recibir servicio t cnico debe mostrar el recibo original NOTA ESTA UNIDAD NO FUE DISE ADA PARA INSTALARSE A TRAV S DE LA PARED N mero de Modelo N mero de Serie Fecha de la compra NECESITA AYUDA...

Страница 26: ...n esta unidad est conectada a tierra a trav s del enchufe de electricidad cuando se conecta a un toma corriente correspondiente en la pared Si no est seguro de si el tomacorriente de la pared est cor...

Страница 27: ...cortinas o sombrillas para evitar que penetre la luz solar directa y el calor a la habitaci n pero no permita que los tules o cortinas obstaculicen el flujo de aire alrededor de la unidad 4 Encienda...

Страница 28: ...cnico NOTA Su equipo de aire acondicionado de pared est dise ado para instalarse f cilmente en una ventana nica o ventana de doble abertura Esta unidad NO est dise ada para ventanas verticales tipo de...

Страница 29: ...cortinas y otros objetos dentro de la habitaci n bloqueen el flujo de aire 5 Aseg rese de que la salida el ctrica correcta est al alcance de la instalaci n Utilice nicamente un circuito de salida nic...

Страница 30: ...tana superior La parte inferior del gabinete debe colocarse en la parte empotrada del marco de la ventana Tire la ventana hacia abajo hasta que quede justo detr s del reborde frontal del soporte de mo...

Страница 31: ...ENTRO de 5 8 a 3 4 pulgadas aproximadamente Fig 7 VELOCIDADES DEL VENTILADOR BAJA har circular el aire a una velocidad m nima sin enfriamiento ALTA har circular el aire a una velocidad m xima sin enfr...

Страница 32: ...orio suave 2 Lave el filtro con agua tibia por debajo de los 40 C 104 F Para obtener los mejores resultados lave con agua jabonosa o un agente de limpieza neutro 3 Enjuague el filtro con agua limpia y...

Страница 33: ...loque una tableta alguicida en la bandeja de la base Se chorrea agua afuera El clima es c lido y h medo La salida de la condensaci n funciona de manera normal bajo estas condiciones Se chorrea agua ad...

Страница 34: ...2629 Warranty Service In home Durante los primeros 12 meses cualquier parte en buen estado de este producto que resulte defec tuosa ser reparado o reemplazado a del fabricante sin cargo para el compr...

Страница 35: ...___________________ __________________________________________________________________________________________ _________________________________________________________________________________________...

Страница 36: ...s la port e de la main lors de la commande de pi ce ou service Type de produit Num ro de mod le Num ro de pi ce Description de la pi ce Todas las piezas de reparaci n disponibles para la com pra o la...

Отзывы: