background image

20 


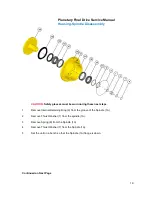
6. 

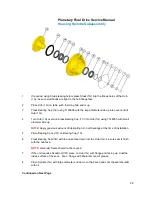
Remove the O-Ring (5) from the Housing (1G) and discard it. 


CAUTION: 

Safety glasses must be worn during these next steps


7. 

Remove Retaining Ring (1I) from the groove of Spindle (1A). 


8. 

Remove Thrust Washer (1H) from the Spindle (1A). 


9. 

Remove two Pipe Plugs (1J) from the Housing (1G). 


10. 

Turn the unit over and carefully place the unit on a support base until the Spindle (1A) post 
rests on it. Ensure there is enough gap to lower the Housing (1G) down. 


11. 

Use a dead blow hammer on the Housing (1G) flange to drive the inboard Bearing Cone 
(1F) off of the Spindle (1A). 


Continued on Next Page 

Содержание Spicer Torque-Hub W3B Series

Страница 1: ...1 Torque Hub Planetary Final Drive W3B W3C Series Service Manual Rev 03 07 13 ...

Страница 2: ...ocument Fairfield Manufacturing Co Inc assumes no liability with respect to the use of the documentation described herein or for any act or omission of Fairfield Manufacturing Co Inc concerning this documentation Torque Hub is a registered trademark of Fairfield Manufacturing Co Inc Features and specifications are subject to change without notice ...

Страница 3: ...12 Carrier Disassembly 15 Coupling Disassembly 16 Input Shaft Disassembly 17 Cover Disassembly 18 Housing Spindle Disassembly 19 Assembly Instructions Cover Subassembly 24 Carrier Subassembly 26 Housing Spindle Subassembly 28 Coupling Subassembly 30 Input Shaft Subassembly 31 Main Assembly 32 Assembly Drawing 36 Parts List 37 Assembly Tools 40 General Information Contact Information 52 ...

Страница 4: ... in the Assembly Tools section Users should familiarize themselves with the procedures for roll and leak testing as well as bolt tightening and torquing found on the following three pages before starting any repairs Standard safety practices should be followed during the disassembly and assembly procedures described Safety glasses and safety shoes should be worn and heavy heat resistant gloves sho...

Страница 5: ...ool from table below or something equivalent to apply constant rotational force to the input of the gearbox If more drag is felt in the gears only at certain points then the gears are not rolling consistently and easily and should be examined for improper installation or defects Some gear packages roll with more difficulty than others Do not be concerned if the gears in the unit seem to roll hard ...

Страница 6: ...ies with lip seals The unit has a leak if the pressure gauge reading on your leak check fitting starts to fall after the gearbox has been pressurized and allowed to equalize Leaks will most likely occur at the pipe plugs the main seal or wherever o rings or gaskets are located The exact location of a leak can usually be detected by brushing a soap and water solution around the main seal and where ...

Страница 7: ...e how to tighten and torque bolts or socket head cap screws in a bolt circle 1 Tighten but do not torque bolt A until snug 2 Go to the opposite side of the bolt circle and tighten bolt B until equally snug 3 Crisscross around the bolt circle and tighten the remainingbolts 4 Use a torque wrench to apply the specified torque to bolt A 5 Using the same sequence crisscross around the bolt circle and a...

Страница 8: ...ed viscosities for various ambient operating temperatures These recommendations are based on temperature rise of 50 to 100 F at normal operating conditions Differential Planetary Simple Planetary Ambient Temperature ISO Index AGMA Lubricate Number ISO Index AGMA Lubricate Number 40 to 5 F 1 VG100 3EP VG100 3EP 5 to 40 F VG150 4EP VG100 3EP 40 to105 F VG220 VG320 5EP 6EP VG150 VG220 4EP 5EP 105 to ...

Страница 9: ... 180 F for continuous operation and no higher than 200 F for intermittent operation For special applications high horsepower high speeds or wide temperature changes please consult Fairfield Oil Fill Level When the Torque Hub unit is mounted horizontally unless otherwise specified the gearbox should be filled half full of oil Consult the appropriate series literature for approximate fill volumes Ve...

Страница 10: ...10 THIS PAGE INTENTIONALLY LEFT BLANK ...

Страница 11: ...11 DISASSEMBLY ...

Страница 12: ...unit 2 Remove the magnetic Pipe Plug 6H from Cover Plate 6A and drain the oil out ofthe gearbox NOTE Record the condition and volume of the oil 3 Remove eight of Bolts 17 followed by four of Bolts 18 from Cover Subassembly 4 Lift the Cover Subassembly off of the unit 5 Lift Ring Gear 4 off the unit Continued on Next Page ...

Страница 13: ...13 NOTE Figure 1 refers to 30 35 50 64 73 1 Ratios NOTE Figure 2 refers to 18 24 31 43 1 Ratios Continued on Next Page ...

Страница 14: ... 9 Remove the Input Spacer 12 from the unit 10 Remove two Thrust Spacers 15 and Thrust Bearing 16 from the Internal Gear 2 11 Remove Internal Gear 2 from the unit 12 Remove Input Shaft Subassembly from the Hub Spindle Subassembly 13 Take out Input Coupling Subassembly of the Hub Spindle Subassembly This concludes the Main Disassembly ...

Страница 15: ...hers 3B and 3H will slide off the shaft as it is removed 3 Using a hammer and punch drive the Roll Pin 3G out of the Planet Shaft 3E and Carrier 3A 4 Remove first set of Needle Bearings 3C from the inside of the Planet Gear 3F 5 Remove Thrust Washer 3D from Planet Gear 3F 6 Remove second set of Needle Bearings 3C from the inside of the Planet Gear 3F 7 Repeat steps 1 6 for the remaining two Planet...

Страница 16: ...y CAUTION Safety glasses must be worn during this next steps 1 If necessary remove Internal Retaining Ring 20 from the groove of Coupling 19 2 If necessary remove External Retaining Ring 21 from the groove of Coupling 19 This concludes the Coupling Disassembly ...

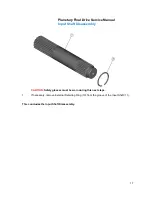
Страница 17: ...Service Manual Input Shaft Disassembly CAUTION Safety glasses must be worn during this next steps 1 If necessary remove External Retaining Ring 10 from the groove of the Input Shaft 11 This concludes the Input Shaft Disassembly ...

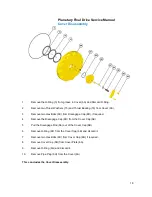
Страница 18: ...lts 6C from Disengage Cap 6D if required 4 Remove the Disengage Cap 6D from the Cover Cap 6B 5 Pull the Disengage Rod 6E out of the Cover Cap 6B 6 Remove O Ring 6F from the Cover Cap 6B and discard it 7 Remove two Hex Bolts 6C from Cover Cap 6B if required 8 Remove Cover Cap 6B from Cover Plate 6A 9 Remove O Ring 6G and discard it 10 Remove Pipe Plug 6H from the Cover 6A This concludes the Cover D...

Страница 19: ...uring these next steps 1 Remove Internal Retaining Ring 9 from the groove of the Spindle 1A 2 Remove Thrust Washer 7 from the spindle 1A 3 Remove Spring 8 from the Spindle 1A 4 Remove Thrust Washer 7 from the Spindle 1A 5 Set the unit on a bench so that the Spindle 1A flange is down Continued on Next Page ...

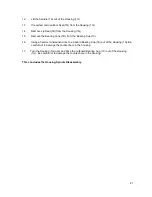
Страница 20: ...move Thrust Washer 1H from the Spindle 1A 9 Remove two Pipe Plugs 1J from the Housing 1G 10 Turn the unit over and carefully place the unit on a support base until the Spindle 1A post rests on it Ensure there is enough gap to lower the Housing 1G down 11 Use a dead blow hammer on the Housing 1G flange to drive the inboard BearingCone 1F off of the Spindle 1A Continued on Next Page ...

Страница 21: ...ng Cone 1D from the Bearing Cup 1C 16 Using a hammer and punch drive the inboard Bearing Cup 1E out of the Housing 1G Be careful not to damage the counter bore in the housing 17 Turn the Housing 1G over and drive the outboard Bearing Cup 1C out of the Housing 1G Be careful not to damage the counter bore in the housing This concludes the Housing Spindle Disassembly ...

Страница 22: ...22 THIS PAGE INTENTIONALLY LEFT BLANK ...

Страница 23: ...23 ASSEMBLY ...

Страница 24: ...used to push the greased O Ring 6F into position in the O Ring groove of the Cover Cap 6B 4 Place Cover Cap 6B into Cover Plate 6A with larger flange hole on Cover Cap 6B located over Pipe Plug 6H Fasten Cover Cap 6B with two Bolts 6C located 180 degrees apart Torque Bolts to 70 80 in lbs 5 Place Disengage Cap 6D on Cover Cap 6B with nipple facing out Secure with twoBolts 6C located 180 degrees ap...

Страница 25: ...e and install Thrust washers 15 and Thrust Bearing 16 into Cover Plate 6A NOTE Thrust Washers 15 has to be assembled onto either sides of Thrust Bearing 16 and then this has to be greased and installed as a single unit into Cover Plate 6A This concludes the Cover Subassembly ...

Страница 26: ...allel to the other rollers into place 3 Place one Spacer 3D on top of the Needle Rollers 3C inside the Planet Gear 3F 4 Install second row of 14 Needle Rollers 3C into the bore of Cluster Gear 3F against Spacer 3D Grease and install Ball Indent Washers 3H onto the counterbores of either sides of Cluster Gear 3F with indents away from the cluster gears 5 Place Carrier 3A into tool fixture so that o...

Страница 27: ...d in the cast slot of Carrier 3A Finish sliding Planet Shaft 3E through the Thrust Washers 3H and 3B and into Carrier 3A 10 Position the chamfered side on the Planet Shaft 3E roll pin hole so that it is in line with the hole in the Carrier 3A using a 1 8 inch diameter punch 11 After using a 3 16 inch punch to align the two roll pin holes Drive the Roll Pin 3G through Carrier 3A and into Planet Sha...

Страница 28: ...into Hub 1G using T148905 with small diameter side up NOTE Apply generous amount of lubricating oil on all bearings at the time of installation 5 Place Bearing Cone 1D on Bearing Cup 1C 6 Press Bearing Seal 1B with the open face down into the Hub 1G be sure seal is flush with the hub face NOTE Generally Seals should not be reused 7 If the unit requires Seal Boot 1Q place on Hub 1G with flange end ...

Страница 29: ... Slowly press Bearing Cone 1F Spacer 1H and Retaining Ring 1I all at once using a Bearing Pressing Tool T137970 untilthe Retaining Ring 1I falls into the retaining ring groove on the Spindle 1A 14 Install Pipe Plug 1J into Hub 1G 15 Grease and install O Ring 5 into Hub 1G 16 Grease and install Thrust Washer 7 into Spindle 1A 17 Install Spring 8 into Spindle 1A until it Bottoms on Thrust Washer 7 1...

Страница 30: ...Safety glasses must be worn during these next steps 1 If necessary install External Retaining Ring 21 into groove on OD of Coupling 19 2 If necessary install Internal Retaining Ring 20 into retaining ring groove of the Coupling 19 This concludes the Coupling Subassembly ...

Страница 31: ...rive Service Manual Input Shaft Subassembly CAUTION Safety glasses must be worn during these next steps 1 If necessary install Retaining Ring 10 onto the groove of Input Shaft 11 This concludes the Input Shaft Subassembly ...

Страница 32: ...32 Planetary Final Drive Service Manual Main Assembly Figure 1 30 35 50 54 73 1 Ratios Figure 2 18 24 31 43 1 Ratios Continued on Next Page ...

Страница 33: ... 4 Slide Thrust Spacer 12 over the Input Shaft 11 Make sure the large end is against the Spindle 1A NOTE Refer to Figure 2 with 18 24 31 43 1 Ratios 5 Place Carrier Subassembly with the large end of Cluster Gears facing up Position all three punch marks on the face of large gears at 12 o clock and secure the gear teeth using timing fixture 6 With longer shoulder side of Ring Gear 4 facing down pla...

Страница 34: ...ed X is aligned with one of shoulder bolt holes in Hub 1G NOTE If the gears do not mesh easily or carrier sub assembly does not rotate freely then remove the Carrier and Ring Gear and check timing Step 5 NOTE Check each Cluster Gear 3F to make sure that the timing punch marks is in line with a tooth on the large end a tooth on the small end of the cluster gear THESE TWO TEETH MUST BE IN LINE WITH ...

Страница 35: ... at least two threads or two full turns before running down and torque to 45 47 ft lbs 15 Place the remaining eight Bolts 17 into the remaining holes and torque to 45 47 ft Lbs 16 Turn the assembly over and insert Input Coupling Subassembly into the Spindle 1A counter bore 17 The unit should now be leak and roll checked as per instructions on page 5 and 6 The motor can be reinstalled into the gear...

Страница 36: ...36 Planetary Final Drive Service Manual Assembly Drawing ...

Страница 37: ...10 STUD 1Q 1 BOOT SEAL 2 1 INTERNAL GEAR 3 1 CARRIER 3A 1 CARRIER 3B 6 WASHER 3C 84 NEEDLE BEARING 3D 3 THRUST WASHER 3E 3 PLANET SHAFT 3F 3 CLUSTER GEAR 3G 3 ROLL PIN 3H 6 BALL INDENT WASHER 4 1 RING GEAR 5 1 O RING 6A 1 COVER PLATE 6B 1 COVER CAP 6C 4 HEX BOLT 6D 1 DISENGAGE CAP 6E 1 DISENGAGE ROD 6F 1 O RING 6G 1 O RING 6H 1 PIPE PLUG 6J 1 ID PLATE 7 2 THRUST WASHER 8 1 SPRING 9 1 INTERNAL RETA...

Страница 38: ...mber Qty Description 12 1 INPUT SPACER 13 1 SUN GEAR 14 1 SPACER 15 4 THRUST WASHER 16 2 THRUST BEARING 17 8 HEX BOLT 18 4 SPECIAL BOLT 19 1 COUPLING 20 1 INTERNAL RETAINING RING 21 1 EXTERNAL RETAINING RING ...

Страница 39: ...39 Planetary Final Drive Repair Instructions Assembly Tools T114920 CRADLE FOR STAKING PLANET PIN PLACE ...

Страница 40: ...40 T122786 PLUG FOR PRESSING IN OIL SEAL ...

Страница 41: ...41 T134344 SNAP RING SEATING TOOL ...

Страница 42: ...42 T137970 TOOL TO PRESS IN BEARING ...

Страница 43: ...43 T148905 ASSEMBLY PRESSING TOOL ...

Страница 44: ...44 T155783 ASSEMBLY PRESSING TOOL ...

Страница 45: ...45 T220225 LEAK TEST ADAPTER PLATE ...

Страница 46: ...46 T201476 LEAK TEST ADAPTER PLATE ...

Страница 47: ...47 T205660 SNAP RING ASSEMBLY TOOL ...

Страница 48: ...48 T223988 ROLL TEST TOOL ...

Страница 49: ...49 T223989 ROLL TEST TOOL ...

Страница 50: ...50 T223990 ROLL TEST TOOL ...

Страница 51: ...51 T223997 ROLL TEST TOOL ...

Страница 52: ...ull service heat treat department Our philosophy of synchronous engineering is a partnership that matches our best and brightest people with your people to evaluate your unique requirements and develop products and assemblies that meet your needs For more information contact Fairfield Manufacturing today Mailing Address Dana Incorporated Off Highway Drive and Motion Technologies 2400 Sagamore Park...

Страница 53: ...53 THIS PAGE INTENTIONALLY LEFT BLANK ...

Страница 54: ...54 Dana Incorporated Off Highway Drive and Motion Technologies 2400 Sagamore Parkway South P O Box 7940 Lafayette IN 47903 USA 765 772 4000 www grazianofairfield com ...

Отзывы: