Daktronics Sportsound Скачать руководство пользователя страница 3

Sportsound Announcer’s Console Quick Start Guide

DD2222114  Rev 0

16 February 2012

201 Daktronics Drive PO Box 5128, Brookings, SD 57006-5128

Tel: 1-800-DAKTRONICS (1-800-325-8766)  Fax: 605-697-4700

Web: www.daktronics.com

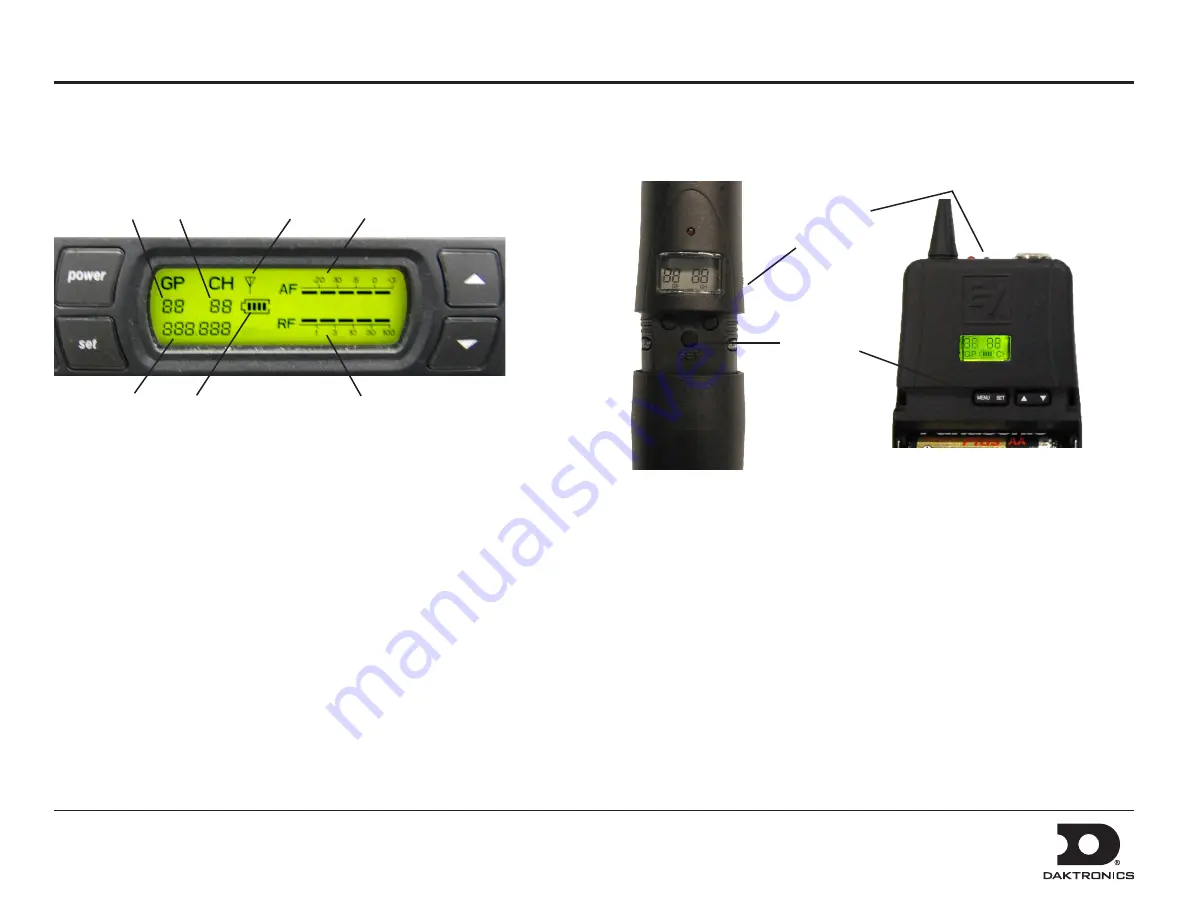
Wireless Receiver Operation

1.

  Press 

POwER

 to turn on the receiver. The display can show the 


     following information:


      a)

  Group Number

      b)

  Channel Number

      c)

  Frequency 

      d)

  Transmitter Battery Status

      e)

  Antenna Diversity Status

      f)

   Audio Meter

      g)

  RF Signal Strength

2.  Perform a ClearScan: 

This function finds the clearest group and 

     channel with the press of a button. With nothing flashing, press

     and hold 

SET 

until “CLEAR SCAN” appears on the right side of

     the screen. When the scan is complete, the receiver will be set to

     the clearest channel in the clearest group.

a

b

c

d

e

f

g

For more information about the optional wireless receiver system operation and troubleshooting, refer to the 

wireless Microphone System User Guide

.

Wireless Microphone or Bodypack Operation

1.

  Open the battery cover to expose the control buttons. Insert new or fully-

     charged batteries prior to each use, and always have spares on hand.

2.

  Power on the unit. 


3.

  Press 

SET

 and use the 

UP/DOwN

 buttons to modify the Group (GP)

     number to match the receiver.


4.

  Press 

SET

 again and modify the Channel (CH) number match the receiver.


5.

  Press 

SET

 a third time to save the settings.

     Note:

 Plug the antenna and mic into the jacks on top of the bodypack unit.

Verify Reception: 

With a transmitter and the receiver both turned on and 


having matching Group and Channel numbers, the main receiver display 


should be indicating an RF signal. Speak into the microphone and the Audio 

Meter should indicate signal presence. 

Power 

ON/OFF

Control 

Buttons

Содержание Sportsound

Страница 1: ...1 5 m XLR cable to the LTIBLOX Laptop Interface and the other end to MIC INPUT 3 The 3 5 mm plug may be connected to the headphone jack of a laptop or MP3 player 4 Locate the 3 prong power cord and plug into a standard outlet Ensure the MIC LIVE LED on the announcer s console is not active and all gain knobs on the mixer are turned down at this time 5 Turn the SOUND SYSTEM switch to ON Power Down ...

Страница 2: ...eak signal indicator LEDs are green and into orange Red LEDs indicate that the signal leaving the mixer is clipped or clipping is imminent Remember Bad input bad output No adjustment on the mixer can make a poor source sound better For best results be sure to use high quality audio files from your MP3 player or laptop and set the device to near full volume DD2222114 Rev 0 16 February 2012 201 Dakt...

Страница 3: ...e clearest group a b c d e f g For more information about the optional wireless receiver system operation and troubleshooting refer to the Wireless Microphone System User Guide Wireless Microphone or Bodypack Operation 1 Open the battery cover to expose the control buttons Insert new or fully charged batteries prior to each use and always have spares on hand 2 Power on the unit 3 Press SET and use...

Страница 4: ...ease this button to deactivate the microphone The MIC LIVE indicator will remain on as long as the button is pressed 6 HEADPHONES jack for headphones 7 MIC 1 XLR output jack to audio mixer 8 AUX 1 XLR input jack from audio mixer 9 POWER INPUT plug in provided 24 VDC wallpack transformer 10 MIC ONLY MIXED AUDIO Located on the bottom of the console this switch determines whether the announcer can he...

Отзывы: