Sportsound SSR-300 Quick Start Guide
4 of 6
DD2222144 Rev 2
05 March 2014
201 Daktronics Drive PO Box 5128, Brookings, SD 57006-5128
Tel: 1-800-DAKTRONICS (1-800-325-8766) Fax: 605-697-4746
Web: www.daktronics.com/support
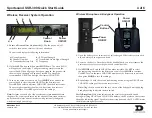
Wireless Receiver System Operation
1.
Ensure all transmitters are powered off.
Flip the power on/off
switch to turn on one receiver if it is not already on.
The unit can display the following information:
a)
Group Number
b)
Channel Number
c)
Transmitter Battery Life
2.
Hold the
SET
button and then press
MODE
once. The word SCAN
will appear on the display. To begin scanning, simply rotate the
control knob. When all groups have been scanned, the group with
the most open channels will appear. Press
SET
to accept the
recommended GROUP and assign the clearest CHANNEL.
3.
Turn on the second receiver unit. Press
MODE
twice and use the
control knob to select the same GROUP
as the first receiver.
Press
SET
and select a different CHANNEL
than the first receiver.
The next highest number should work, but it may be necessary
to select another. Press
SET
again to save the settings.
Note:
Perform a scan on all of the wireless units
just minutes
before
the game! If a scan is performed too far ahead of time, frequencies set
up by the media later on may interfere with previously configured
wireless microphone settings.
a
b
c
e
f
d
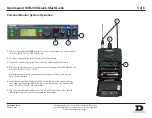
Wireless Microphone & Bodypack Operation
1.
Open the battery cover. Insert new or fully-charged 9V batteries prior to each
use, and always have spares on hand.
2.
Power on the device. Note that with the handheld mic, you must remove the
protective sleeve to access the power and control buttons.
3.
Hold
MODE
until only the GROUP number is visible. Use
SET
to select
the same group number as the first receiver unit. Press
MODE
to continue.
Use
SET
to select the same CHANNEL number as the first receiver unit and
then press
MODE
to save the settings.
4.
Repeat steps 1-3 with the second transmitting device, using the GROUP and
CHANNEL settings of the second receiver unit.
Note:
Plug the mic switch into the jack on top of the bodypack unit and plug
headphones/lapel mic into the mic switch.
Verify Reception:
With a transmitter and the receiver both turned on and
having matching GROUP and CHANNEL numbers, the RF meter on the receiver
should be indicating signal. Speak into the microphone and the TX AUDIO meter
should indicate signal presence.
Power
ON/OFF
Power
ON/OFF
Power
ON/OFF
Control
Knob
Control
Buttons
d)
RF Signal Strength
e)
Transmitted Audio Signal Strength
f)
Frequency


