background image

8

Personal Security Communicator User Manual

Using the App to personalise  

for self-monitoring

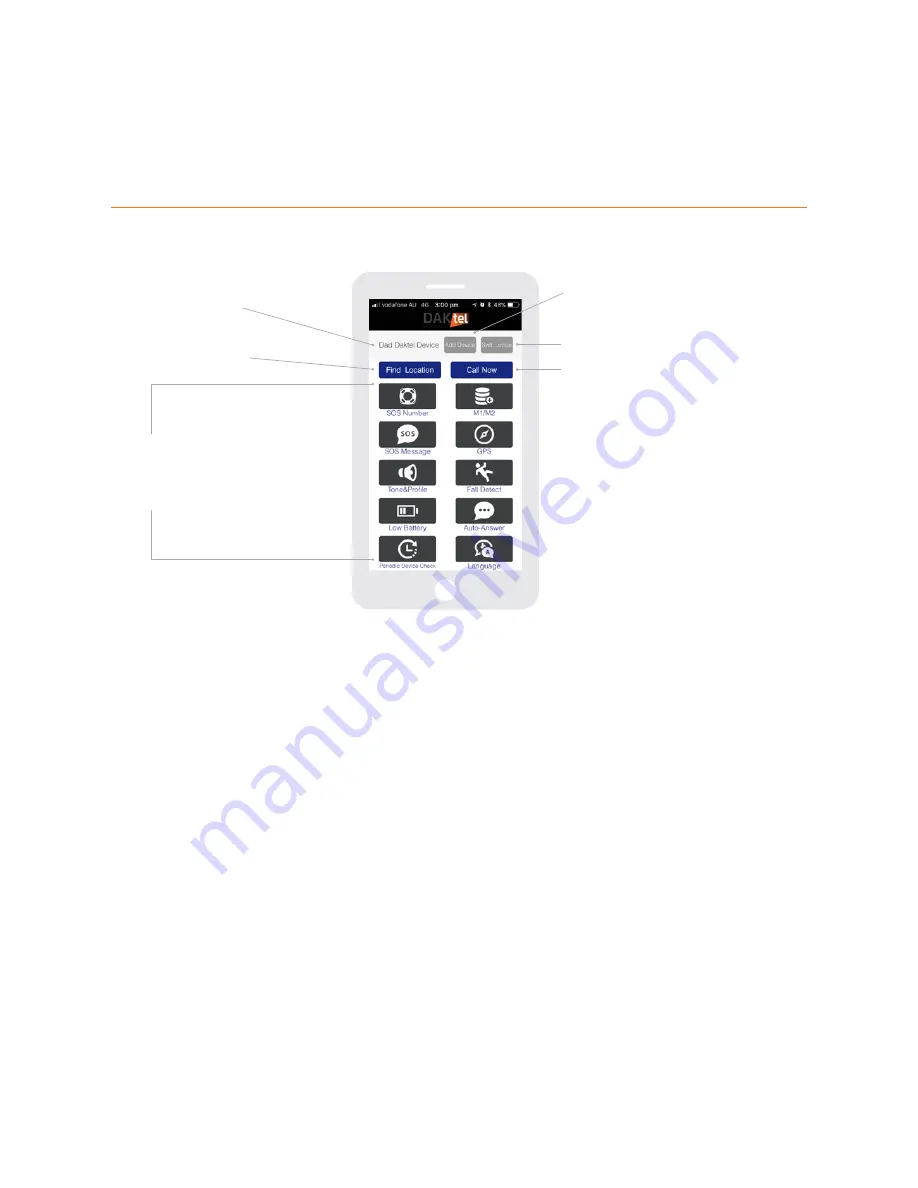
Main screen

Current device in use

Send a text to find the 

location of the device

Adding new devices to the app

Switch between devices in the app
Launch a call to the device

Features

 – click to 

enter the setup for each 

different feature

1.   Add your new Personal Security Communicator mobile 

number into your smartphone contact list (see welcome 

letter/email for mobile number).

2.   Put your device into “admin mode”. With the device off, 

press the ON/OFF button and SOS button simultaneously 

for 2 seconds. The device will turn on, the front LEDs will 

start flashing and a voice will announce the Firmware 

number. You will need to wait until another voice  

confirms the “device is connected”. If this does not happen, 

it may mean the network availability is low in the area, and 

you may need to move the device somewhere it can connect 

to the network.

3.   In the Daktel app on your smartphone, press the “Add 

Device” button. Search for the contact that you previously 

set up in the smartphone, and select it. Click “Add” and  

send a “Go Conecto” message to the device. The device 

will read out your mobile number and you will receive a 

confirmation text.

The device is now paired to this smartphone. If you wish for 

other phones to be able to control and monitor this device,  

you will need to add them into the SOS numbers (Phone 2-7)  

or Memory numbers (M1 & M2).

Find location

This function will launch your smartphone’s messaging system, 

so you can send a text code to the device. Once your text has 

been sent, the Personal Security Communicator will send a 

return text with location details (as long as the device is on,  

has network connectivity and has received a location).

Call device

This function allows you to call directly to the device, it will 

ask you to confirm that you wish to call the Personal Security 

Communicator before automatically launching a phone call.  

If auto answer is enabled, Personal Security Communicator  

will automatically pick up the call for the user.

Switch device

If you have multiple Personal Security Communicators, you 

will need to make sure that you are changing settings for the 

correct device. Press “switch device” to change the current 

Personal Security Communicator (current Personal Security 

Communicator displayed in top left corner).

Note: 

These instructions on page 8-14 only apply to customers who have chosen self-monitoring.

Содержание myhomefone DT8

Страница 1: ...Personal Security Communicator Goes everywhere you go myhomefone com au User Manual Everything you need to know to personalise your self monitoring device...

Страница 2: ...r 5 What do the lights mean 6 Battery performance 6 Setup instructions for self monitored devices 7 Using the App to personalise for self monitoring Main screen 8 SOS number 9 Memory numbers M1 M2 10...

Страница 3: ...3 Personal Security Communicator User Manual What s included Handset Base Belt clip Plug USB cable Lanyard...

Страница 4: ...rsonal Security Communicator Handset Base Red LED Memory Buttons Speed Dial Front LEDs Green LED ON OFF button Blue LED Battery SIM card cover Microphone SOS Button Speaker Charging Contacts Red LED C...

Страница 5: ...eiver will be prompted to accept the emergency call by a voice recording If you have chosen professional monitoring your device will immediately dial our 24 7 call centre and they will assist you The...

Страница 6: ...Ds Charger Red LED Battery performance Low battery When the battery is getting low a voice announcement will be heard from the device to charge the unit The device will send automatic SMS messages thr...

Страница 7: ...g DO NOT pair your device to a smartphone as your device has already been paired to our monitoring system If you are not sure which monitoring option you ordered please check your order confirmation e...

Страница 8: ...to message to the device The device will read out your mobile number and you will receive a confirmation text The device is now paired to this smartphone If you wish for other phones to be able to con...

Страница 9: ...e number again up to 3 times before proceeding to try the next contact This applies to voicemail messages 4 Once the receiver confirms by pressing 5 the 2 way voice call will be opened immediately by...

Страница 10: ...empty field and insert the desired SOS message using your keyboard Mark the SOS numbers that you wish to send to and press Set to send text command Personal Security Communicator will confirm Note The...

Страница 11: ...rmined border for the device so it will alert you when the user leaves the area To select the home location press on the map to leave a pin and then adjust the range scale to the desired amount up to...

Страница 12: ...the fields will be displayed Set You can enable disable the low battery voice warning and set a number to send alerts to when the device is in low battery mode It is recommended to always have this en...

Страница 13: ...t the lowest setting first to reduce the number of false activations then adjust as necessary Get Pressing GETwill show you the history of all fall detection settings Auto answer Set You can set auto...

Страница 14: ...of reports Set The device supports 7 languages which change the language in the app and the voice announcements from the Personal Security Communicator Get Pressing GETwill show you the status and his...

Страница 15: ...is now ready for use If you have any further questions or concerns please go to myhomefone com au or call 1300 031 107 Personal Security Communicator Suite 102 Level 1 100 William Street Woolloomoolo...

Отзывы: