background image


 DM(AG)-H9Q User Manual


Author: MES                              Revised by: MES                              Rev: 08/13/21                              Page 7 of 12 

IX.


MENU SETTINGS 
 
A.


Monitor Menu Settings 


1.


Press the MENU key on the face of monitor or remote.  MENU key a

lso acts as “enter” key once within menu

2.


Use the AV key on the monitor (up and down arrows on remote) to select an item under each section. Selected 
menu items turn blue.  

3.


Use 

 or + on the monitor (left and right arrows on remote) to change the value of the highlighted item.   

4.


To exit: Press the MENU button monitor (left or right arrow on remote) multiple times until the menu goes away. 
Allow monitor to time out (approximately 10 seconds).    


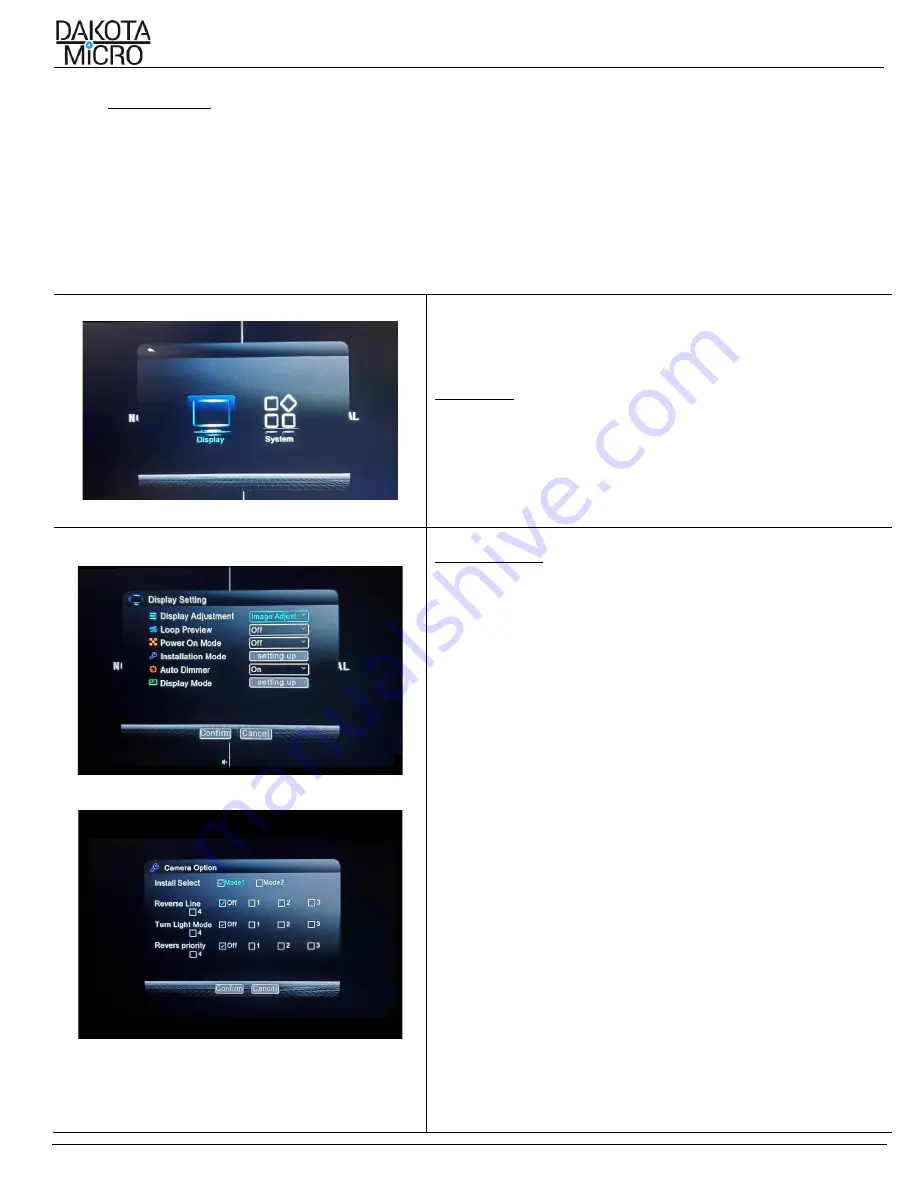
MAIN MENU 
Display:


Adjusts monitor display settings 

System:    


System Settings including time setup                                   


Installation Mode (pictured below) 


DISPLAY SETTING 
DISPLAY ADJUSTMENT

:    When utilizing microphone, allows for noise 


reduction settings 

Scene Mode:                   Adjusts look of entire display 

 highlight, film, 

brilliance, cool, warm, custom. Adjustment of 
brightness, contrast, saturation & hue of 
chosen scene also available 

Image Adjust:                 Allows adjustment of individual cameras 


brightness, contrast, saturation, hue. You can 
also individually flip each camera. 

LOOP PREVIEW: 

Set auto rotation time between screen views


OFF, 3, 5, 8, 10 or 15 seconds


POWER ON MODE: 

Select the default camera view when you 
power on. Select from cameras: 1, 2, 3, 4, ½, ¾, 
H, and Quad


INSTALLATION MODE: 

Choose from more default camera view 
options.


Install Select:                  Mode 1 is regular screen view and Mode 2 flips 

screen upside down.  

Reverse Line:                  Check the boxes of which cameras (or none) 

you’d like to view the reverse guidelines

. Note, 

reverse lines can only be displayed in full 
screen one at a time. 

Turn Light Mode:           N/A 
Reverse Priority:            Select which single camera overrides any other 

trigger event when reversing 

AUTO DIMMER:                 

Mark “On” if you want the monitor to 

automatically dim in low-light conditions


Содержание DM-H9Q

Страница 1: ...ta Micro Inc website for installation training videos at www dakotamicro com Table of Contents I Included Monitor Kit Components 2 II Standard Features 3 III Important Information About Analog AHD 3 I...

Страница 2: ...innovative ability to be quickly moved from one application to the next Description Picture Dakota Micro Inc 9 AHD Quad Monitor Monitor Wire Harness PN DM H9QMWH Monitor Remote PN DM H9QRMT styles va...

Страница 3: ...ng hardware Mounting location is the most important part of the monitor installation as it ensures you the maximum visual benefit from your AgCam system With that said when installing your monitor ens...

Страница 4: ...MAX 3amp blade fuse 2 There is a small glass fuse located on the inside tip of the 12v portion of the power adaptor PN DMAC 12v When replacing this fuse use a MAX 3amp glass fuse VII EVENT TRIGGER WIR...

Страница 5: ...ss displays all four cameras in quad view Second press views all four cameras in H view Adjust viewing options in Display Settings Duration between screen views can be adjusted in Loop Preview under D...

Страница 6: ...te POWER ON give it a few seconds OFF Switches between video channels Displays Menu Navigation Arrows Navigation Arrows Navigation Arrows Navigation Arrows Brings Channel 1 Camera 1 Full screen Brings...

Страница 7: ...reduction settings Scene Mode Adjusts look of entire display highlight film brilliance cool warm custom Adjustment of brightness contrast saturation hue of chosen scene also available Image Adjust All...

Страница 8: ...layed on screen as well as background border colors SYSTEM SETTING LANGUAGE SETTING Select Language POWER SAVING MODE Set Power Saving Mode duration Off 10min 30min 1 hr 2 hr RESTORE FACTORY Restore m...

Страница 9: ...24v Color System NTSC PAL auto switch Operating Temp 30 F 130 F 34 C 54 C Brightness 350cd m2 Resolution HxV 1024 H x600 V Contrast 500 1 Viewing Angle L R 70 Up 50 Down 70 Operating Voltage Min 12v C...

Страница 10: ...oltage may be present and there are no user serviceable parts inside All warranties will be void should any enclosures be tampered with in any way Do not use any harsh chemical solvents cleaning agent...

Страница 11: ...formation RA Number provided by Dakota Micro Technical Support Shipping and associated costs to ship product to DM factory to be borne by the customer unless otherwise specified 5 Customer should mail...

Страница 12: ...orce the rights under this limited warranty the purchaser should follow the steps set forth in the complete Dakota Micro Warranty Repair Policy listed on page 11 section XVI and provide proof of purch...

Отзывы: