background image

Dakota Micro, Inc.                                                                                   


            7MQ Users Manual 

Author: CNR           

              Rev. 09/04/12    


Page 7 of 16 


Once


you


have


attached


the


monitor


to


the


mounting


bracket,


follow


these


steps


to


finalize


the


installation.


1.


With


the


mount


and


monitor


attached,


find


and


mark


the


desired


position


for


the


monitor.


2.


Remove


the


monitor


from


the


mount.


3.


Thoroughly


clean


the


intended


mounting


location


with


alcohol


prep


wipe


or


other


non

oil


based


cleaner.


4.


Remove


the


paper


backing


from


the


stand


and


press


firmly


in


desired


location.


5.


If


mounting


in


other


than


a


flat,


level


location,


use


small


screws


in


the


four


corners


of


the


mounting


bracket


to


permanently


secure.


6.


DO


NOT


expect


that


the


adhesive


will


hold


up


your


monitor


(i.e.


on


the


ceiling


or


side


post


of


a


cab),


it


is


ONLY


intended


to


hold


the


bracket


down

.


7.


Attach


the


monitor


to


the


mount


and


tighten


the


wing


nut.


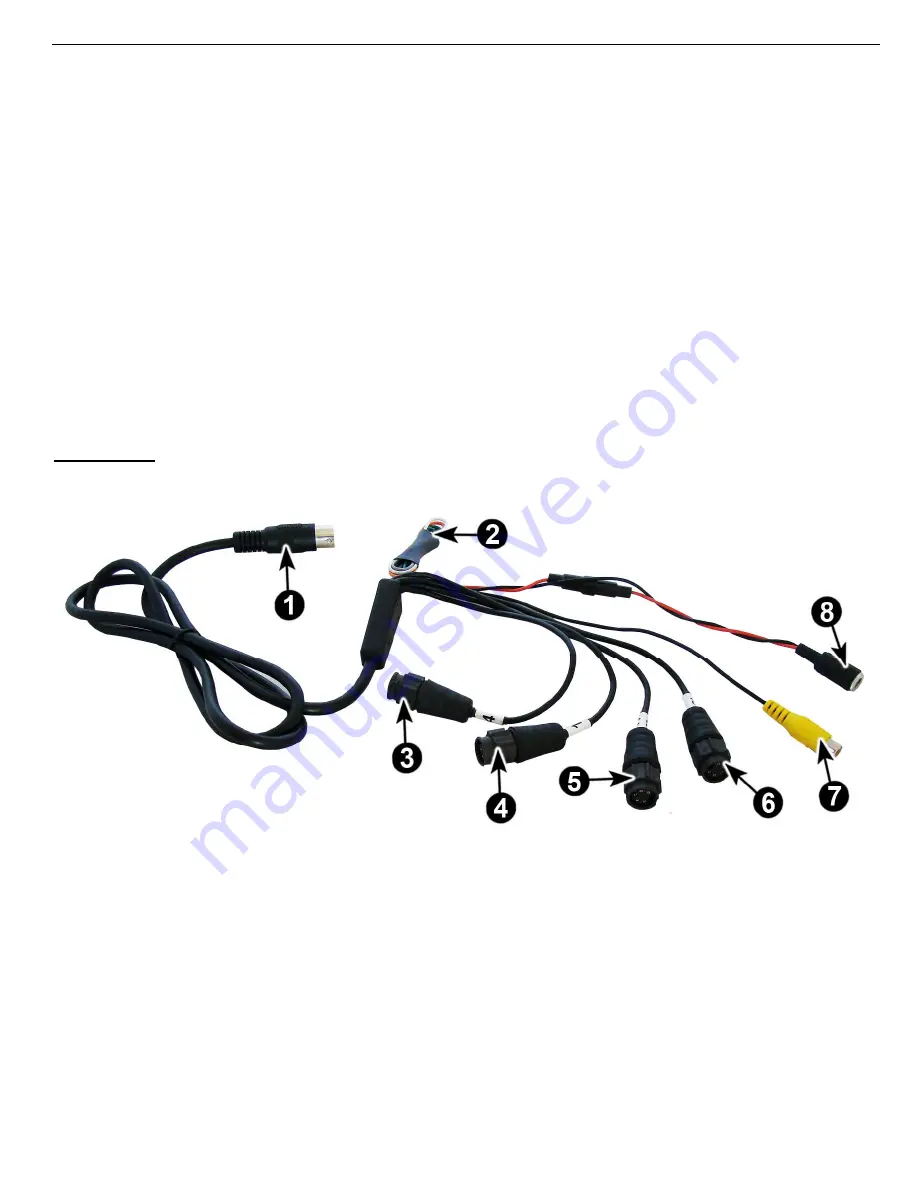
Installation:


1)


Input


to


Monitor


5)


AV2

 ‐ 

Audio/Video


Input


2)


AV1

4


Event


trigger


wires


(details


pg.


8)


6)


AV3

 ‐ 

Video


Input


3)


AV4

 ‐ 

Audio/Video


Input


7)


RCA

Video


Output


4)


AV1

 ‐ 

Audio/Video


Input


8)


Power


Input*


Содержание 7MQ?C1(2)

Страница 1: ...tallation Mounting 4 b Camera function plugs 4 c Cable Installation Mounting 5 6 d Monitor Installation Mounting 6 8 e Trigger Event Operations 8 4 Monitor Remote Operation 8 10 5 Standard Menu Settings 10 12 6 Specifications 13 7 Warranty 14 8 Warnings 15 9 Dealer Information 16 Always read the manuals prior to operating this equipment please follow all safety signs and precautions See DM Website...

Страница 2: ...tor styles vary 3 Monitor Base 4 Monitor sun shield pictured w 5 on monitor 5 9 LCD Quad Monitor w sunshield 6 12v power adaptor 7 A V input harness not pictured Camera Kit Contents per camera kit 1 Camera w bracket magnetic base 2 60 Video Cable 3 20 Video Cable 4 Camera component bag not pictured includes Allen wrench x2 nylon washers x2 retaining screws camera tail ...

Страница 3: ... conditions and becomes completely transparent under low light conditions This lens is also transparent of infrared light allowing the LED s to penetrate even when it is darkened Standard lens features 92 field of view 3 6mm Optional lenses available include 4 3mm 6mm 12mm 16mm A complete lens guide is available on our website at www agcam com or www enduracam com Function plugs on Elite AgCam End...

Страница 4: ...ugs utilize a polarized magnet to change camera functionality 1 IR ON OFF This function plug requires a magnet to allow for the IR LED s to function in low light conditions If you remove the polarized magnet the IR LED s will NOT come on 2 MIR FOR This function requires a magnet to activate deactivate the mirror forward function of the camera Elite cameras are shipped from the factory with the MIR...

Страница 5: ...e MIR Function Plug on the camera so as to accurately represent left and right This will give you the effect of looking in a rear view mirror Camera Warnings NEVER RELY ON YOUR AGCAM ENDURACAM AS A SAFETY FEATURE It is up to your discretion to keep your road travel and other operations safe Your AgCam EnduraCam will provide you with information only based on what it sees Operation of machinery saf...

Страница 6: ...ne d Monitor Installation Mounting Mounting Remove your monitor carefully from packaging and inspect all mounting hardware Mounting location is the most important part of the monitor installation to ensure maximum visual benefit from your AgCam EnduraCam system Keep in mind Least direct sunlight Keeping your monitor out of direct sunlight will prolong the life of the unit as well as ensure optimum...

Страница 7: ...Remove the paper backing from the stand and press firmly in desired location 5 If mounting in other than a flat level location use small screws in the four corners of the mounting bracket to permanently secure 6 DO NOT expect that the adhesive will hold up your monitor i e on the ceiling or side post of a cab it is ONLY intended to hold the bracket down 7 Attach the monitor to the mount and tighte...

Страница 8: ...ires can be attached to any 12V positive event This will cause the monitor to change to that camera regardless of the state of the monitor i e ON OFF or Channel selection The most recent event will be the primary display so if two video channels AV1 AV2 are attached to an event output the one that happens last will change the monitor to its respective camera view The wires can be attached to any p...

Страница 9: ...uration each camera remains on screen is able to be changed in PRESET menu Loop time 5 key To decrease parameter 6 key To increase parameter 7 MENU To switch menu selection press multiple times To go to next icon use 8 AV Key Will exit menu settings and return to camera view 9 POWER Turns monitor ON OFF 11 12 ports located on sides and bottom of monitor 10 USB Port Input for optional cable when us...

Страница 10: ... image on pg 9 or CH1 CH2 CH3 CH4 button on remote Repeatedly pushing the Full Screen button will cycle through the video channels 5 Standard Menu Settings Press the MENU key on the monitor or remote Use the and keys on the monitor or the LEFT and RIGHT arrow keys on the remote to move through the icons at the top of the screen 1 Use the MENU key on the monitor up and down arrows on remote to sele...

Страница 11: ...ra is plugged in RESET Returns settings to default VOLUME VOLUME Adjusts the volume level OPTION CAMERA 1 AV1 event trigger delay time CAMERA 2 AV2 event trigger delay time CAMERA 3 AV3 event trigger delay time CAMERA 4 AV4 event trigger delay time MIRROR Press keys to toggle through options From left to right digits represent camera 1 4 When a 0 is present camera is forward facing When a 1 is pre...

Страница 12: ... default SOURCE Adjusts the AV input source AV1 default PRESET SLEEP Enables sleep timer delay setting in minutes LOOP TIME Allows users to set duration that each individual camera remains displayed on screen when monitor is auto rotating through AV1 AV2 AV3 AV3 Quad Screen VGA Enable ON or Disable OFF VGA input ...

Страница 13: ...rnished Board Lens 3 6mm F2 0 Photogray Body Synchronous System Internal Negative sync Back Light Compensation On Off Switch able Video Output 1 Vp p 75 Ohms Operating Temp 45 F 150 F 42 C 66 C Construction Aluminum Case Waterproofing criteria IP 68 69 Dimensions 53x58 L mm Body Only B LCD Monitor Screen Size 7 16 9 digital panel Overall Size 235 L X155 W X36 5 H mm Weight 600g Power input AC 10 5...

Страница 14: ...ubjected to improper voltage or other misuse abnormal service or handling or which has been altered or modified in design or construction In order to enforce the rights under this limited warranty the purchaser should follow the steps set forth in the complete DM Warranty Repair Policy listed at www dakotamicro com and provide proof of purchase to Dakota Micro Neither the sales personnel of Dakota...

Страница 15: ...photo gray camera lenses have been made impact resistant and have been drop ball tested according to Sec 3 84 21 CRF BUT ARE NOT UNBREAKABLE Because they have been hardened chemically they show no stress pattern Inspect your lenses frequently Chipped or scratched surfaces will reduce protection Such lenses should be replaced by the manufacturer please contact your local dealership for more informa...

Страница 16: ...___ Can We Break It Find out at CanWeBreakIt com Dakota Micro Inc 1 866 462 4226 www agcam com www enduracam com info dakotamicro com 8659 148th Ave SE Cayuga ND 58013 Dakota Micro Inc products specifications pricing and programs are subject to change without prior notice Dakota Micro Inc reserves the right to make design changes at any time without obligation to retroactively install them on prev...

Отзывы: