background image


3.


Specifications


Your  Daken  Finishing  Mower  is  designed  to  cut  a  variety  of  grasses  and  other  ground  covers.  You  take  the 
responsibility if the machine is used for any other purpose. 


The  Finishing Mower consists  of three rotating  shafts  with five three steel blades  attached  to them. The blades 
cut the grass while travelling over the working area. Rotational power to the shaft is provided by  the tractor PTO 
through the gearbox in the center of the machine. 


The Finishing Mower attaches to the 3 point hitch on the tractor. 


4.


Operation


Checking before Operating


Before operating the machine, the following areas should be checked off: 

1


Before starting up the machine, check and lubricate all external grease points and ensure that  all 
lubricated parts inside the machine have been oiled. 

2


Use only an agricultural tractor of horsepower within limits of the machine specified. 

3


Check that the machine is properly attached to the tractor. Be sure retainers are used on the mounting 
pins. 

4


Check the oil level in the gearbox. Add as required. 

5


Check that the tractor PTO shaft turns freely and that the machine drive shaft safety cover can  telescope 
easily. 

6


Check the blades.  Be sure they are not damaged or broken.  Repair or replace as required. 

7


Check and tighten the blade bolts. 

8


Check for entangled material in all rotating parts. Remove this material. 

9


Install and secure all guards, doors and covers before starting. 

10


The chain on the protective parts  of  the universal joint shall be guaranteed in good condition, in case, 
automatic rotation occurs. 


Attaching / Unhooking


The Finishing Mower should always be located on a level, dry area that is free of debris and other foreign objects. 


1.


Remove protective cover from tractor’s PTO shaft, lower link and suspension mechanics of tractor.

  It 

may be necessary to add weight to the 3 point hitch to lower the lift arms. 

2.


Reverse tractor at low speed towards the Finishing Mower and raise the lower links to proper level. 

3.


Connect 

tractor’s

 lower links with Finishing 

Mower’s

 left and right lower suspension pins. Connect the 

tractor’s upper link with Finishing Mower’s upper suspension bracket and insert

 pin. 

4.


Attach the machine drive shaft to the tractor’s PTO shaft, slide the

  universal joint over the shaft and push 

on the universal joint until the lock pin clicks into position. Pull on the universal joint to be sure it is locked 
in position. 

5.


Check the length of the PTO drive shaft, there must be at least two thirds engagement to operate correctly. 

6.


If the drive shaft is too long it may need to be shortened.  

7.


Make sure the machine drive shaft telescopes easily and the shield rotates freely. 

8.


Use the 3 pint hitch to raise the machine from the ground before moving the machine. 

9.


Reverse the above procedure when unhooking the machine from the tractor. 


CAUTION: 

Before attaching the mower to the tractor, the tractor and mower should be turned off.


Содержание DK120

Страница 1: ...1 Finishing Mower DK120 DK150 DK180 Operators Manual Parts List Clark Equipment P L 30 Salisbury Road Hornsby NSW 2077 Phone Toll Free 1800 636 451 ...

Страница 2: ... sitting in the tractor driver s seat and facing in the direction of travel Additional Information and Potential Changes FHM reserves the right to discontinue change and improve its products at any time without notice or obligation to the purchaser The descriptions and specifications contained in this manual were in effect at printing Equipment described within this manual may be optional Some ill...

Страница 3: ...ly further than you think NEVER start or operate your Finishing Mower unless sitting on tractorseat ALWAYS place all controls in neutral lower machine stop PTO and turn off engine before dismountingtractor ALWAYS keep hands feet hair and clothing away from movingparts DON T attempt any adjustment whatsoever while the machine is operating or spinning DON T attempt to clear any obstruction around th...

Страница 4: ...ial 9 Install and secure all guards doors and covers before starting 10 The chain on the protective parts of the universal joint shall be guaranteed in good condition in case automatic rotation occurs Attaching Unhooking The Finishing Mower should always be located on a level dry area that is free of debris and other foreign objects 1 Remove protective cover from tractor s PTO shaft lower link and...

Страница 5: ... following mechanical checks bemade A After operating for hour or after completing 2 acres 1 Check and tighten all nuts bolts and other fasteners 2 Check that the blades are in good condition and swing freely 3 Check the oil level in the gearbox Add as required 4 Check that the machine drive shaft shield turns freely 5 Lubricate all grease points ...

Страница 6: ...he condition of the job being done and set the speed to obtain a quality cutting job and maintain control of the mower Decrease speed if you are producing a ragged cut leaving patches uncut or it is bouncing Routine Service and Maintenance The Daken Finishing Mower is designed to cut grass on a finished surface It is a simple and reliable system that requires minimal maintenance However to prolong...

Страница 7: ...ace any components that are damaged or worn Reattach the drive shaft to the mower it should telescope easily and the guard should turn freely on the shaft Grease if necessary Drive belt Tension adjustment With the tractor switched off and the park brake engaged remover the two covers Loosen the 4 gear box mounting bolts adjust the rear nut to side the gearbox mount forward or back as required 5 Tr...

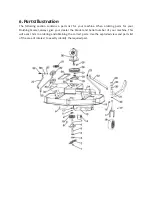
Страница 8: ...ine When ordering parts for your Finishing Mower always give your dealer the Model and Serial number of your machine This will assist him in ordering and obtaining the correct parts Use the exploded view and parts list of the area of interest to exactly identify the required part ...

Страница 9: ......

Отзывы: