background image

IOM 1266-2 • MAGNITUDE

®

 MODEL WME CHILLERS 

18 www.DaikinApplied.com

I

nsTallaTIon

•  water pressure gauge connection taps and gauges at the 

inlet and outlet connections of both vessels for measuring 

water pressure drop.

NOTE: 

This product, in its standard configuration, is 

equipped with a shell and tube evaporator with 

carbon steel shell and copper tubes. The water or 

other fluid used in contact with the wetted surfaces of 

the heat exchangers must be clean and non-corrosive 

to the standard materials of construction. Daikin 

Applied makes no warranty as to the compatibility 

of fluids and materials. Non-compatible fluids may 

void the equipment warranty. If the compatibility of 

the fluid with the standard materials of construction 

is in question, a professional corrosion consultant 

should administer the proper testing and evaluate 

compatibility.

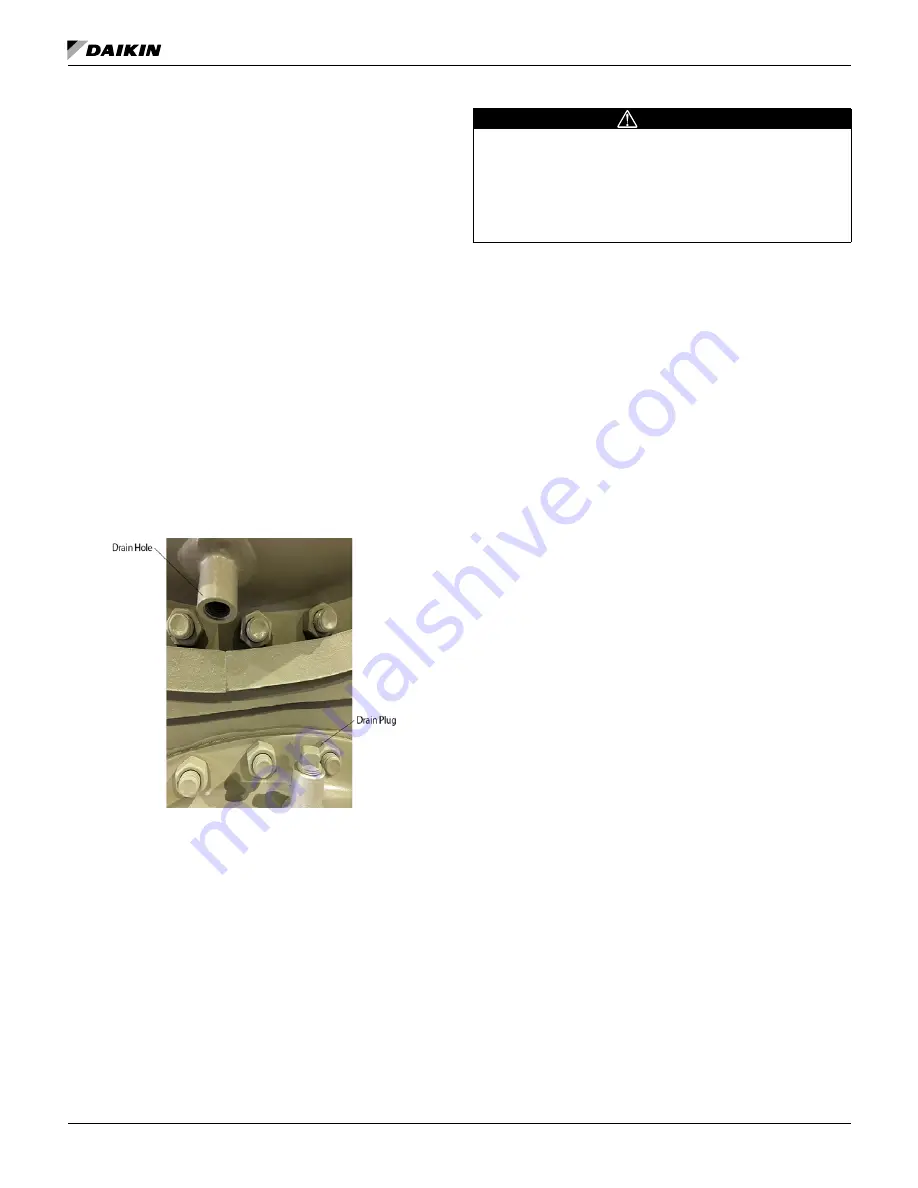
Vessel Drains at Startup

The unit is drained of water at the factory. Units are shipped 

with the drain plug in the top water box drain hole and no plug 

in the bottom drain hole. Drain plugs for each vessel head 

are shipped separately in the control box. Be sure to install 

the bottom drain plugs prior to filling the vessel with fluid. See 

Figure 16.

Figure 16: Drain Plug Installation    

Water Quality Guidelines

The water quality provided by the owner/occupant/operator/

user to a chiller system should minimize corrosion, scale 

buildup, erosion, and biological growth for optimum efficiency 

of HVAC equipment without creating a hazard to operating 

personnel or the environment. Strainers must be used to 

protect the chiller systems from water-borne debris. Daikin will 

not be responsible for any water-borne debris damage or water 

side damage to the chiller heat exchangers due to improperly 

treated water.  

Water systems should be cleaned and flushed prior to chiller 

installation. Water testing and treatment should be verified 

during initial chiller installation/commissioning and maintained 

on a continuous basis by water treatment professionals (see 

Limited Product Warranty).

 WARNING

The improper use of detergents, chemicals, and additives 

in the chiller system water may adversely affect chiller 

performance and potentially lead to repair costs not covered 

by warranty. Any decision to use these products is at the 

discretion of the owner/occupant/operator/user and as such 

they assume full liability/responsibility for any damage that 

may occur due to their use. 

Variable Fluid Flow Rates 

Both excessively high and low fluid flow rates should be 

avoided. Extremely high fluid flow rates and high tube 

velocities will result in high fluid pressure drops, high pumping 

power, and potential tube erosion or corrosion damage. 

Extremely low fluid flow rates and low velocities should also 

be avoided as they will result in poor heat transfer, high 

compressor power, sedimentation and tube fouling. 

If it is decided to vary the evaporator or condenser water flow 

rate, the flow rate should not exceed the minimum or maximum 

limits. Additionally, the rate of change for the evaporator flow 

rate should not exceed 50% of the current value per minute.

Water Volume

All chilled water systems need adequate time to recognize a 

load change to avoid short cycling of the compressors or loss 

of control. The potential for short cycling usually exists when 

the building load falls below the minimum chiller plant capacity 

or on close-coupled systems with very small water volumes.
Assuming that there are no sudden load changes and that 

the chiller plant has reasonable turndown, a rule of thumb 

of “gallons of water volume equal to two to three times the 

chilled water gpm flow rate” is often used. For a more accurate 

determination of minimum system volume, consult Chiller Plant 

Design Application Guide, AG 31-003.
A properly designed storage tank should be added if the 

system components do not provide sufficient water volume.

Water Temperature Guidelines

The maximum temperature of water entering the chiller 

evaporator on standby must not exceed 115°F (46.1°C). 

Maximum temperature entering the evaporator on startup must 

not exceed 90°F (32°C). 

Reducing Condenser Entering Water 

Temperature 

Magnitude

®

 WME chillers can start and run with entering 

condenser water temperatures as low as 40°F (4.4°C). The 

WME chillers can also start and maintain operation with 

inverted conditions, meaning the entering condenser water 

temperature can be lower than the leaving chilled water 

temperature. Contact your local Daikin Applied sales office 

if your application requires a condenser entering water 

temperature lower than 40°F (4.4°C). 

Содержание Magnitude WME Series

Страница 1: ...eration and Maintenance Manual Magnitude Magnetic Bearing Centrifugal Chillers Model WME C vintage 400 to 1600 Tons 1400 to 5600 kW HFC 134a Refrigerant IOM 1266 2 Group Chiller Part Number IOM1266 2...

Страница 2: ...erator Schools 25 Sequence of Unit Operation 25 Unit Enabling Disabling and Overrides 26 Human Machine Interface HMI 27 Alarms 46 Controller Inputs and Outputs 49 Building Automation Systems BAS 51 Us...

Страница 3: ...ols wired Wiring complies with National Electrical Code and local codes See Note 4 Condenser pump starting relay CP1 2 installed and wired See Note 3 Miscellaneous Yes No N A Initials Oil cooled water...

Страница 4: ...Intentionally Left Blank...

Страница 5: ...auxiliary tank a grounding strap must be used An electrical charge builds when halo carbon refrigerant travels in a rubber hose A grounding strap must be used between the auxiliary refrigerant tank a...

Страница 6: ...ility Necessary equipment protection and operating controls are included All Daikin Applied centrifugal chillers must be commissioned by a factory trained Daikin Applied service technician Failure to...

Страница 7: ...rol on page 19 for more information The MicroTech unit controller also communicates with the HMI for graphic display and is located in the unit control panel as shown in Figure 4 The on board compress...

Страница 8: ...g and electrical panels The spreader bar length should be equal to or no more than 1 foot shorter than the distance between the lifting holes located at opposite ends of the chiller The unit will requ...

Страница 9: ...ase Make sure that the floor or structural support is adequate to support the full operating weight of the complete unit The neoprene vibration pads shipped loose in the power panel should be placed u...

Страница 10: ...monic filter will require additional panels than shown in Figure 7 Unit Dimensions and Shipping Weight Figure 7 Representative WME Dimensional Drawing Table 1 WME Overall Dimensions NOTE 1 Unit config...

Страница 11: ...be removed from the unit if the vessels are to be separated Exert the proper precautions before attempting any disassembly assume the condenser isolation valves may have leaked and that any component...

Страница 12: ...or s and vessels receive an inert gas holding charge that must be released prior to attempting to open any connection All free piping ends are capped Blockoffs will cover all compressor and vessel ope...

Страница 13: ...EW E30 C2612 ONLY H26 W27 LEFT VIEW E30 C2612 ONLY FRONT VIEW TYPICAL UNIT REPRESENTATION E30 C30 SHOWN W28 EVAPORATOR TOP VIEW CONDENSER W27 H25 LEFT END VIEW W23 H28 H27 W24 H26 RIGHT END VIEW FRONT...

Страница 14: ...mensional Diagram for Typical WME Knockdown Dual Compressor Models NOTE See page 10 for overall unit length width and height dimensions for WME models LEFT END VIEW H25 W27 FRONT VIEW TYPICAL UNIT REP...

Страница 15: ...Outside Foot Mounting Hole to Center of Suction 2 H25 Height Mounting Foot with Mounting Brackets H26 Height Condenser Tubesheet with Mounting Brackets H27 Height Evaporator Tubesheet with Mounting B...

Страница 16: ...e condenser 4 Ensure that the charge has been removed from the compressor and evaporator and that the discharge check valve is holding the charge in the condenser 5 Loosen and remove bolts on the top...

Страница 17: ...bove freezing Open all valves 14 Perform refrigerant leak check to ensure all connections and fittings are securely fastened Water Piping All evaporators and condensers have OGS type grooved water con...

Страница 18: ...to repair costs not covered by warranty Any decision to use these products is at the discretion of the owner occupant operator user and as such they assume full liability responsibility for any damage...

Страница 19: ...rly closed at startup to restrict water flow which keeps generated heat in the condenser until an acceptable minimum condenser pressure is reached As heat builds the valve will open slowly until a ful...

Страница 20: ...alves prior to making pipe connections Whenever vent piping is installed the lines must be in accordance with local code requirements Where local codes do not apply the latest issue of ANSI ASHRAE Sta...

Страница 21: ...age within 13 and 6 of nameplate voltage and the voltage unbalance between phases must not exceed 2 Since a 2 voltage unbalance will cause a current unbalance of 6 to 10 times the voltage unbalance pe...

Страница 22: ...0 amp circuit breaker frame size has a 35 kA SCCR rating 800 amp circuit breaker frame size has a 50 kA SCCR rating RapidRestore Quickly restores cooling capacity when power is restored after a power...

Страница 23: ...VDC OR 24 230VAC EVAPORATOR PUMP 1 EP1 L1 L2 EP2 EVAPORATOR PUMP 2 CP1 CONDENSOR PUMP 1 CP2 CONDENSOR PUMP 2 TS1 TOWER STAGE 1 TS2 TOWER STAGE 2 L1 L2 L3 CIRCUIT BREAKER BY OTHERS CUSTOMER SUPPLIED PO...

Страница 24: ...SIG CNDP BLK 3 RED RED RED 32 21 PE Address 1 G G0 Vbat U2 U1 U3 GND U4 U5 U6 GND U7 U8 U9 U10 GND NO1 C1 2 NO2 NO3 C3 4 5 NO4 C3 4 5 NO5 NO6 NC6 C6 J1 J2 J10 J11 J12 EHUB J9 5Vref GND Vdc MODBUS ON...

Страница 25: ...load proven Once evaporator flow has been confirmed and the chiller load proven the sequence for starting the compressor will begin 3 Compressor shaft levitation The magnetic bearings are activated a...

Страница 26: ...ty to manage the chiller load until the load increases to the point where another compressor is needed or the load reduces below the minimum capacity of one compressor and the leaving water temperatur...

Страница 27: ...lay port and can be used to view operational data to clear alarms and to change setpoints if necessary If the HMI and the chiller both appear to be inoperable the embedded Chiller PC should be checked...

Страница 28: ...pressor Status shown for each unit compressor 1 only for single compressor units both 1 and 2 for dual compressor units The possible states are shown in Table 12 The bottom icon bar will be visible on...

Страница 29: ...igure 31 Active Alarm Icon Additional HMI View Screens Pressing the Detail Tab on the top of the Home View Screen provides specific unit operating parameters shown in Figure 32 Similarly the Power Tab...

Страница 30: ...IOM 1266 2 MAGNITUDE MODEL WME CHILLERS 30 www DaikinApplied com Operation Figure 33 Power Information Figure 34 Evaporator Information Figure 35 Compressor Details...

Страница 31: ...he startup sequence One can see the requirements light up as they are met and also determine why a non start may have occurred Similarly during the shut down process the sequence transitions back to O...

Страница 32: ...g control source unit mode etc 3 MOTOR selects power related setpoints such as amp limits 4 TOWER selects the method of controlling the cooling tower and sets the parameters for fan staging VFD 5 VALV...

Страница 33: ...ctable text menus rather than numeric values Select the desired option using the dropdown menu that appears on that particular setpoint Toggle between choices using the UP or DOWN button If dashed lin...

Страница 34: ...e reset methods below The current LWT setpoint is Cool LWT as determined by the chiller mode The type of reset in effect is determined by the LWT Reset Type setpoint Reset Type NONE The Active Leaving...

Страница 35: ...ump 2 Primary M Pump Load Balance balances hours between 1 and 2 pumps Pump 1 Only Pump 2 Only use only specified pump Pump 1 Primary and Pump 2 Primary if primary pump fails other pump is used Evapor...

Страница 36: ...Transition Target 1 0 8 to 1 2 T Scaling factor for transitioning compressors based on efficiency curves Nameplate RLA VFD Load Side Factory set Model dependent T Sets the Rated Load Amps RLA per comp...

Страница 37: ...to 20 0 psi O Sets control deadband Cooling Tower Control Lift Valve Deadband Temp 2 0 F 1 0 to 10 0 F O Sets control deadband Cooling Tower Control Temp Valve Target Lift 30 psi 10 to 130 psi O Targe...

Страница 38: ...e five tower control strategies are provided next Cooling Tower Stages on the TOWER Setpoint Screen sets the number of tower stages Strategy I VFD STAGE Default In this mode a VFD controls the first f...

Страница 39: ...7 Strategy II VALVE SP Figure 48 Strategy II VALVE SP Valve Opening vs Temp As shown in Figure 48 the default temperature at which the valve opens completely is 65 F This temperature is the Valve SP a...

Страница 40: ...ge through the use of relays 4 Select Fan Stage Up Time from 1 to 60 minutes The default value of 2 minutes is a good starting point The value may need to be adjusted later depending on actual system...

Страница 41: ...00 Additional fans stage on when the VFD speed reaches the maximum value that was set In addition Figure 54 shows that the default temperature at which the valve opens completely is 65 F This temperat...

Страница 42: ...sets Setpoint Settings Description Default Range PW Comments Evap EWT 0 0 1 5 to 1 5 T Sets the offset for the sensor listed based upon jobsite calibrations Evap LWT 0 0 1 5 to 1 5 T Cond EWT 0 0 1 5...

Страница 43: ...ssure 29 psi 28 to 45 psi T Sets the evaporator pressure value below which the compressor is shut down may need to be lowered if glycol is added to the system If Glycol Enabled is selected minimum may...

Страница 44: ...Of the following limits the one creating the lowest capacity limit is in effect Low Evaporator Pressure If the evaporator pressure approaches within 2 psi above the Low Evaporator Pressure setpoint th...

Страница 45: ...appropriate button respectively For any time period the trend will display the current time beginning on the right of the screen with history flowing to the left When the Unit Control Processor is po...

Страница 46: ...r to keep running Warnings cannot be cleared manually and will be cleared automatically when the issues has been resolved Critical Alarms will always shutoff the chiller and Critical Alarms that do no...

Страница 47: ...history files have been successfully transferred to the USB drive 5 Repeat this process for each desired day of history Each day must be downloaded individually It is not possible to download multipl...

Страница 48: ...compressor controller and the MBC are interrupted Low Suction Pressure Suction Pressure is less than Low Suction Pressure setpoint and Suction Pressure Warning is not active High Discharge Pressure D...

Страница 49: ...si Reset of Leaving Water Temperature Field BAS 4 to 20 mA Current 0 to 100 Demand Limit Field BAS 4 to 20 mA Current 0 to 100 NOTE Sensor Range in Table 25 indicates the range of the input NOT the op...

Страница 50: ...125 C 6 Inlet Guide Vane Position Rotary Transducer 1 5 to 2 6 VDC nominal Closed to Open 7 Motor Winding Temperature 1 NTC Thermistor 10k 25 C 40 to 150 C 8 Motor Winding Temperature 2 NTC Thermistor...

Страница 51: ...enerators are sensitive to the peak current loads of the chiller Although the normal VFD start sequence does not require these peak values of current certain dynamic conditions such as changes in wate...

Страница 52: ...6 highlights the position of the electrical connector and indentation mark on flow switch Figure 66 Flow Switch Details It is required that the flow switch be mounted such that the electrical connecti...

Страница 53: ...the outer LEDs will flash green as shown in Figure 69 Figure 69 Automatic Teach of Setpoint Step 3 After the Teach function is completed and the outer LEDs have flashed the flow switch will indicate...

Страница 54: ...he same procedure is performed to toggle to unlocked NOTE 1 The LED window display on flow switch represents a velocity range of 50 cm s The window centers on the SP For example if the SP was set to 2...

Страница 55: ...or The condenser sensor should be cleaned anytime the condenser is opened This should typically be performed at the annual inspection however more frequent cleaning may be required depending on the co...

Страница 56: ...Unit A Run Test Performance Evaluation X B Leak Test entire unit X X X C General Appearance 1 Paint Corrosion X 2 Insulation X VI Electrical A Check and record line voltage X B Inspect power component...

Страница 57: ...ttempts to prevent low pressure shutdowns by keeping evaporator pressure above the shutdown limit The target low pressure limit is the Low Evap Pressure Stop setpoint plus the Low Evap Pressure Delta...

Страница 58: ...94 112 0 134 210 5 16 15 7 56 52 4 96 115 9 136 216 6 18 17 1 58 54 9 98 120 0 138 222 8 20 18 4 60 57 4 100 124 1 140 229 2 22 19 9 62 60 0 102 128 4 142 235 6 24 21 3 64 62 7 104 132 7 144 242 2 26...

Страница 59: ...EPTIONS 1 If free warranty labor is available as set forth above such free labor does not include diagnostic visits inspections travel time and related expenses or unusual access time or costs require...

Страница 60: ...s sold pursuant to its standard terms and conditions of sale including Limited Product Warranty Consult your local Daikin Applied representative for warranty details To find your local Daikin Applied...

Отзывы: