background image

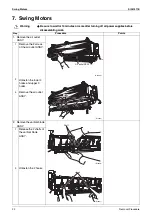
Swing Motors

Si041411E

24

Removal Procedure

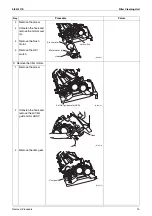
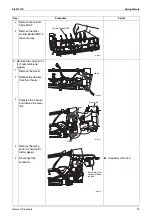
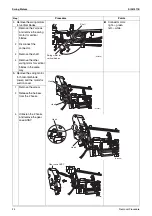
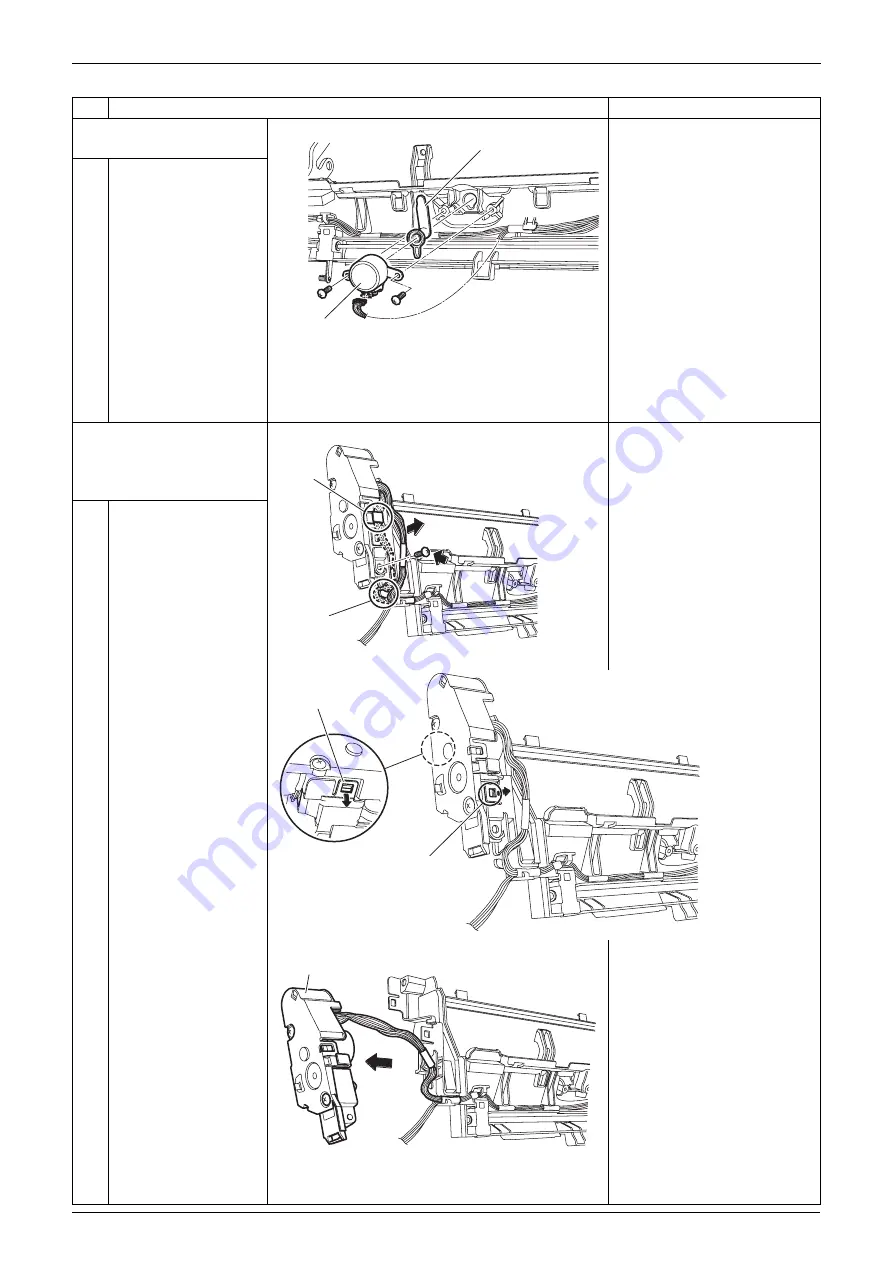
4. Remove the swing motors 

for vertical blades.

„

Connector color:
right 

→ 

green

left 

 white

1

2

3

4

Remove the 2 screws 
and remove the swing 
motor for vertical 
blades.

Disconnect the 
connector.

Remove the shaft.

Remove the other 
swing motor for vertical 
blades in the same 
way.

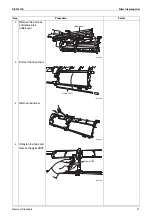
5. Remove the swing motor 

for horizontal blade 
(lower) and the motor for 
suction cover.

1

2

Remove the screw.

Release the harness 
from the 2 hooks.

3

Unfasten the 2 hooks 
and remove the gear 
case ASSY.

Step

Procedure

Points

Swing motor for 
vertical blades

Shaft

(R20728)

Hook

Hook

(R19897)

Hook

(R19898)

Hook

Gear case ASSY

(R19899)

Содержание FTXZ09NV1S

Страница 1: ...REMOVAL PROCEDURE S E R V I C E M A N U A L Indoor Unit Inverter Wall Mounted Type 2 5 3 5 5 0 kW Class 9000 12000 18000 Btu h Class Si041411E...

Страница 2: ...anual Removal Procedure Indoor Unit zHeat Pump FTXZ09NV1S FTXZ12NV1S FTXZ18NV1S FTXZ25NVM FTXZ35NVM FTXZ50NVM FTXZ25NVM4 FTXZ35NVM4 FTXZ50NVM4 FTXZ25NVMM FTXZ35NVMM FTXZ50NVMM FTXZ25NVMV FTXZ35NVMV FT...

Страница 3: ...Streamer Unit Dust Box 3 3 Filters 4 4 Front Grilles Horizontal Blades 5 5 Electrical Box PCBs 9 6 Filter Cleaning Unit 18 7 Swing Motors 22 8 Indoor Heat Exchanger 26 9 Fan Rotor Fan Motor 29 Note T...

Страница 4: ...s before disassembling work Step Procedure Points 1 Appearance features 2 Remove the front panel 1 Open the front panel 2 3 Slide the left rotary shaft to the outside and release it Release the right...

Страница 5: ...ts 1 Remove the streamer unit The streamer unit can be removed without removing the front panel 1 Remove the streamer unit 2 Remove the dust box 1 Slide the right and left knobs on the dust box inward...

Страница 6: ...moving the air filters 1 Pull down the filter holding frame 2 Turn up the display unit 3 4 Pull the air filter downward and remove it Remove the other air filter in the same way 2 Remove the photocata...

Страница 7: ...nutes or more after turning off all power supplies before disassembling work Step Procedure Points 1 Remove the front grille left 1 Open the 2 horizontal blades 2 Remove the 2 screws of the front gril...

Страница 8: ...le right 1 Remove the 3 screws of the front grille right 2 Unfasten the 2 hooks and remove the front grille right 3 Remove the front grille bottom 1 Remove the screw cover with a flat head screwdriver...

Страница 9: ...let cover 4 Unfasten the 8 hooks and remove the front grille bottom If piping work is difficult remove the piping cover and cut the front grille bottom to expand the opening Step Procedure Points R198...

Страница 10: ...and remove the horizontal blade upper 3 4 Release the shaft of the horizontal blade lower in the same way Remove the horizontal blade lower 5 Remove the air inlet cover 1 Release the shafts of the air...

Страница 11: ...ct the connecting wires 1 2 Remove the screw and remove the wire fixture Remove the 4 screws on the terminal board and disconnect the connecting wire 2 Remove the electrical box 1 Remove the screw 2 3...

Страница 12: ...e 3 hooks 7 Disconnect the connectors S41 S44 S46 and release the harnesses from the hook S41 swing motors humidity sensor PCB for humidifying S44 brush motor filter motors limit switch for brush S46...

Страница 13: ...11 9 Unfasten the 3 hooks and lift the filter cleaning unit 10 Remove the earth ground screw 11 Detach the indoor heat exchanger thermistor Step Procedure Points R19841 Filter cleaning unit Hook Hook...

Страница 14: ...trical box a little 13 Disconnect the connector S200 S200 fan motor 14 Remove the electrical box 3 Remove the control PCB 1 2 Remove the shield plate Remove the screw and remove the terminal board The...

Страница 15: ...from the hook S33 humidity sensor PCB for room S52 high voltage unit PCB 6 7 Disconnect the connectors S32 S53 Release the harnesses from the hook S32 indoor heat exchanger thermistor S53 limit switc...

Страница 16: ...motor filter motors limit switch for brush S46 signal receiver display PCB S52 high voltage unit PCB S53 limit switch for streamer S200 fan motor 4 Remove the humidity sensor PCB for room 1 2 Unfaste...

Страница 17: ...tage unit PCB 3 Disconnect the connectors S401 B401 CN403 and remove the high voltage unit PCB S401 for control PCB B401 CN403 streamer 4 Release the harnesses from the hooks 5 Remove the 2 screws and...

Страница 18: ...eceiver display PCB 1 Remove the display unit from the filter cleaning unit 2 Remove the 2 screws on the back of the display unit 3 4 Remove the streamer duct and the mounting plate Unfasten the 5 hoo...

Страница 19: ...S26 S56 S26 INTELLIGENT EYE sensor PCBs S56 control PCB 8 Remove the INTELLIGENT EYE sensors 1 Unfasten the 4 hooks and remove the lamp cover 2 Pinch and remove the INTELLIGENT EYE sensors Step Proce...

Страница 20: ...upplies before disassembling work Step Procedure Points 1 Remove the cleaning unit 1 Remove the 2 screws on the both side 2 Unfasten the center hook 3 Remove the filter cleaning unit 2 Remove the brus...

Страница 21: ...er a Remove the brush motor Remove the limit switch 3 Remove the filter motors 1 Remove the screw 2 Unfasten the hook and remove the air filter guide motor ASSY 3 Remove the cam gear Step Procedure Po...

Страница 22: ...otor cover b 6 Remove the filter motors 4 Remove the peripheral parts 1 Release the shafts on the right and left side and remove the filter holding frame Step Procedure Points R20725 Hook Hook Hook R2...

Страница 23: ...l Procedure 21 2 Remove the 3 screws and remove the undercover 3 Pull out the drive shaft 4 Remove the screw 5 Unfasten the hook and remove the gear ASSY Step Procedure Points Undercover R19881 R19882...

Страница 24: ...bling work Step Procedure Points 1 Remove the air outlet ASSY 1 Remove the 2 screws of the air outlet ASSY 2 3 Unfasten the lower 4 hooks and upper 3 hooks Remove the air outlet ASSY 2 Remove the vert...

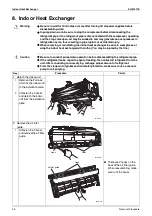
Страница 25: ...orizontal blade upper 1 2 Remove the screw Release the harness from the 3 hooks 3 Unfasten the 5 hooks and remove the cover link 4 5 Remove the swing motor for horizontal blade upper Disconnect the co...

Страница 26: ...the connector Remove the shaft Remove the other swing motor for vertical blades in the same way 5 Remove the swing motor for horizontal blade lower and the motor for suction cover 1 2 Remove the scre...

Страница 27: ...e hook and remove the motor for suction cover Disconnect the connector Connector color red 8 9 Remove the swing motor for horizontal blade lower Disconnect the connector Connector color green Step Pro...

Страница 28: ...u may be injured by the fins Caution Be sure to conduct pump down operation before disassembling the refrigerant pipe If the refrigerant leaks repair the spot of leaking then collect all refrigerant f...

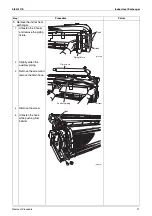
Страница 29: ...ten the 3 hooks and remove the piping fixture 2 3 Slightly widen the auxiliary piping Remove the screw and remove the drain hose 4 5 Remove the screw Unfasten the hook while pushing from behind Step P...

Страница 30: ...Indoor Heat Exchanger Si041411E 28 Removal Procedure 6 Unfasten the hook and remove the indoor heat exchanger Step Procedure Points R19911 Hook Indoor heat exchanger R19912...

Страница 31: ...lies before disassembling work Step Procedure Points 1 Remove the 2 screws and remove the right side panel 2 Remove the 4 screws of the drain pan ASSY 3 Unfasten the hook and remove the drain pan ASSY...

Страница 32: ...et of the motor is united with the fan rotor Be careful not to attract metal waste to the magnet Keep away from the materials that can be affected by magnetic force also 8 Unfasten the 2 hooks and rem...

Страница 33: ...Revision History Month Year Version Revised contents 08 2014 Si041411E First edition...

Страница 34: ...ries supplied or specified by Daikin Ask a qualified installer or contractor to install those parts and accessories Use of unauthorised parts and accessories or improper installation of parts and acce...

Отзывы: