4 User interface
Operation manual
10
EZESHP20 EZLSHP20AUAW1B
Exigo E1500 Trailer Refrigeration Unit
4P726855-1 – 2023.03
Function of the HMI buttons
The physical buttons of the display are divided in two sections:
▪ Commands: All the buttons on the right side are reserved for
basic commands of the unit. The functionality of these buttons
never changes, no matter which page is displayed.
▪ Navigation: All the left side buttons are reserved for navigation
commands. The functionality of these buttons can change
depending on the active page.
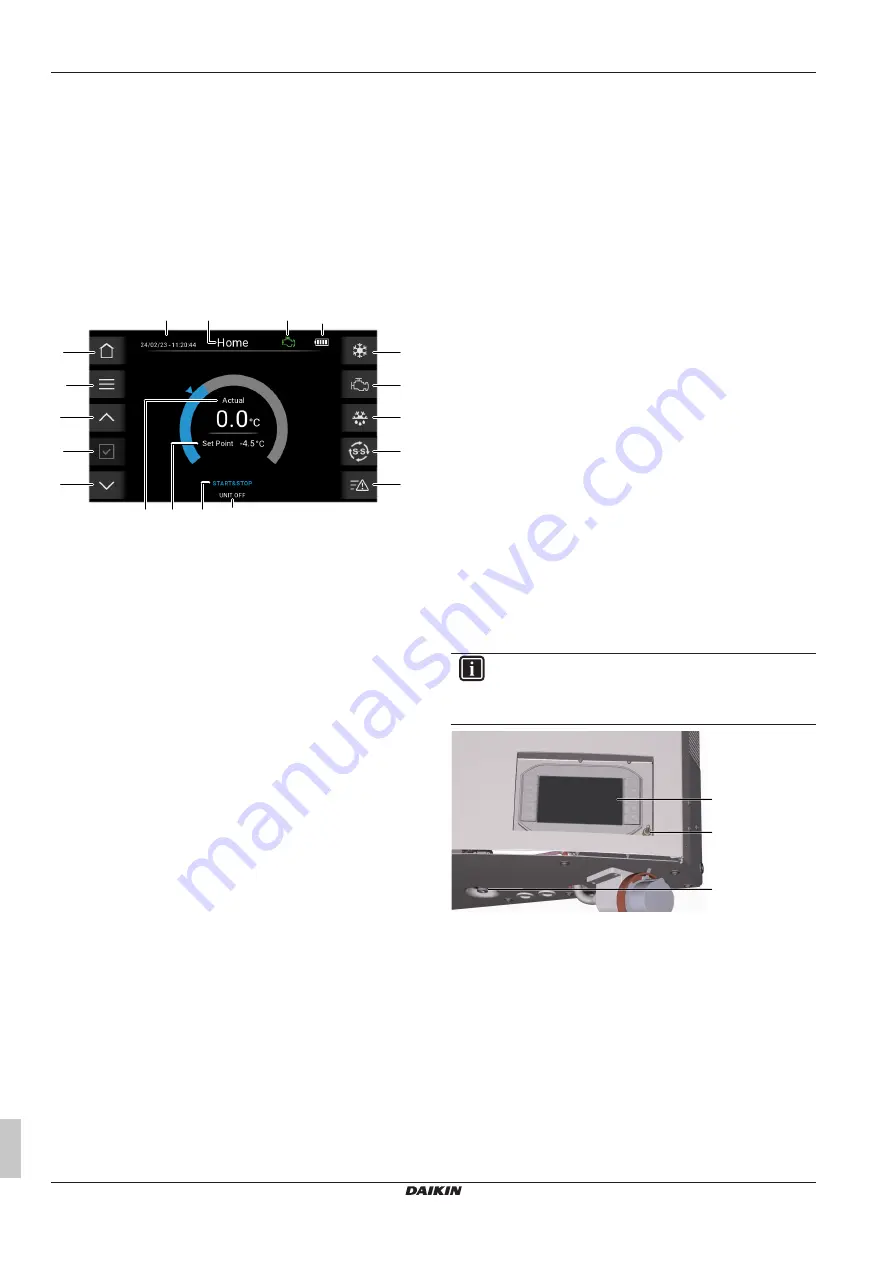
▪ Homepage (n):
Whatever page the HMI is showing, pushing the homepage button
(n) makes the HOME page appear.
All the main information is on the HOME page of the HMI:
i
n
m
l
k
j
c
d
e
f
g
b
a
o
p
q
r
s
On the home page you can see:
▪ Date and time (a).
▪ Page name (b).
▪ Engine condition (o).
▪ Battery condition (p).
▪ Thermoregulation status (c).
▪ Road or grid mode status (d).
▪ Manual defrost status (e).
▪ Start & stop or continuous mode activated (f).
▪ Alarms menu status (g).
▪ Unit status (e.g. UNIT OFF) (i).
▪ Start & stop or continuous mode status (q).
▪ Set point value (e.g. –4.5°C) (r).
▪ Actual temperature inside the cold room (e.g. 0.0°C) (s).
On the home page you can control:
▪ The set point; using the "Up" or "Down" buttons to set, and the
"Enter" button to confirm.
▪ The status of the thermoregulation (c), the road or grid mode
(d), the manual defrost (e) and the start & stop or continuous
mode (f).
▪ Active alarms (g).
▪ Menu (m):
Pushing the Menu button (n) makes the menu page appear. To
enter the page, see
"4.2.7 To go through the menu"
14].
▪ Up arrow (l):
This Push button allows to navigate in the upward direction.
▪ Enter (k):
This Push button allows to select the desired value.
▪ Down arrow (j):
This Push button allows to navigate in the downward direction.
▪ Thermoregulation ON/OFF (c):
This Push button allows to change the thermoregulation status
from ON → OFF and OFF → ON, see
operation mode from ON to OFF"
▪ Road/grid mode selection (d):
This Push button allows to select the desired mode; road or grid.
See
"4.2.6 To select a working mode"
When pressed for a long time, the automatic road mode start-up
function is disabled, see
"4.2.3 To disable automatic road mode
▪ Manual defrost (e):
This Push button allows to activate the defrost operation manually,
see
"4.2.13 To manually start the defrost mode"
▪ Start & stop/continuous (f):
This Push button allows to change the thermoregulation
management, see
"4.2.14 To change the start & stop/continuous
▪ Alarms menu (g):
This Push button allows users to see if there are any active
alarms, see
4.2
Basic functions
4.2.1
To update the HMI and PCB software
There are two ways of updating:
▪ From a USB drive
▪ From telematics
The first way requires the operator to be physically in contact with
the Exigo 1500 to insert the USB drive in the USB Serial Port (a)
situated below the HMI (b).
INFORMATION
Only USB 2.0 flash drives (single partition, formatted as
FAT32) are compatible with the USB Host port. Do not
connect other USB devices. Max 100 mA.
a
b
c
a
HMI
b
ON/OFF switch
c
USB Serial Port
The second way allows remote updating using the interface platform
with the telematics device of the unit.
The procedure for updating itself is the same for both ways.
To update the HMI software:
1
Go to Daikin Business Portal and download the update HMI
software in a .zip format named “UpdatePackage.zip” onto a
USB drive.
2
Turn the unit ON with the ON/OFF switch.
3
Insert the USB drive with the update files for the HMI or the
PCB software into the USB Serial Port of the HMI.


