background image

6 Electrical installation

Installation manual

19

ET9W
Daikin Altherma 3 H HT F
4P644730-1 – 2021.02

A

14

Q4L

13

B

A

B

X5M

13 14

5

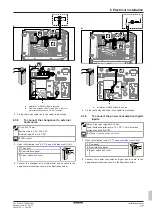
Fix the cable with cable ties to the cable tie mountings.

NOTICE

Make sure to select and install the safety thermostat for the
additional zone according to the applicable legislation.

In  any  case,  to  prevent  unnecessary  tripping  of  the  safety
thermostat, we recommend the following:

▪ The safety thermostat is automatically resettable.

▪ The  safety  thermostat  has  a  maximum  temperature

variation rate of 2°C/min.

▪ There is a minimum distance of 2 m between the safety

thermostat and the 3‑way valve.

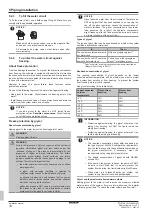
INFORMATION

ALWAYS configure the safety thermostat for the additional
zone  after  it  is  installed.  Without  configuration,  the  indoor
unit will ignore the safety thermostat contact.

6.3.11

To connect a Smart Grid

This topic describes 2 possible ways to connect the indoor unit to a
Smart Grid:

▪ In case of low voltage Smart Grid contacts

▪ In  case  of  high  voltage  Smart  Grid  contacts.  This  requires  the

installation of the Smart Grid relay kit (EKRELSG).

The 2 incoming Smart Grid contacts can activate the following Smart
Grid modes:

Smart Grid contact

Smart Grid operation mode

1

2

0

0

Free running

0

1

Forced off

1

0

Recommended on

1

1

Forced on

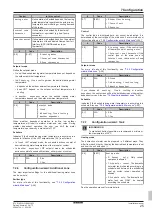
The use of a Smart Grid pulse meter is not mandatory:

If Smart Grid pulse meter is… Then [9.8.8] 

Limit setting kW

is…

Used

([9.A.2] 

Electricity meter 2

 ≠

None

)

Not applicable

Not used

([9.A.2] 

Electricity meter 2

 =

None

)

Applicable

In case of low voltage Smart Grid contacts

Wires (Smart Grid pulse meter): 0.5 mm²

Wires (low voltage Smart Grid contacts): 0.5 mm²

[9.8.4]=3 (

Benefit kWh power supply

 = 

Smart grid

)

[9.8.5] 

Smart grid operation mode

[9.8.6] 

Allow electrical heaters

[9.8.7] 

Enable room buffering

[9.8.8] 

Limit setting kW

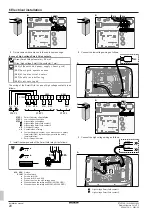
The  wiring  of  the  Smart  Grid  in  case  of  low  voltage  contacts  is  as
follows:

14

13

S11S

6

5

S4S

4

3

X5M

S10S

10

9

a

2

1

a

Jumper (factory-mounted). If you also connect a safety
thermostat (Q4L), replace the jumper with the safety
thermostat wires.

S4S

Smart Grid pulse meter

1

/S10S

Low voltage Smart Grid contact 1

2

/S11S

Low voltage Smart Grid contact 2

1

Open the following (see 

"4.2.1 To open the indoor unit"

 [

4

 6]):

1

Top panel

1

2

3

2

User interface panel

3

Upper switch box cover

2

Connect the wiring as follows:

A

X5M.4
X5M.3

S4S

X5M.10
X5M.9

S10S

X5M.6
X5M.5

S11S

2

1

Содержание ETVZ16S23EA9W

Страница 1: ...https daikintechnicaldatahub eu Installation manual Daikin Altherma 3 H HT F English Installation manual Daikin Altherma 3 H HT F ETVZ16S18EA6V ETVZ16S23EA6V ETVZ16S18EA9W ETVZ16S23EA9W...

Страница 2: ...imi pokyny odpov daj n sleduj c m norm m nebo normativn m dokument m u skladu sa slijede im standardom ima ili drugim normativnim dokumentom ima uz uvjet da se oni koriste u skladu s na im uputama 16...

Страница 3: ...figuration wizard 22 7 2 1 Configuration wizard Language 22 7 2 2 Configuration wizard Time and date 22 7 2 3 Configuration wizard System 22 7 2 4 Configuration wizard Backup heater 24 7 2 5 Configura...

Страница 4: ...NING Field piping method MUST be in accordance with the instructions from this manual See 5 Piping installation 48 WARNING Install the tundish away from any electrical device Possible consequence Elec...

Страница 5: ...underfloor heating in the main zone this is the zone with the lowest water temperature radiators in the additional zone this is the zone with the highest water temperature 4 1 1 Installation site req...

Страница 6: ...the cables from the back of the user interface panel to prevent damage 2 1 1 3 4 X14Y X1A 3 Remove the switch box cover 4 T25 4 If necessary remove the front plate This is for example necessary in the...

Страница 7: ...e pallet and place it on the floor Also see 3 1 2 To handle the indoor unit 45 2 Connect the drain hose to the drain See 4 3 2 To connect the drain hose to the drain 47 3 Slide the indoor unit into po...

Страница 8: ...the water volume and flow rate Minimum water volume Check that the total water volume in the installation is minimum 20 litres the internal water volume of the outdoor unit NOT included NOTICE When ci...

Страница 9: ...o domestic cold water in and domestic hot water out connections These shut off valves are field supplied NOTICE Overpressure bypass valve delivered as accessory We recommend to install the overpressur...

Страница 10: ...nce the presence may lead to the precipitation of certain components in the glycol s corrosion inhibitor NOTICE Glycol absorbs water from its environment Therefore do NOT add glycol that has been expo...

Страница 11: ...ual of the outdoor unit or the installer reference guide 6 Electrical installation DANGER RISK OF ELECTROCUTION WARNING ALWAYS use multicore cable for power supply cables CAUTION Do NOT push or place...

Страница 12: ...aximum length 500 m 2 9 Control 1 6 Room sensor offset Item Description WLAN module See Installation manual of the WLAN module Addendum book for optional equipment Use the cable delivered with the WLA...

Страница 13: ...connect X11Y to X11YB The necessity of separate normal kWh rate power supply to indoor unit b X2M 5 6 depends on the type of preferential kWh rate power supply Separate connection to the indoor unit i...

Страница 14: ...Q1DI a b a Factory mounted cable connected to the contactor of the backup heater inside the switch box K5M b Field wiring see table below Model power supply Connections to backup heater power supply 6...

Страница 15: ...th transistor output check the polarity The positive polarity MUST be connected to X5M 6 and X5M 4 the negative polarity to X5M 5 and X5M 3 1 Open the following see 4 2 1 To open the indoor unit 46 1...

Страница 16: ...P1HBAA is required A Y1 7 B A B 7 9 X2M A4P Y1 YC X1M a b a Installation of EKRP1HBAA is required b Prewiring between X2M 7 9 and Q1L thermal protector backup heater Do NOT change 3 Fix the cable with...

Страница 17: ...2 3 2 User interface panel 3 Upper switch box cover 2 Connect the changeover to external heat source cable to the appropriate terminals as shown in the illustration below A X1 X2 L N B A B A4P X2M X1...

Страница 18: ...ION Installation of a safety thermostat field supply is required for the main zone otherwise the unit will NOT operate NOTICE A safety thermostat MUST be installed on the main zone to avoid too high w...

Страница 19: ...kit EKRELSG The 2 incoming Smart Grid contacts can activate the following Smart Grid modes Smart Grid contact Smart Grid operation mode 1 2 0 0 Free running 0 1 Forced off 1 0 Recommended on 1 1 Force...

Страница 20: ...P 2 Low voltage connections STEP 3 High voltage connections 1 High voltage Smart Grid contact 1 2 High voltage Smart Grid contact 2 a b Coil sides of relays c d Contact sides of relays e Jumper factor...

Страница 21: ...wizard starts to help you configure the system Restart the configuration wizard If the system is already configured you can restart the configuration wizard To restart the configuration wizard go to I...

Страница 22: ...tton to go back to the home screen INFORMATION When you change the overview settings and you go back to the home screen the user interface will show a popup screen and request to restart the system Wh...

Страница 23: ...ure of the user interface only INFORMATION If a heat pump failure occurs and Emergency is set to Manual the room frost protection function the underfloor heating screed dryout function and the water p...

Страница 24: ...have a big impact on the required time for the unit to heat up the domestic hot water tank Capacity step 1 Code Description 9 3 4 6 03 The capacity of the first step of the backup heater at nominal vo...

Страница 25: ...set or custom Code Description 2 1 N A 0 No 1 Yes 7 2 6 Configuration wizard Additional zone The most important settings for the additional leaving water zone can be set here Emitter type For more inf...

Страница 26: ...North wall of the building If the outdoor temperature drops or rises the unit compensates instantly Thus the unit does not have to wait for feedback by the thermostat to increase or decrease the tempe...

Страница 27: ...s of outdoor ambient temperature Item Description Y1 Y2 Y3 Y4 Examples of desired tank temperature or leaving water temperature The icon corresponds to the heat emitter for that zone Underfloor heatin...

Страница 28: ...esented here 7 4 1 Main zone Thermostat type Only applicable in external room thermostat control Following combinations are possible to control the unit not applicable when C 07 0 C 07 2 Room thermost...

Страница 29: ...ctrical heaters Limit setting kW Enable room buffering Allow heater Allow pump 9 Installer settings Configuration wizard Domestic hot water Backup heater Emergency Balancing Water pipe freeze preventi...

Страница 30: ...local supply panel and the indoor unit Between the indoor unit and the valves if applicable Between the indoor unit and the room thermostat if applicable The system is properly earthed and the earth t...

Страница 31: ...the menu go to Stop test run 2 Select OK to confirm INFORMATION If the outdoor temperature is outside the range of operation the unit may NOT operate or may NOT deliver the required capacity To monit...

Страница 32: ...2 06 to 0 and KEEP it disabled until the screed dryout has finished Ignoring this notice will result in cracking of the screed NOTICE For the underfloor heating screed dryout to be able to start make...

Страница 33: ...e main mixed zone a2 Space heating additional direct zone Water OUT screw connection 1 M3S 3 way valve space heating domestic hot water b1 Space heating main mixed zone Water IN screw connection 1 R1T...

Страница 34: ...10 Technical data Installation manual 34 ETVZ16S18 23EA6V 9W Daikin Altherma 3 H HT F 4P644730 1 2021 02 q Loose nut 1...

Страница 35: ...stor External thermistor Heat pump convector Heat pump convector Add LWT Additional leaving water temperature On OFF thermostat wired On OFF thermostat wired On OFF thermostat wireless On OFF thermost...

Страница 36: ...oltage Smart Grid For safety thermostat For safety thermostat For safety thermostat For safety thermostat For smartgrid For Smart Grid Inrush Inrush current Max load Maximum load Normally closed Norma...

Страница 37: ...core 2 core 2 core 2 core 2 core 3 core R2T External sensor floor or ambient Only for KRTETS signal 2 core 3m included A14P P1 P2 user interface Only for Human Comfort Interface Only for KRTR wireles...

Страница 38: ......

Страница 39: ......

Страница 40: ...4P644730 1 2021 02 Copyright 2021 Daikin 4P644730 1 0000000M Verantwortung f r Energie und Umwelt...

Отзывы: