


3
x
Installation
Installation instructions
34
EKSV21P/EKSV26P/EKSH26P
Solar panels on-roof installation
008.1618444_00 – 12/2012
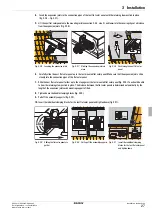
4.
Inside the roof, connect the silicone cable of the solar panel temperature sensor to the input cable of the solar panel
temperature sensor of the regulating and pump unit (
EKSRPS3 or
EKSR3PA).
3.5
Removing the flat solar panel
Solar panel dismantling is carried out basically in the reverse sequence to the solar panel assembly.
3.
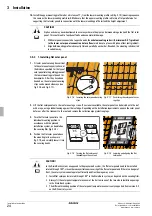
Run the silicone-covered sensor cable to
the roof breakthrough (with drip-off
elbow), and secure it to the mounting rail or
connecting pipe by means of cable ties.
Fig. 3-56 Work step 3 (shown on the Drain-Back system
)
CAUTION!
Moisture can damage the temperature sensor.
• When securing the cable, make sure that no rainwater can run down the cable to the sensor well (installing
with drip-off elbow see fig. 3-57).
WARNING!
Live parts can cause an electric shock on contact and cause life-threatening burns and injuries.
• Before beginning removal work, disconnect all components that are electrically linked to the solar system
(heat generator, solar control, etc.) from the power supply (switch off fuse, main switch) and secure
against unintentional restart.
• Comply with the relevant safety at work regulations.
WARNING!
Danger of burns from hot solar panel couplings and hot solar panel frame.
• Do not touch hot parts.
• Wear protective gloves.
If the flat solar panels are to be separated,
the connection elbows or expansion joints
must first be released as follows:
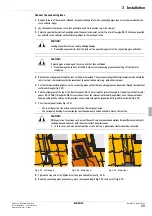
1.
Press the retaining clamps out of the
engagement positions and pull off
(fig. 3-57 and fig. 3-58).
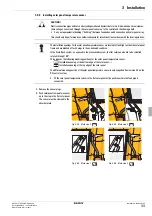
2.
Pull off the connection elbows
(fig. 3-58).
Fig. 3-57 Work step 1
Fig. 3-58 Work step 2


