


3
x
Installation
Installation instructions
30
EKSV21P/EKSV26P/EKSH26P
Solar panels on-roof installation
008.1618444_00 – 12/2012
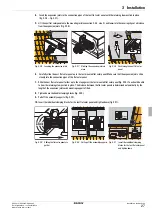
10.
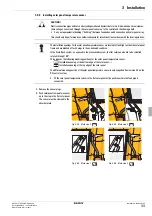
De-burr the ends of the pipes (O-ring protection in push fitting).
11.
Cut the enclosed UV resistant heat insulation pipes to the required length (fig. 3-38).
12.
Slide the thermal insulation sleeves onto the VA Solar system connecting pipes and clinch (fig. 3-39).
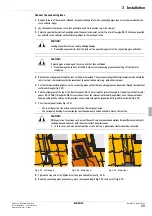
13.
Push the push fittings of the solar panel connection elbows onto feed (at the top of the flat solar panel / VA 15 Solar) or
return flow connection pipe (at the bottom on the flat solar panel / VA 18 Solar) (fig. 3-40).
14.
Insert the solar panel connection elbows in the solar panel connection pipes until the retaining clamps click in place (fig. 3-41).
15.
Slide the clinched thermal insulation hose over the fitting (fig. 3-42).
16.
Insert the end plugs into the open solar panel connection pipes until the retaining clamps click in place (fig. 3-43).
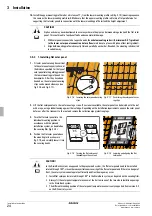
Fig. 3-35 Work step 8
Fig. 3-36 Work step 9- marking
Fig. 3-37 Work step 9- cutting off
Fig. 3-38 Work step 11
Fig. 3-39 Work step 12
Fig. 3-40 Work step 13
Fig. 3-41 Work step 14
Fig. 3-42 Work step 15
Fig. 3-43 Work step 16
In order to protect the VA Solar system connecting pipes from excess temperatures, the flow and return fittings
are equipped with thermal separation.