


4.
To stop operation, press
.
Result:
and
disappear from the LCD and
the timer lamp goes off. and the day of the week are
displayed on the LCD.
4-5-3 To combine OFF timer and ON timer
1.
To set the timers, refer to “4-5-1 To start/stop OFF timer
operation” on page 11 and “4-5-2 To start/stop ON timer
operation” on page 11.
Result:
and
are displayed on the LCD.
Example:
Display
Current time
Set while…
Operation…
6:00
the unit is
operating.
stops at 7:00
and starts at
14:00.
the unit is NOT
operating.
starts at 14:00.
Note:
If the timer setting is active, the current time is NOT
displayed on the LCD.
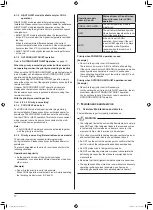
4-6 Weekly timer operation
With this operation, you can save up to 4 timer settings for each
day of the week.
Example:
Create a different setting from Monday to Friday and
a different setting for weekends.
Day of the week
Setting example
Monday
•
Make up to 4 settings.
6:00
8:30
17:30
25°C
27°C
22:00
1
2
3
4
ON
OFF
ON
OFF
Tuesday~Friday
•
Use the copy mode
if the settings are the
same as for Monday.
6:00
8:30
17:30
25°C
27°C
22:00
1
2
3
4
ON
OFF
ON
OFF
Saturday
•
No timer setting
—
Sunday
•
Make up to 4 settings.
8:00 10:00
19:00 21:00
27°C
27°C
25°C
ON
OFF
OFF
ON
1
2
3
4
•
ON-ON-ON-ON setting
. Enables scheduling the operation
mode and set temperature.
•
OFF-OFF-OFF-OFF setting
. Only the turn off time can be
set for each day.
Note:
Be sure to aim the remote controller at the indoor unit
and check for a receiving tone when setting the Weekly timer
operation. See “2-2-3 To operate the remote controller” on page 5.
INFORMATION
The clock MUST be set correctly before using any timer
functions. Refer to “3-3-1 To set the clock” on page 6.
INFORMATION
•
Weekly timer and ON/OFF timer operation CANNOT be
used at the same time. The ON/OFF timer operation takes
priority. Weekly timer will be in standby,
disappears
from the LCD. When the ON/OFF timer is completed, the
Weekly timer becomes active.
•
The day of the week, ON/OFF timer mode, time and
temperature (only for ON timer) can be set with the Weekly
timer. Other settings are based on previous ON timer setting.
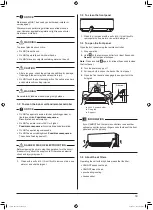
4-6-1 To set Weekly timer operation
1.
Press
.
Result:
The day of the week and the reservation number
of the current day are displayed.
2.
Press
or
to select the day of the week and the
reservation number.
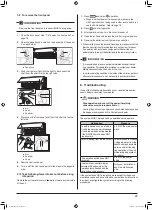
3.
Press
.
Result:
The day of the week is set.
and
blink.
4.
Press
or
to select the mode.
Result:
The setting will change as follows:
Display
Feature
ON timer
OFF timer
Blank
Deletes reservation
5.
Press
.
Result:
The ON/OFF timer mode is set.
and the
time blink.
Note:
: Press
to return to the previous screen. If blank
is selected, continue to step 9.
6.
Press
or
to select the time. The time can be set
between 0:00~23:50 in 10 minute intervals.
7.
Press
.
Result:
The time is set and
and the temperature
blink.
Note:
Press
to return to the previous screen. If OFF
timer is selected, continue to step 9.
12
01_EN_3P620957-1.indd 12
26-Jun-20 10:17:37 AM


