background image

15

 | 

Technical data

Installer reference guide

241

EPRA14~W1 + ETVH/9W(G)
Daikin Altherma 3 H HT F
4P587502-1 – 2019.07
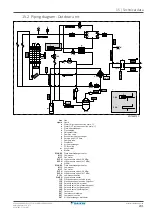
S1S

# Preferential kWh rate power supply contact

S2S

# Electricity meter pulse input 1

S3S

# Electricity meter pulse input 2

S6S~S9S

* Digital power limitation inputs

SS1 (A4P)

* Selector switch

TR1

Power supply transformer

X6M

# Backup heater power supply terminal strip

X*, X*A, X*Y, Y*

Connector

X*M

Terminal strip

* Optional
# Field supply

Translation of text on wiring diagram

English

Translation

(1) Main power connection

(1) Main power connection

For preferential kWh rate power supply For preferential kWh rate power supply

Indoor unit supplied from outdoor

Indoor unit supplied from outdoor

Normal kWh rate power supply

Normal kWh rate power supply

Only for normal power supply
(standard)

Only for normal power supply
(standard)

Only for preferential kWh rate power
supply (outdoor)

Only for preferential kWh rate power
supply (outdoor)

Outdoor unit

Outdoor unit

Preferential kWh rate power supply
contact: 16 V DC detection (voltage
supplied by PCB)

Preferential kWh rate power supply
contact: 16 V DC detection (voltage
supplied by PCB)

SWB1

Switch box

Use normal kWh rate power supply for
indoor unit

Use normal kWh rate power supply for
indoor unit

(2) Backup heater power supply

(2) Backup heater power supply

Only for ***

Only for ***

(3) User interface

(3) User interface

Only for LAN adapter

Only for the LAN adapter

Only for remote user interface HCI

Only for the dedicated Human Comfort
Interface (BRC1HHDA used as room
thermostat)

SWB1

Switch box

(5) Ext. thermistor

(5) External thermistor

SWB1

Switch box

(6) Field supplied options

(6) Field supplied options

12 V DC pulse detection (voltage
supplied by PCB)

12 V DC pulse detection (voltage
supplied by PCB)

Содержание Altherma 3 H HT F Series

Страница 1: ...rma 3 H HT F EPRA14DAV3 EPRA16DAV3 EPRA18DAV3 EPRA14DAW1 EPRA16DAW1 EPRA18DAW1 ETVH16S18DA6V G ETVH16S23DA6V G ETVH16S18DA9W G ETVH16S23DA9W G ETVX16S18DA6V G ETVX16S23DA6V G ETVX16S18DA9W G ETVX16S23...

Страница 2: ...ble options for the outdoor unit 23 4 3 3 Possible options for the indoor unit 24 5 Application guidelines 27 5 1 Overview Application guidelines 27 5 2 Setting up the space heating cooling system 28...

Страница 3: ...7 2 3 To connect the water piping 80 7 2 4 To connect the recirculation piping 82 7 2 5 To fill the water circuit 83 7 2 6 To protect the water circuit against freezing 83 7 2 7 To fill the domestic h...

Страница 4: ...3 1 Yearly maintenance outdoor unit overview 209 12 3 2 Yearly maintenance outdoor unit instructions 209 12 3 3 Yearly maintenance indoor unit overview 209 12 3 4 Yearly maintenance indoor unit instr...

Страница 5: ...H HT F 4P587502 1 2019 07 14 1 To recover refrigerant 227 15 Technical data 229 15 1 Service space Outdoor unit 230 15 2 Piping diagram Outdoor unit 231 15 3 Piping diagram Indoor unit 233 15 4 Wiring...

Страница 6: ...nt topics follow them carefully The installation of the system and all activities described in the installation manual and in the installer reference guide MUST be performed by an authorised installer...

Страница 7: ...means Table 3 in chapter 1 1 2 For the installer 1 2 1 General If you are NOT sure how to install or operate the unit contact your dealer DANGER RISK OF BURNING Do NOT touch the refrigerant piping wat...

Страница 8: ...t least following information MUST be provided at an accessible place at the product Instructions for shutting down the system in case of an emergency Name and address of fire department police and ho...

Страница 9: ...xygen deficiency Toxic gas may be produced if refrigerant gas comes into contact with fire DANGER RISK OF EXPLOSION Pump down Refrigerant leakage If you want to pump down the system and there is a lea...

Страница 10: ...entering into the system Charge the liquid refrigerant as follows If Then A siphon tube is present i e the cylinder is marked with Liquid filling siphon attached Charge with the cylinder upright A si...

Страница 11: ...with EU directive 98 83 EC 1 2 6 Electrical DANGER RISK OF ELECTROCUTION Turn OFF all power supply before removing the switch box cover connecting electrical wiring or touching electrical parts Discon...

Страница 12: ...ore the current carrying connections are established When disconnecting the power supply the current carrying connections must be separated before the earth connection is The length of the conductors...

Страница 13: ...icable if the power supply is three phase and the compressor has an ON OFF starting method If there exists the possibility of reversed phase after a momentary black out and the power goes on and off w...

Страница 14: ...basic and advanced usage Format Digital files on http www daikineurope com support and manuals product information Installation manual Outdoor unit Installation instructions Format Paper in the box o...

Страница 15: ...utions Navigator registration to the Stand By Me platform is required For more information see https professional standbyme daikin eu Daikin e Care Mobile app for installers and service technicians th...

Страница 16: ...hat to do and know to configure the system after it is installed Commissioning What to do and know to commission the system after it is configured Hand over to the user What to give and explain to the...

Страница 17: ...t 21 3 1 Overview About the box This chapter describes what you have to do after the boxes with the outdoor and indoor unit are delivered on site Keep the following in mind At delivery the unit MUST b...

Страница 18: ...W G Daikin Altherma 3 H HT F 4P587502 1 2019 07 Forklift or pallet truck Enter the pallet from the heavy side 3 persons After unpacking carry the unit using the slings attached to the unit See also 3...

Страница 19: ...3 About the box Installer reference guide 19 EPRA14 18DAV3 W1 ETVH X16S18 23DA6V 9W G Daikin Altherma 3 H HT F 4P587502 1 2019 07 3 2 2 To unpack the outdoor unit 1 2 3 5 4 a b a b Accessories...

Страница 20: ...with integrated filter b O ring for drain socket c Drain socket d Thermistor fixture for installations in areas with low ambient temperatures e Installation manual Outdoor unit f Disposal manual Recov...

Страница 21: ...l safety precautions d Addendum book for optional equipment e Indoor unit installation manual f Operation manual g Sealing rings for shut off valves space heating water circuit h Sealing rings for fie...

Страница 22: ...outdoor unit 23 4 3 3 Possible options for the indoor unit 24 4 1 Overview About the units and options This chapter contains information about Identifying the outdoor unit Identifying the indoor unit...

Страница 23: ...ing 16 Capacity class S Integrated tank material Stainless steel 23 Integrated tank volume DA Model series 6V Backup heater model G G Grey model White model 4 3 Combining units and options 4 3 1 Possi...

Страница 24: ...wireless thermostat EKRTETS You can use a wireless indoor temperature sensor EKRTETS only in combination with the wireless thermostat EKRTR1 For installation instructions see the installation manual o...

Страница 25: ...nit and a PC It gives the possibility to update the software of the indoor unit For installation instructions see the installation manual of the PC cable Heat pump convector FWXV FWXT FWXM For providi...

Страница 26: ...ly model to a reversible model For installation instructions see the installation manual of the conversion kit Human Comfort Interface BRC1HHDA used as room thermostat The Human Comfort Interface HCI...

Страница 27: ...rate power supply 47 5 5 4 Preferential kWh rate power supply 49 5 6 Setting up the power consumption control 49 5 6 1 Permanent power limitation 50 5 6 2 Power limitation activated by digital inputs...

Страница 28: ...m frost protection However the room frost protection is only possible if C 2 Space heating cooling On INFORMATION In case an external room thermostat is used and room frost protection needs to be guar...

Страница 29: ...higher comfort and higher efficiency Lowest possible leaving water temperature higher efficiency Easy You can easily set the desired room temperature via the user interface For your daily needs you c...

Страница 30: ...ON OFF signals it is specifically designed for the heat pump system Comfort In case of underfloor heating the wireless external room thermostat prevents condensation on the floor during cooling operat...

Страница 31: ...e zone Main External room thermostat for the main zone 2 A Code C 05 1 1 contact When the used external room thermostat or heat pump convector can only send a thermo ON OFF condition No separation bet...

Страница 32: ...space operation mode is sent by one digital output X2M 4 and X2M 3 on the indoor unit to The heat pump convectors The shut off valve Configuration Setting Value Unit temperature control 2 9 Code C 07...

Страница 33: ...cated Human Comfort Interface BRC1HHDA used as room thermostat For more information about connecting the electrical wiring to the unit see 8 2 Connections to the outdoor unit 492 8 3 Connections to th...

Страница 34: ...ee reliable operation provide a minimum water flow as described in table To check the water volume and flow rate in 7 1 Preparing water piping 474 The user interface integrated in the indoor unit deci...

Страница 35: ...of the heat pump convectors The installation manual of the heat pump convector options The addendum book for optional equipment The user interface integrated in the indoor unit decides the space opera...

Страница 36: ...A shut off valve to prevent hot water supply when the room has no heating demand A shut off valve to prevent condensation on the floor during cooling operation of the rooms with heat pump convectors...

Страница 37: ...perature in heating and the highest design temperature in cooling Additional zone Zone with the highest design temperature in heating and the lowest design temperature in cooling CAUTION If there is m...

Страница 38: ...tion This is to guarantee the correct water flow balance between the main leaving water temperature zone and the additional leaving water temperature zone in relation to the required capacity of both...

Страница 39: ...the space operation mode Mind that the operation mode on each controller of the heat pump convectors must be set to match the indoor unit Configuration Setting Value Unit temperature control 2 9 Code...

Страница 40: ...or unit An auxiliary boiler field supply connected to the system When the room thermostat requests heating the indoor unit or the auxiliary boiler starts operating depending on the outdoor temperature...

Страница 41: ...ntroller to maximum 60 C Install an aquastat valve in the return water flow of the heat pump Set the aquastat valve to close above 60 C and to open below 60 C Install non return valves Make sure to on...

Страница 42: ...or Indoor unit Auto Automatic Boiler Boiler NOTICE Make sure the auxiliary contact has enough differential or time delay to prevent frequent changeover between indoor unit and auxiliary boiler If the...

Страница 43: ...r example 15 C Selecting the volume and desired temperature for the DHW tank consists of 1 Determining the DHW consumption equivalent hot water volume at 40 C 2 Determining the volume and desired temp...

Страница 44: ...you can lower the desired DHW tank temperature The heat pump itself can produce domestic hot water of maximum 55 C 50 C if outdoor temperature is low The electrical resistance integrated in the heat...

Страница 45: ...r IN b Hot water OUT shower field supply c DHW pump field supply d Recirculation connection By connecting a DHW pump instant hot water can be available at the tap The DHW pump and the installation are...

Страница 46: ...int you can connect a DHW pump and heater element if needed as shown above Configuration The indoor unit can control DHW pump operation For more information see 9 Configuration 4116 5 5 Setting up the...

Страница 47: ...a measure the capacity resistance measurement and set the capacity via the user interface for the backup heater step 1 Measuring the consumed energy Preferred method because of higher accuracy Require...

Страница 48: ...a Electrical cabinet L1 L2 L3 N b Power meter L1 L2 L3 N c Fuse L1 L2 L3 N d Fuse L1 N e Outdoor unit L1 L2 L3 N f Indoor unit L1 L2 L3 N g Backup heater L1 L2 L3 N Exception You can use a second pow...

Страница 49: ...r unit Power meter 2 In case of a single phase backup heater configuration use a single phase power meter In other cases use a three phase power meter Example Single phase outdoor unit with a three ph...

Страница 50: ...ntrols If you do so the unit uses the most restrictive control NOTICE It is possible to install a field fuse with lower than recommended rating over the heat pump For this you must modify field settin...

Страница 51: ...by limiting one of the following Current in A Power input in kW The energy management system field supply decides the activation of a certain power limitation level Example To limit the maximum power...

Страница 52: ...limited and turned OFF first The system limits power consumption in the following order 1 Turns OFF the backup heater 2 Limits the outdoor unit 3 Turns OFF the outdoor unit Example If the configurati...

Страница 53: ...o use an external temperature sensor in the following cases Indoor ambient temperature In room thermostat control the dedicated Human Comfort Interface BRC1HHDA used as room thermostat measures the in...

Страница 54: ...tdoor unit is active see Power saving function 4192 the outdoor unit is turned down to reduce standby energy losses As a result the outdoor ambient temperature is NOT read out If the desired leaving w...

Страница 55: ...3 5 To provide drainage 66 6 3 6 To install the discharge grille 68 6 3 7 To remove the discharge grille and put the grille in safety position 69 6 4 Mounting the indoor unit 71 6 4 1 About mounting...

Страница 56: ...outlet Do NOT install the unit in the following places Sound sensitive areas e g near a bedroom so that the operation noise will cause no trouble Note If the sound is measured under actual installatio...

Страница 57: ...frigerant circuit R32 but you do NOT have to do any refrigerant field piping or refrigerant charging Mind the following requirements and precautions WARNING Do NOT pierce or burn Do NOT use means to a...

Страница 58: ...it is very important to select an installation site where the snow will NOT affect the unit If lateral snowfall is possible make sure that the heat exchanger coil is NOT affected by the snow If necess...

Страница 59: ...he unit Take the weight of the unit with a domestic hot water tank full of water into account Make sure in the event of a water leak water cannot cause any damage to the installation space and surroun...

Страница 60: ...vibration or noise may be generated The transportation stays 2 protect the unit during transport During installation they must be removed a a Transportation stays 2 1 Open the switch box cover See 6...

Страница 61: ...nit Overview 1 2 4 3 5 1 Top panel 2 User interface panel 3 Switch box cover 4 Front panel 5 High voltage switch box cover Open 1 Remove the top panel 5 T25 2 Remove the user interface panel Open the...

Страница 62: ...box cover 4 T25 4 If necessary remove the front plate This is for example necessary in the following cases 6 2 6 To lower the switch box on the indoor unit 463 6 4 4 To connect the drain hose to the...

Страница 63: ...you will need access to the inside of the indoor unit To have easier front access put the switch box lower on the unit as follows Prerequisite The user interface panel and front panel have been remove...

Страница 64: ...an connect the water piping Typical workflow Mounting the outdoor unit typically consists of the following stages 1 Providing the installation structure 2 Installing the outdoor unit 3 Providing drain...

Страница 65: ...e the unit is positioned at least 100 mm above the maximum expected level of snow Anchor points 800 mm 479 Pedestal When installing on a pedestal make sure that the discharge grille still can be put i...

Страница 66: ...nstallation structure 4 M12 3 Remove the slings and screws and dispose of them 4 6 3 5 To provide drainage Make sure that condensation water can be evacuated properly Install the unit on a base to mak...

Страница 67: ...stalled in a cold climate take adequate measures so that the evacuated condensate CANNOT freeze We recommend to do the following Insulate the drain hose Install a drain tube heater field supply To con...

Страница 68: ...ille connect the electrical wiring Install the lower part of the discharge grille 1 Insert the hooks 2 Insert the ball studs 1 2 3 Fix the 2 lower screws 3 2 Install the upper part of the discharge gr...

Страница 69: ...ws 9 6 6 3 7 To remove the discharge grille and put the grille in safety position WARNING Rotating fan Before powering ON or servicing the outdoor unit make sure that the discharge grille covers the f...

Страница 70: ...23DA6V 9W G Daikin Altherma 3 H HT F 4P587502 1 2019 07 4 2 Remove the lower part of the discharge grille 4 3 Rotate the lower part of the discharge grille 4 Align the ball stud and hook on the grille...

Страница 71: ...indoor unit INFORMATION Also read the precautions and requirements in the following chapters 1 General safety precautions 46 6 1 Preparing the installation site 455 6 4 3 To install the indoor unit 1...

Страница 72: ...hose inside the unit You must connect the drain hose to an appropriate drain according to the applicable legislation You can route the drain hose through the left or right side panel Prerequisite The...

Страница 73: ...6 Unit installation Installer reference guide 73 EPRA14 18DAV3 W1 ETVH X16S18 23DA6V 9W G Daikin Altherma 3 H HT F 4P587502 1 2019 07 Option 2 Through the right side panel 1 3 T25 3 2...

Страница 74: ...TICE In case of plastic pipes make sure they are fully oxygen diffusion tight according to DIN 4726 The diffusion of oxygen into the piping can lead to excessive corrosion Connecting piping Legislatio...

Страница 75: ...min Field supply components Water Only use materials that are compatible with water used in the system and with the materials used in the indoor unit Field supply components Water pressure and temper...

Страница 76: ...the domestic hot water tank must be flushed with fresh water This procedure must be repeated at least once a day the first 5 consecutive days after installation Domestic hot water tank Standstills In...

Страница 77: ...extra water might be required M2 a b a a c c c c M3 M1 c a Individual room thermostat optional b Overpressure bypass valve delivered as accessory c Shut off valve Maximum water volume NOTICE The maxi...

Страница 78: ...ence m between the highest point of the water circuit and the indoor unit If the indoor unit is at the highest point of the installation the installation height is 0 m Minimum flow rate Check that the...

Страница 79: ...will lead to malfunction of the system Changing the pre pressure of the expansion vessel should be done by releasing or increasing nitrogen pressure through the Schrader valve of the expansion vessel...

Страница 80: ...cting the recirculation piping 4 Connecting the drain hose to the drain 5 Filling the water circuit 6 Filling the domestic hot water tank 7 Insulating the water piping 7 2 2 Precautions when connectin...

Страница 81: ...outdoor unit water connection pipes of the indoor unit 2 Connect the outdoor unit field piping to the shut off valves 3 Connect the O rings and shut off valves to the space heating cooling water pipe...

Страница 82: ...slation It is recommended to install a pressure reducing valve on the cold water inlet in accordance with the applicable legislation An expansion vessel should be installed on the cold water inlet in...

Страница 83: ...case of low temperatures Water pipe freeze prevention see Water pipe freeze prevention 4182 Drain prevention Only applicable when Bivalent is enabled C 02 1 This function prevents the opening of freez...

Страница 84: ...CE Glycol absorbs water from its environment Therefore do NOT add glycol that has been exposed to air Leaving the cap off the glycol container causes the concentration of water to increase The glycol...

Страница 85: ...m is very likely to freeze and get damaged Glycol and the maximum allowed water volume Adding glycol to the water circuit reduces the maximum allowed water volume of the system For more information se...

Страница 86: ...e water outside the house is drained In other circumstances example when there is a pump failure The normally closed valves remain open If the freeze protection valves open the water from inside the h...

Страница 87: ...The Hydronic Piping Calculation tool also calculates the maximum hydronic piping length from the indoor unit to the outdoor unit based on the emitter pressure drop or the other way around The Hydroni...

Страница 88: ...estic hot water pump 108 8 3 6 To connect the alarm output 109 8 3 7 To connect the space cooling heating ON OFF output 110 8 3 8 To connect the changeover to external heat source 111 8 3 9 To connect...

Страница 89: ...ith an inverter A phase advancing capacitor will reduce performance and may cause accidents WARNING Rotating fan Before powering ON or servicing the outdoor unit make sure that the discharge grille co...

Страница 90: ...M X2M X5M 1 2 1 5 M4 earth 8 1 3 About electrical compliance Only for EPRA14 18DAV3 Equipment complying with EN IEC 61000 3 12 European International Technical Standard setting the limits for harmonic...

Страница 91: ...s different depending on whether the power supply is interrupted or not 8 1 5 Overview of electrical connections except external actuators Normal power supply Preferential kWh rate power supply Power...

Страница 92: ...Open the switch box cover See 6 2 2 To open the outdoor unit 459 2 Strip insulation 20 mm from the wires a b a Strip wire end to this point b An excessive strip length may cause electrical shock or le...

Страница 93: ...GND Maximum running current Refer to name plate on unit L N PE b a L N Q1DI 1N 50 Hz 230 V AC F1B 1 3 2 4 I I BRN BLU YLW GRN b a L N a Factory mounted power supply cable b Field wiring F1B Overcurre...

Страница 94: ...ptional Drain tube heater cable Make sure the heating element of the drain tube heater is completely inside the drain tube Route the cable through the frame Connect the wires to the terminal block and...

Страница 95: ...5A INFORMATION Power saving function The power saving function is only applicable for V3 models For more information about the power saving function 9 F or overview field setting E 08 see Power saving...

Страница 96: ...LU YLW GRN a Factory mounted power supply cable b Field wiring F1B Overcurrent fuse field supply Recommended fuse 4 pole 16 A or 20 A fuse C curve Q1DI Earth leakage circuit breaker 30 mA field supply...

Страница 97: ...ptional Drain tube heater cable Make sure the heating element of the drain tube heater is completely inside the drain tube Route the cable through the frame Connect the wires to the terminal block and...

Страница 98: ...16S18 23DA6V 9W G Daikin Altherma 3 H HT F 4P587502 1 2019 07 1 2 8 2 2 To reposition the air thermistor on the outdoor unit This procedure is only necessary in areas with low ambient temperatures Req...

Страница 99: ...g ON OFF output 4110 Changeover to external heat source control See 8 3 8 To connect the changeover to external heat source 4111 Power consumption digital inputs See 8 3 9 To connect the power consump...

Страница 100: ...heat pump convector options Addendum book for optional equipment Wires 0 75 mm Maximum running current 100 mA For the main zone 2 9 Control 2 A Thermostat type For the additional zone 3 A Thermostat t...

Страница 101: ...n system layout app control or Smart Grid application App control Item Requirement LAN adapter software It is recommended to ALWAYS keep the LAN adapter software up to date Unit control method On the...

Страница 102: ...D 1 5 mm A 1 2 3 a B A B 1 2 3 X2M X1A X11YA X11YB X11Y X1M a a Interconnection cable main power supply In case of preferential kWh rate power supply Interconnection cable main power supply Wires 3 GN...

Страница 103: ...ntings INFORMATION In case of preferential kWh rate power supply connect X11Y to X11YB The necessity of separate normal kWh rate power supply to indoor unit b X2M 5 6 depends on the type of preferenti...

Страница 104: ...6 kW 1N 230 V a 26 A b c 0 22 2 kW 3 230 V d 5 A 4 kW 3 230 V d 10 A 6 kW 3 230 V d 15 A 9W 3 kW 3N 400 V 4 A 6 kW 3N 400 V 9 A 9 kW 3N 400 V 13 A a 6V b Electrical equipment complying with EN IEC 61...

Страница 105: ...the contactor of the backup heater inside the switch box K5M b Field wiring see table below Model power supply Connections to backup heater power supply 6V 6V 1N 230 V 1N 50 Hz 230 V AC SWB 4 3 6 5 2...

Страница 106: ...supply NOTICE Do NOT cut or remove the backup heater power supply cable 8 3 3 To connect the shut off valve Heating Cooling INFORMATION Shut off valve usage example In case of one LWT zone and a comb...

Страница 107: ...electricity meters Wires 2 per meter 0 75 mm Electricity meters 12 V DC pulse detection voltage supplied by PCB 9 A Energy metering INFORMATION In case of an electricity meter with transistor output...

Страница 108: ...ble tie mountings 8 3 5 To connect the domestic hot water pump Wires 2 GND 0 75 mm DHW pump output Maximum load 2 A inrush 230 V AC 1 A continuous 9 2 2 DHW pump 9 2 3 DHW pump schedule 1 Open the fol...

Страница 109: ...ct the alarm output Wires 2 1 0 75 mm Maximum load 0 3 A 250 V AC 9 D Alarm output 1 Open the following see 6 2 5 To open the indoor unit 461 1 Top panel 1 2 3 2 User interface panel 3 Upper switch bo...

Страница 110: ...cable with cable ties to the cable tie mountings 8 3 7 To connect the space cooling heating ON OFF output INFORMATION Cooling is only applicable in case of Reversible models Heating only models conve...

Страница 111: ...7 B A B 7 9 X2M A4P Y2 YC X1M a b a Installation of EKRP1HBAA is required b Prewiring between X2M 7 9 and Q1L thermal protector backup heater Do NOT change 3 Fix the cable with cable ties to the cable...

Страница 112: ...1HBAA is required 3 Fix the cable with cable ties to the cable tie mountings 8 3 9 To connect the power consumption digital inputs Wires 2 per input signal 0 75 mm Power limitation digital inputs 12 V...

Страница 113: ...fety thermostat normally closed contact Wires 2 0 75 mm Maximum length 50 m Safety thermostat contact 16 V DC detection voltage supplied by PCB The voltage free contact shall ensure the minimum applic...

Страница 114: ...has a maximum temperature variation rate of 2 C min There is a minimum distance of 2 m between the safety thermostat and the 3 way valve INFORMATION ALWAYS configure the safety thermostat after its in...

Страница 115: ...8 Electrical installation Installer reference guide 115 EPRA14 18DAV3 W1 ETVH X16S18 23DA6V 9W G Daikin Altherma 3 H HT F 4P587502 1 2019 07 Without low voltage cables With low voltage cables...

Страница 116: ...er dependent curves 133 9 5 Settings menu 135 9 5 1 Malfunctioning 135 9 5 2 Room 136 9 5 3 Main zone 140 9 5 4 Additional zone 149 9 5 5 Space heating cooling 155 9 5 6 Tank 163 9 5 7 User settings 1...

Страница 117: ...t methods However NOT all settings are accessible via both methods If so the corresponding table columns in this chapter are set to N A not applicable Method Column in tables Accessing settings via th...

Страница 118: ...ngs can be configured via the menu structure If for any reason it is required to change a setting using the overview settings then the overview settings can be accessed as follows 1 Set the user permi...

Страница 119: ...rtant initial settings This way the unit will be able to run properly Afterwards more detailed settings can be done via the menu structure if required You can find a short overview of the settings in...

Страница 120: ...if applicable Schedule 2 1 WD curve type 2 E Additional zone only if 4 4 1 Emitter type 3 7 9 5 4 Additional zone 4149 Control read only 3 9 Setpoint mode 3 4 Heating WD curve 3 5 if applicable Coolin...

Страница 121: ...nt curve c4 Screen with schedule 9 3 2 Home screen Press the button to go back to the home screen You see an overview of the unit configuration and the room and setpoint temperatures Only symbols appl...

Страница 122: ...cy mode or heat pump is forced off d Current date and time e Smart energy e1 Smart energy is available via solar panels or smart grid e2 Smart energy is currently being used for space heating e3 Smart...

Страница 123: ...er type Underfloor heating Fancoil unit Radiator i3 21 Measured room temperature a i4 45 Leaving water temperature setpoint a j Holiday mode Holiday mode active k Additional zone k1 Installed room the...

Страница 124: ...dedicated Human Comfort Interface BRC1HHDA used as room thermostat is controlling the indoor unit Set the room temperature 2 Main zone Shows the applicable symbol for your main zone emitter type Set t...

Страница 125: ...on or off 9 3 4 Menu screen Example 7 1 Language Time date Holiday Possible actions on this screen Go through the list Enter the submenu setting 9 3 5 Setpoint screen The setpoint screen is displayed...

Страница 126: ...dial to increase decrease Submenu e Turn or press the left dial to go to the submenu 9 3 6 Detailed screen with values Example a b c a b c 7 2 1 Time date Hours 11 30 Minutes a Settings b Values c Sel...

Страница 127: ...schedule for Monday 4 Copy the schedule to the other weekdays 5 Program the schedule for Saturday and copy it to Sunday 6 Give the schedule a name To go to the schedule 1 Go to 1 1 Room Schedule 2 Se...

Страница 128: ...darker colour than a low temperature 0 6 00 8 30 17 30 20 C 18 C 22 00 18 C 21 C 12 24 Mon Note To clear an action set its time as the time of the previous action 4 Confirm the changes Result The sch...

Страница 129: ...hu Tue Sun User defined 1 C 5 Repeat this action for all other weekdays Mon Sat Wed Fri Thu Tue Sun User defined 1 C To program the schedule for Saturday and copy it to Sunday 1 Select Saturday 2 Sele...

Страница 130: ...her dependent if the desired leaving water or tank temperature is determined automatically by the outdoor temperature It therefore is connected to a temperature sensor on the North wall of the buildin...

Страница 131: ...personal preference See 9 4 4 Using weather dependent curves 4133 Availability The weather dependent curve is available for Main zone Heating Main zone Cooling Additional zone Heating Additional zone...

Страница 132: ...Slope and offset Define the weather dependent curve by its slope and offset Change the slope to differently increase or decrease the temperature of the leaving water for different ambient temperature...

Страница 133: ...tional zone heating Main zone or additional zone cooling Domestic hot water X1 X2 Examples of outdoor ambient temperature Y1 Y2 Y3 Y4 Examples of desired tank temperature or leaving water temperature...

Страница 134: ...nk go to 2 E Main zone WD curve type Viewing which type is selected is also possible via 3 C Additional zone WD curve type 5 E Tank WD curve type To change the weather dependent curve Zone Go to Main...

Страница 135: ...ent curve of a zone or tank You feel Fine tune with setpoints At regular outdoor temperatures At cold outdoor temperatures Y2 a Y1 a X1 a X2 a OK Cold OK Hot Cold OK Cold Cold Cold Hot Hot OK Hot Cold...

Страница 136: ...rature is controlled by a schedule and can be modified by the user Heating schedule Applicable for all models Define a heating schedule of the room temperature in 1 2 Heating schedule See 9 3 7 Schedu...

Страница 137: ...m Antifrost setting is active and a U4 error occurs the unit will automatically start the Antifrost function via the backup heater If the backup heater is not allowed the room Antifrost setting MUST b...

Страница 138: ...oling On and The external room thermostat is Thermo OFF and Outdoor temperature drops below 6 C The unit will supply leaving water to the heat emitters to heat up the room again and the temperature se...

Страница 139: ...ually go to the Malfunctioning main menu screen and confirm emergency operation before starting Room frost protection is active even if the user does not confirm emergency operation Setpoint range Onl...

Страница 140: ...ting cooling 2 Main zone Setpoint screen 2 1 Schedule 2 2 Heating schedule 2 3 Cooling schedule 2 4 Setpoint mode 2 5 Heating WD curve 2 6 Cooling WD curve 2 7 Emitter type 2 8 Setpoint range 2 9 Cont...

Страница 141: ...temperature depends on the outdoor ambient temperature for heating does NOT depend on the outdoor ambient temperature for cooling In Weather dependent mode the desired leaving water temperature depend...

Страница 142: ...rature 40 C 5 C 1 01 High outdoor ambient temperature 10 C 25 C 1 02 Desired leaving water temperature when the outdoor temperature equals or drops below the low ambient temperature 9 01 C 9 00 C Note...

Страница 143: ...ater is required 1 09 Desired leaving water temperature when the outdoor temperature equals or rises above the high ambient temperature 9 03 C 9 02 C Note This value should be lower than 1 08 as for h...

Страница 144: ...ers If there are 2 zones it is important that in heating the zone with the lowest water temperature is configured as the main zone and the zone with the highest water temperature is configured as the...

Страница 145: ...preset values shift values weather dependent curves modulation As a result too high or too low leaving water temperatures could occur which lead to overtemperatures or capacity shortage By limiting th...

Страница 146: ...on is only possible if C 2 Space heating cooling On Code Description 2 A C 05 External room thermostat type for the main zone 1 1 contact The used external room thermostat can only send a thermo ON OF...

Страница 147: ...ween leaving water temperature setpoint and inlet temperature at startup INFORMATION If the main zone or the additional zone has a heating demand and this zone is equipped with radiators then the targ...

Страница 148: ...n only be read out on the user interface 2 C 2 8 06 Max modulation 0 C 10 C This is the temperature value by which the desired leaving water temperature is increased or decreased INFORMATION When leav...

Страница 149: ...The shut off valve 0 No is NOT influenced by heating or cooling demand 1 Yes closes when there is NO heating or cooling demand INFORMATION The setting F 0B is only valid when there is a thermostat or...

Страница 150: ...perature for the additional zone via setpoint screen 3 Additional zone See 9 3 5 Setpoint screen 4125 Schedule Indicates if the desired leaving water temperature is according to a schedule See 9 5 3 M...

Страница 151: ...or the Slope Offset method Also see 9 4 2 2 points curve 4131 and 9 4 3 Slope offset curve 4132 The curve type in the menu of the additional zone is read only It corresponds to the curve type that is...

Страница 152: ...temperature 10 C 25 C 0 01 Desired leaving water temperature when the outdoor temperature equals or drops below the low ambient temperature 9 05 C 9 06 C Note This value should be higher than 0 00 as...

Страница 153: ...ratures less cold water is required 0 04 Desired leaving water temperature when the outdoor temperature equals or rises above the high ambient temperature 9 07 C 9 08 C Note This value should be lower...

Страница 154: ...2 8 3 9 02 Cooling minimum 5 C 18 C 2 8 4 9 03 Cooling maximum 18 C 22 C Control The control type for the additional zone is read only It is determined by the control type of the main zone See 9 5 3...

Страница 155: ...ation mode 4 2 Operation mode schedule 4 3 Operation range 4 4 Number of zones 4 5 Pump operation mode 4 6 Unit type 4 7 Pump limitation 4 8 Pump limitation 4 9 Pump outside range 4 A Increase around...

Страница 156: ...Operation mode 2 Select one of the following options Heating Only heating mode Cooling Only cooling mode Automatic The operation mode changes automatically based on the outdoor temperature Restricted...

Страница 157: ...heating off temperature When the averaged outdoor temperature rises above this value space heating is turned off a 14 C 35 C 4 3 2 F 01 Space cooling off temperature When the averaged outdoor temperat...

Страница 158: ...ne and quick heat emitters N A 4 0B Hysteresis ensures that changeover is only done when necessary The space operation only changes from heating to cooling when the room temperature rises above the de...

Страница 159: ...portant that in heating the zone with the lowest water temperature is configured as the main zone and the zone with the highest water temperature is configured as the additional zone CAUTION If there...

Страница 160: ...a b c d b c a Space heating cooling control b Off c On d Pump operation 4 5 F 0D 1 Sample The pump is ON when there is heating or cooling demand as the leaving water temperature has not yet reached t...

Страница 161: ...pe 0 Reversible 1 Heating only Pump limitation Pump speed limitation 9 0D defines the maximum pump speed In normal conditions the default setting should NOT be modified The pump speed limitation will...

Страница 162: ...e value set by the Space heating off temperature 4 02 or if the outdoor temperature drops below the value set by the Space cooling off temperature F 01 When the pump operation is enabled the pump oper...

Страница 163: ...crease around 0 C 0 No 1 increase 2 C span 4 C 2 increase 4 C span 4 C 3 increase 2 C span 8 C 4 increase 4 C span 8 C Overshoot This function defines how much the water temperature may rise above the...

Страница 164: ...eration to immediately start heating up the water to the preset value Storage comfort However this consumes extra energy If powerful operation is active will be shown on the home screen To activate po...

Страница 165: ...rature denotes the lower desired tank temperature It is the desired temperature when a storage economic action is scheduled preferably during day Code Description 5 3 6 0B Eco setpoint 30 C min 50 6 0...

Страница 166: ...ing to a schedule See the operation manual for more details Disinfection Applies only to installations with a domestic hot water tank The disinfection function disinfects the domestic hot water tank b...

Страница 167: ...upted by possible domestic hot water demand NOTICE Disinfection mode Even if you turn OFF tank heating operation C 3 Operation Tank disinfection mode will remain active However if you turn it OFF whil...

Страница 168: ...tion function Hysteresis The following ON hysteresis can be set Heat pump ON hysteresis Applicable when domestic hot water preparation is reheat only When the tank temperature drops below the reheat t...

Страница 169: ...the weather dependent curve During weather dependent operation the end user cannot adjust the desired tank temperature on the user interface Also see 9 4 Weather dependent curve 4130 Code Description...

Страница 170: ...estic hot water temperature TU User setpoint temperature as set on the user interface t Time Example setpoint TU maximum heat pump temperature 6 01 THP MAX 6 01 t 6 00 HP 5 10 20 30 40 43 45 TU THP OF...

Страница 171: ...tings Time date once the unit is initialised Holiday About holiday mode During your holiday you can use the holiday mode to deviate from your normal schedules without having to change them While holid...

Страница 172: ...a quiet mode level Enable the user to program a quiet mode schedule If enabled by the installer the user can program a quiet mode schedule INFORMATION If the outdoor temperature is below zero we reco...

Страница 173: ...dium 7 5 3 N A Electricity price Low 7 6 N A Gas price INFORMATION Electricity price can only be set when bivalent is ON 9 C 1 or C 02 These values can only be set in menu structure 7 5 1 7 5 2 and 7...

Страница 174: ...operation cost taking into account the reimbursement will be optimized NOTICE Make sure to modify the setting of the energy prices at the end of the incentive period To set the gas price in case of an...

Страница 175: ...ata 8 2 Malfunction history 8 3 Dealer information 8 4 Sensors 8 5 Actuators 8 6 Operation modes 8 7 About 8 8 Connection status 8 9 Running hours 8 A Reset Dealer information The installer can fill i...

Страница 176: ...stem 8 8 Connection status Information about the connection status of the unit the room thermostat and the LAN adapter 8 9 Running hours Running hours of specific system components 9 5 9 Installer set...

Страница 177: ...following 3 overview settings E 05 Can the system prepare domestic hot water E 06 Is a domestic hot water tank installed in the system E 07 What kind of domestic hot water tank is installed DHW pump C...

Страница 178: ...the type of heater can be viewed but not changed Code Description 9 3 1 E 03 3 6V 4 9W Voltage For a 6V model this can be set to 230V 1ph 230V 3ph For a 9W model this is fixed to 400V 3ph Code Descrip...

Страница 179: ...cond and first step of the backup heater at nominal voltage Nominal value depends on backup heater configuration Equilibrium Code Description 9 3 6 5 00 Equilibrium Is backup heater operation allowed...

Страница 180: ...INFORMATION If a heat pump failure occurs and Emergency is set to Manual the room frost protection function the underfloor heating screed dryout function and the water pipe antifreeze function will re...

Страница 181: ...up heater will assist during domestic hot water heating 5 01 Equilibrium temperature and 5 03 Space heating priority temperature are related to backup heater So you must set 5 03 equal or a few degree...

Страница 182: ...mestic hot water operation Domestic hot water heating stops even when the target domestic hot water temperature is NOT reached The actual maximum running time also depends on setting 8 04 When Control...

Страница 183: ...ply or a Safety thermostat 0 No The outdoor unit is connected to a normal power supply 1 Open The outdoor unit is connected to a preferential kWh rate power supply When the preferential kWh rate signa...

Страница 184: ...00 to 1 or 3 when D 01 is set to 1 or 2 will reset D 00 back to 0 as the system does not have a booster heater Only set D 00 to the values in the table below D 00 Backup heater Compressor 0 Forced OFF...

Страница 185: ...nd 9 9 2 Amp Code Description 9 9 4 5 05 Limit 1 0 A 50 A 9 9 5 5 06 Limit 2 0 A 50 A 9 9 6 5 07 Limit 3 0 A 50 A 9 9 7 5 08 Limit 4 0 A 50 A Limit when 9 9 1 Continuous and 9 9 2 kW Code Description...

Страница 186: ...e booster heater will be limited first before the backup heater is limited Note In case power consumption control is DISABLED for all models the setting 4 01 defines whether backup heater and booster...

Страница 187: ...eters configure the settings as described below Select the pulse frequency output of each power meter in accordance with the power meter specifications It is possible to connect up to 2 power meters w...

Страница 188: ...emark This value has only meaning in room thermostat control Ext amb sensor offset ONLY applicable in case an external outdoor ambient sensor is connected and configured You can calibrate the external...

Страница 189: ...unit stops automatically and the permission signal for the auxiliary boiler is active If Bivalent is disabled Space heating is only done by the indoor unit within the operation range The permission s...

Страница 190: ...tion 9 C 3 C 03 Range 25 C 25 C step 1 C 9 C 4 C 04 Range 2 C 10 C step 1 C The higher the value of C 04 the higher the accuracy of the switch over between the heat pump system and the auxiliary boile...

Страница 191: ...romote the use of the heat pump Code Description 7 5 1 N A User settings Electricity price High 7 5 2 N A User settings Electricity price Medium 7 5 3 N A User settings Electricity price Low 7 6 N A U...

Страница 192: ...In case of V3 models 493 Defines whether the outdoor unit power supply can be interrupted internally by indoor unit control during stand still conditions no space heating cooling nor domestic hot wat...

Страница 193: ...can be done using the menu structure If for any reason it is required to change a setting using the overview settings then the overview settings can be accessed in the field settings overview 9 I See...

Страница 194: ...s Information Operation A Commissioning A 1 Operation test run A 2 Actuator test run A 3 Air purge A 4 UFH screed dryout About commissioning See 10 Commissioning 4197 9 5 11 Operation Overview The fol...

Страница 195: ...y data Malfunction history Dealer information Sensors Actuators Operation modes About Connection status Running hours B User profile C Operation Room Space heating cooling Tank 1 4 Antifrost Activatio...

Страница 196: ...rgy metering 9 B Sensors External sensor Ext amb sensor offset Averaging time 9 C Bivalent Bivalent Boiler efficiency Temperature Hysteresis 9 9 Power consumption control Power consumption control Typ...

Страница 197: ...tective functions such as room antifrost The unit automatically runs these functions when necessary During installation or service this behaviour is undesired Therefore the protective functions can be...

Страница 198: ...nce all checks are fulfilled the unit must be closed Power up the unit after it is closed You read the complete installation instructions as described in the installer reference guide The indoor unit...

Страница 199: ...ted if necessary 10 4 1 Minimum flow rate Purpose For a correct operating unit it is important to check if the minimum flow rate is reached If needed modify the bypass valve setting Minimum required f...

Страница 200: ...workflow Purging the air from the system should consist of 1 Performing a manual air purge 2 Performing an automatic air purge INFORMATION Start by performing a manual air purge When almost all the a...

Страница 201: ...er See To change the user permission level 4117 2 Go to A 3 Commissioning Air purge 3 In the menu set Type Automatic 4 Select Start air purge 5 Select OK to confirm Result The air purge starts It stop...

Страница 202: ...o monitor the temperatures 1 In the menu go to Sensors 2 Select the temperature information 10 4 4 Actuator test run Purpose Perform an actuator test run to confirm the operation of the different actu...

Страница 203: ...r for the maximum allowed water temperature to avoid cracking the screed programming the underfloor heating screed dryout schedule according to the initial heating instructions of the screed manufactu...

Страница 204: ...underfloor heating screed dryout function is active even if the user does NOT confirm emergency operation During underfloor heating screed dryout pump speed limitation 9 0D is NOT applicable NOTICE To...

Страница 205: ...f the screed dryout schedule the total remaining time and the current desired leaving water temperature 2 Press the left dial to open the menu structure and to 1 View the status of sensors and actuato...

Страница 206: ...16S18 23DA6V 9W G Daikin Altherma 3 H HT F 4P587502 1 2019 07 3 Modify and restart the execution of the program a a If the UFH screed dryout program was stopped due to a power failure and the power re...

Страница 207: ...ller setting table in the operation manual with the actual settings Make sure that the user has the printed documentation and ask him her to keep it for future reference Inform the user that he can fi...

Страница 208: ...view Maintenance and service 208 12 2 Maintenance safety precautions 208 12 3 Yearly maintenance 209 12 3 1 Yearly maintenance outdoor unit overview 209 12 3 2 Yearly maintenance outdoor unit instruct...

Страница 209: ...e heat exchanger yearly A blocked heat exchanger can lead to too low pressure or too high pressure leading to worse performance Water filter Clean and rinse the water filter NOTICE Handle the filter w...

Страница 210: ...f the water circuit If required add water NOTICE When checking the magnetic filter dirt separator for tightness hold it firmly so as NOT to apply stress to the water piping Do NOT isolate the magnetic...

Страница 211: ...the relief valve is clean If it contains debris or dirt Open the valve until the discharged water does not contain debris or dirt anymore Flush and clean the complete tank including the piping betwee...

Страница 212: ...very hot Prerequisite Stop the unit operation via the user interface Prerequisite Turn OFF the respective circuit breaker Prerequisite Close the cold water supply Prerequisite Open all the hot water t...

Страница 213: ...water in a bottle sink using the installed drain hose 7 Remove the 2 clips that fix the water filter a b a a Clip b Magnetic filter dirt separator 8 Remove the water filter 9 Remove the drain hose fr...

Страница 214: ...p filter and strainer in the water filter housing INFORMATION Correctly install the strainer in the magnetic filter dirt separator housing using the protrusions a b c c a Rolled up filter b Strainer c...

Страница 215: ...e water filter to the water circuit pipes 3 Make sure that the air purge valve of the water filter is in the open position 4 Open the valve if equipped of the water circuit towards the expansion vesse...

Страница 216: ...space is NOT sufficiently heated at low outdoor temperatures 221 13 3 10 Symptom The pressure at the tapping point is temporarily unusually high 222 13 3 11 Symptom Tank disinfection function is NOT c...

Страница 217: ...ll shut off valves of the water circuit are completely open The water filter is clean Clean if necessary There is no air in the system Purge air if necessary You can purge air manually see To perform...

Страница 218: ...e preferential kWh rate power supply settings and electrical connections do NOT match This should match with the connections as explained in 8 3 1 To connect the main power supply 4101 8 1 4 About pre...

Страница 219: ...itters or collectors 13 3 5 Symptom The pump is blocked Possible causes Corrective action If the unit has been powered off for a long time lime might block the rotor of the pump Remove the screw of th...

Страница 220: ...nstallation is too high Make sure that the water volume in the installation is below the maximum allowed value see 7 1 3 To check the water volume and flow rate 476 and 7 1 4 Changing the pre pressure...

Страница 221: ...e system The air purge operation The backup heater equilibrium temperature has not been configured correctly Increase the equilibrium temperature to activate the backup heater operation at a higher ou...

Страница 222: ...ection function at least 4 hours later than the last expected large hot water tapping This start up can be set by installer settings disinfection function If in 5 6 Tank Heat up mode the mode Schedule...

Страница 223: ...uction 7H 05 Water flow problem during heating sampling 7H 06 Water flow problem during cooling defrost 80 01 Returning water temperature sensor problem 81 00 Leaving water temperature sensor problem...

Страница 224: ...pressor startup defect E7 00 OU Malfunction of outdoor unit fan motor E8 00 OU Power input overvoltage E9 00 Malfunction of electronic expansion valve EA 00 OU Cool heat switchover problem EC 00 Abnor...

Страница 225: ...sensor abnormality JC 01 Evaporator pressure abnormality L1 00 Malfunction of INV PCB L3 00 OU Electrical box temperature rise problem L4 00 OU Malfunction of inverter radiating fin temperature rise L...

Страница 226: ...recommended to program the start up of the disinfection function at least 4 hours later than the last expected large hot water tapping This start up can be set by installer settings disinfection funct...

Страница 227: ...nt Use the service port a to recover refrigerant Make sure the valves Y1E Y3E Y2S Y3S Y4S are open If they are not open during refrigerant recovery refrigerant remains trapped in the unit a Y3S Y2S Y4...

Страница 228: ...ching of live parts Result The unit opens all necessary valves 3 After recovering refrigerant deactivate the vacuum recovery mode by pushing BS1 3 times within 10 seconds To open the valves when power...

Страница 229: ...nical data is available on the regional Daikin website publicly accessible The full set of latest technical data is available on the Daikin Business Portal authentication required In this chapter 15 1...

Страница 230: ...Wall height unrestricted 1000 X X H 150 H 500 500 300 500 500 300 300 1000 500 1000 500 500 1000 500 1000 500 1000 300 X X H X X H General mm 3D124412 300 150 100 Top side obstacle No top side obstacl...

Страница 231: ...vice port 5 16 flare i Capillary tube j Distributor k Air heat exchanger l PCB cooling m Accumulator n Muffler E1HHEX Plate heat exchanger heater M1C Compressor M1F Fan motor S1PH High pressure switch...

Страница 232: ...ide 232 EPRA14 18DAV3 W1 ETVH X16S18 23DA6V 9W G Daikin Altherma 3 H HT F 4P587502 1 2019 07 R5T Air heat exchanger middle R6T Refrigerant liquid R7T Compressor shell R8T Compressor port R9T Entering...

Страница 233: ...ot water cold water IN loose nut 3 4 b2 Domestic hot water hot water OUT loose nut 3 4 c1 Water IN connection c2 Water OUT connection d Pump e Backup heater f Shut off valve male female 1 g Expansion...

Страница 234: ...on Electronic component assembly Electronic component assembly Front side view Front side view Indoor Indoor OFF OFF ON ON Outdoor Outdoor Position of compressor terminal Position of compressor termin...

Страница 235: ...setting of the selector switch DS1 7 only for W1 models Ferrite core Z8C consists of 2 separate core parts Legend in case of V3 models A1P Printed circuit board main A2P Printed circuit board noise f...

Страница 236: ...compressor suction R4T Thermistor air heat exchanger distributor R5T Thermistor air heat exchanger middle R6T Thermistor refrigerant liquid R7T Thermistor compressor shell R8T Thermistor compressor p...

Страница 237: ...d supply E1HHEX Plate heat exchanger heater F1U Field fuse field supply F1U F7U A1P A2P Fuse H1P H7P A1P Light emitting diode service monitor is orange HAP A1P A2P Light emitting diode service monitor...

Страница 238: ...water R11T Thermistor fin S1NPH High pressure sensor S1PH S2PH High pressure switch S1PL Low pressure switch T1A Current transfo V1R V2R A2P IGBT power module V3R A2P Diode module X1M X2M Terminal str...

Страница 239: ...nection point of the power supply for the BUH should be foreseen outside the unit Note 1 Connection point of the power supply for the backup heater should be foreseen outside the unit Backup heater po...

Страница 240: ...d PCB A11P MMI user interface of the indoor unit Main PCB A13P LAN adapter A14P PCB of the dedicated Human Comfort Interface BRC1HHDA used as room thermostat A15P Receiver PCB wireless On OFF thermost...

Страница 241: ...r normal power supply standard Only for normal power supply standard Only for preferential kWh rate power supply outdoor Only for preferential kWh rate power supply outdoor Outdoor unit Outdoor unit P...

Страница 242: ...load Min load Minimum load Only for demand PCB option Only for demand PCB option Only for digital I O PCB option Only for digital I O PCB option Options ext heat source output alarm output Options ex...

Страница 243: ...2 core 2 core 2 core 2 core 3 core R2T External sensor floor or ambient Only for KRTETS signal 2 core 3m included A13P P1 P2 LAN adapter A14P P1 P2 user interface Only for Human Comfort Interface Onl...

Страница 244: ...product or application explaining how to install configure and maintain it Operation manual Instruction manual specified for a certain product or application explaining how to operate it Maintenance...

Страница 245: ...Applicable indoor units ETBH16DA6V ETBH16DA9W ETBX16DA6V ETBX16DA9W ETVH16S18DA6V ETVH16S23DA6V ETVH16S18DA9W ETVH16S23DA9W ETVX16S18DA6V ETVX16S23DA6V ETVX16S18DA9W ETVX16S23DA9W Notes 1 6V 2 9W 3 E...

Страница 246: ...2 RT control 2 A C 05 R W 0 1 1 contact 2 2 contacts Delta T 2 B 1 1 0B R W 3 10 C step 1 C 5 C 2 B 2 1 0D R W 3 10 C step 1 C 5 C Modulation 2 C 1 8 05 R W 0 No 1 Yes 2 C 2 8 06 R W 0 10 C step 1 C 5...

Страница 247: ...5 1 Heating only 6 4 7 9 0D R W 0 8 step 1 0 No limitation 1 4 50 80 5 8 50 80 during sampling 6 Space heating cooling 4 9 F 00 R W 0 Restricted 1 Allowed 4 A D 03 R W 0 No 1 increase 2 C span 4 C 2 i...

Страница 248: ...kWh 7 5 2 R W 0 00 990 kWh 1 kWh 7 5 3 R W 0 00 990 kWh 1 kWh User settings 7 6 R W 0 00 990 kWh 0 00 290 MBtu 1 0 kWh Installer settings Configuration wizard System 9 1 3 2 E 03 R O 3 6V 1 4 9W 2 9...

Страница 249: ...9 1 A 0 07 R W 10 25 C step 1 C 20 C Tank 9 1 B 1 6 0D R W 0 Reheat only 1 Reheat sched 2 Scheduled only 9 1 B 2 6 0A R W 30 6 0E C step 1 C 60 C 9 1 B 3 6 0B R W 30 min 50 6 0E C step 1 C 45 C 9 1 B...

Страница 250: ...07 1 3 hour E 07 1 9 6 5 8 00 R W 0 20 min step 1 min 1 min 9 6 6 8 01 R W 5 95 min step 5 min 30 min 9 6 7 8 04 R W 0 95 min step 5 min 95 min Installer settings 9 7 4 04 R O 0 Intermittent Benefit...

Страница 251: ...7 C 2 0C 2 18 C 9 I 0 05 R W 9 07 9 08 C step 1 C 22 C 9 I 0 06 R W 25 43 C step 1 C 35 C 9 I 0 07 R W 10 25 C step 1 C 20 C 9 I 0 0B R W 35 6 0E C step 1 C 55 C 9 I 0 0C R W 45 6 0E C step 1 C 60 C...

Страница 252: ...y DHW What is the maximum allowed current over the heatpump Is auto restart of the unit allowed What is the disinfection target temperature What emitter type is connected to the main LWT zone What emi...

Страница 253: ...C 60 C 3 E 07 5 40 80 C step 1 C 80 C 4 40 65 C step 1 C 65 C 9 I 7 00 R W 0 4 C step 1 C 0 C 9 I 7 01 R W 2 40 C step 1 C 2 C 9 I 7 02 R W 0 1 LWT zone 1 2 LWT zones What is the desired reheat temper...

Страница 254: ...om sensor 9 I C 09 R W 0 Normally open 1 Normally closed 9 I C 0A 0 9 I C 0B 0 9 I C 0C 0 9 I C 0D 0 9 I C 0E 0 9 I D 00 R W 0 None 1 BSH only 2 BUH only 3 All heaters What is the thermo request conta...

Страница 255: ...I E 0E 0 9 I F 00 R W 0 Disabled 1 Enabled 9 I F 01 R W 10 35 C step 1 C 20 C 9 I F 02 3 9 I F 03 5 9 I F 04 0 9 I F 05 0 9 I F 09 R W 0 Disabled 1 Enabled 9 I F 0A 0 9 I F 0B R W 0 No 1 Yes 9 I F 0C...

Страница 256: ...4P587502 1 2019 07 Copyright 2019 Daikin Verantwortung f r Energie und Umwelt...

Отзывы: