


-
E11
-
6. CONNECTION PROCEDURE
CAUTION
Observe the following to prevent electric shock.
Do not touch the charged sections; otherwise, you might receive serious electric shock or get
burned.
●
Do not touch the charged sections.
●
Have a qualified electric engineer ground the case of the welding power source. Have a qualified
electric engineer ground the base metal or jig electrically connected, following a local low.
●
Connect the welding machine with all the line disconnect switches inside the switch box turned off.
●
Do not use a cable with lack of capacity or a damaged cable.
●
Tighten and insulate the connections of cables.
●
Attach the case properly after connecting the cable.
●
Do not place the welding power source, wire feeder, torch, control unit, conduit and control cable
(including the extension cable) in an area where the equipment can become wet.
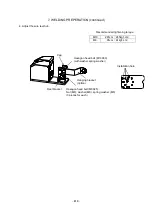
6.1 Connection to the Welding Power Source and to the Gas regulator
Standard Composition
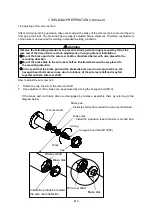
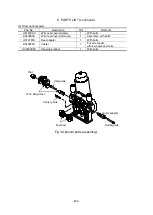
1. Remove the guide adapter from the wire feeder, insert the outlet guide into the guide adapter and
attach the guide adapter to the conduit of the welding torch. Use proper sized outlet guide adjusted
to the wire size.
Outlet guide for wire diameter 0.9-1.2 is attached. For other diameter wire, change outlet guide for
suitable diameter depending on the using wire.
2. Insert the guide adapter to the place it was, and screw with bolt.
Bolt (M6)
Guide adapter
Outlet guide
Conduit
Gas cylinder
Gas regulator
Welding power source
Power cable for
base metal
Welding torch
Wire feeder
Wire guide
Conduit
Remote
control
Control
unit
Base metal
*Control cable
* Ground a work piece if a local law requires.
●
The parts names indicated in the boxes are
standard parts. Preparation of the other
parts is required to use the welding power
source.
●
*Extension cables/hoses
(5 m, 10 m, 15 m, and 20 m) are available.


