323
number if necessary.
UDP port
The default value is 37778. You can input the actual port
number if necessary.
HTTP port
The default value is 80. You can input the actual port number if
necessary.
HTTPS
The default value is 443. You can input the actual port number if
necessary.
RTSP port
The default value is 554.
5.8.2.3 WIFI AP
Please note this function is for some series only.
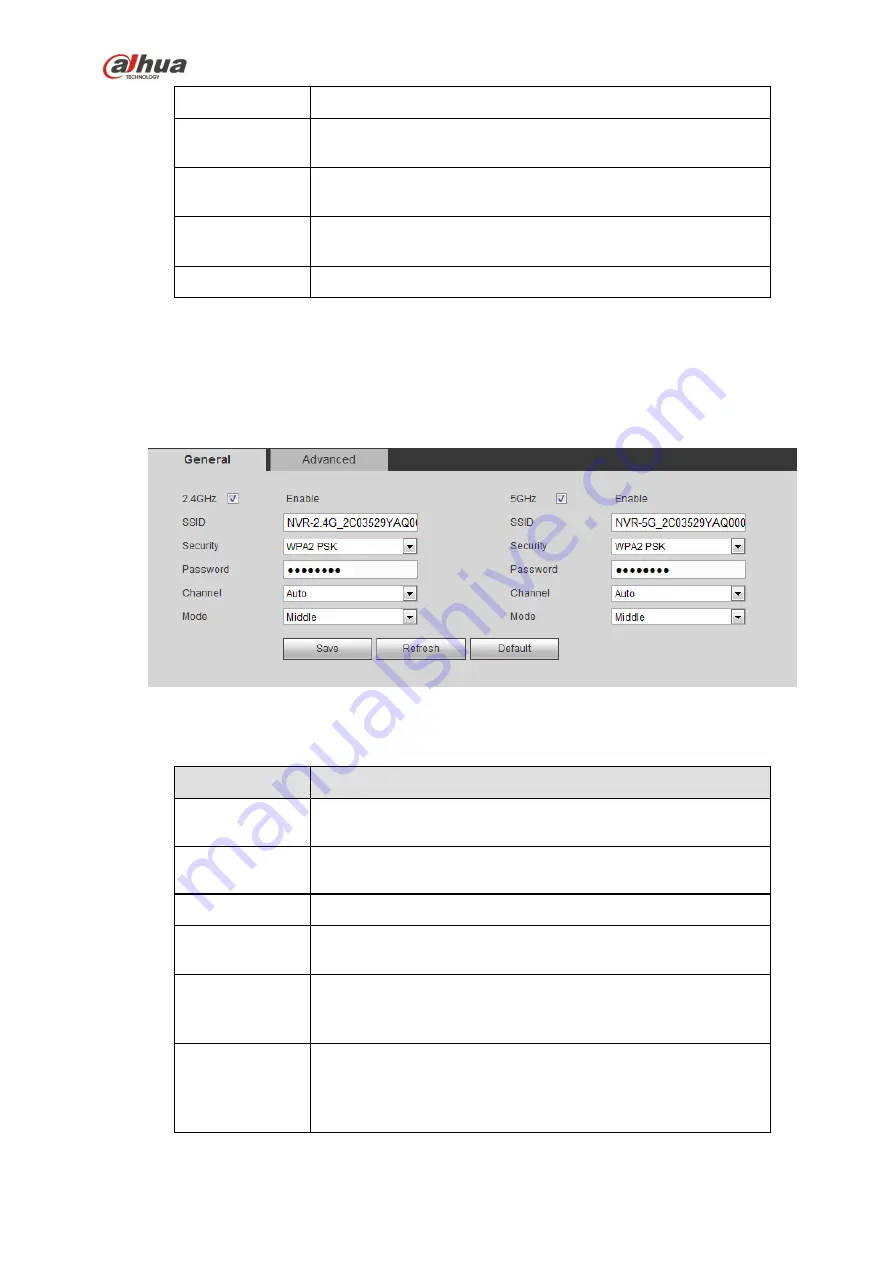
5.8.2.3.1 General Setup
The WIFI AP interface is shown as in Figure 5-29. Here you can set WIFI hotspot, so that the network
camera can use the hotspot to connect to the network.
Figure 5-29
Please refer to the following sheet for detailed information.
Parameter
Function
SSID
It is to set SSID name. You can use this name to search the
device.
Password
It is to set SSID password. You can use this password to
connect to the network.
Seucurity
Select authentication from the dropdown list.
Start IP/End IP
Input start IP and end IP. The NVR can allocate the IP address
in the range you specified here.
WPS
Click WPS button to enable WPS function. After the network
camera enabled this function, it can automatically connect to the
network.
Remote device
In the list, you can view the network camera(s) that connected
to the NVR. It includes signal intensity, IP, MAC address, bit
rate, channel number, type, status and etc.
5.8.2.3.2 Advanced
Содержание NVR4204-P-4KS2
Страница 159: ...144 Figure 3 3 3 5 4 NVR11HS 41HS W S2 Series Please refer to Figure 3 4 for connection sample ...
Страница 160: ...145 Figure 3 4 3 5 5 NVR41HS W S2 Series Please refer to Figure 3 5 for connection sample ...
Страница 163: ...148 Figure 3 7 3 5 8 NVR42N Series Please refer to Figure 3 8 for connection sample Figure 3 8 ...
Страница 171: ...156 Figure 3 18 3 5 19 NVR78 Series Please refer to Figure 3 19 for connection sample ...
Страница 172: ...157 Figure 3 19 3 5 20 NVR78 16P Series Please refer to Figure 3 20 for connection sample ...
Страница 173: ...158 Figure 3 20 3 5 21 NVR78 RH Series Please refer to Figure 3 21 for connection sample ...
Страница 174: ...159 Figure 3 21 3 5 22 NVR70 Series Please refer to Figure 3 22 for connection sample ...
Страница 175: ...160 Figure 3 22 3 5 23 NVR70 R Series Please refer to Figure 3 23 for connection sample ...
Страница 176: ...161 Figure 3 23 3 5 24 NVR42V 8P Series Please refer to Figure 3 24 for connection sample ...
Страница 177: ...162 Figure 3 24 ...
Страница 188: ...173 Figure 4 19 Click smart add button you can see device enables DHCP function See Figure 4 20 Figure 4 20 ...
Страница 243: ...228 Figure 4 89 Figure 4 90 ...
Страница 244: ...229 Figure 4 91 Figure 4 92 ...
Страница 259: ...244 Figure 4 110 Figure 4 111 ...
Страница 260: ...245 Figure 4 112 Figure 4 113 ...
Страница 261: ...246 Figure 4 114 Figure 4 115 ...
Страница 263: ...248 Figure 4 117 Figure 4 118 ...
Страница 290: ...275 Figure 4 148 In Figure 4 148 click one HDD item the S M A R T interface is shown as in Figure 4 149 Figure 4 149 ...
Страница 355: ...340 Figure 5 55 Figure 5 56 ...
Страница 356: ...341 Figure 5 57 Figure 5 58 Figure 5 59 ...
Страница 367: ...352 Figure 5 73 Figure 5 74 ...


