background image

16 

 Room No. Management 

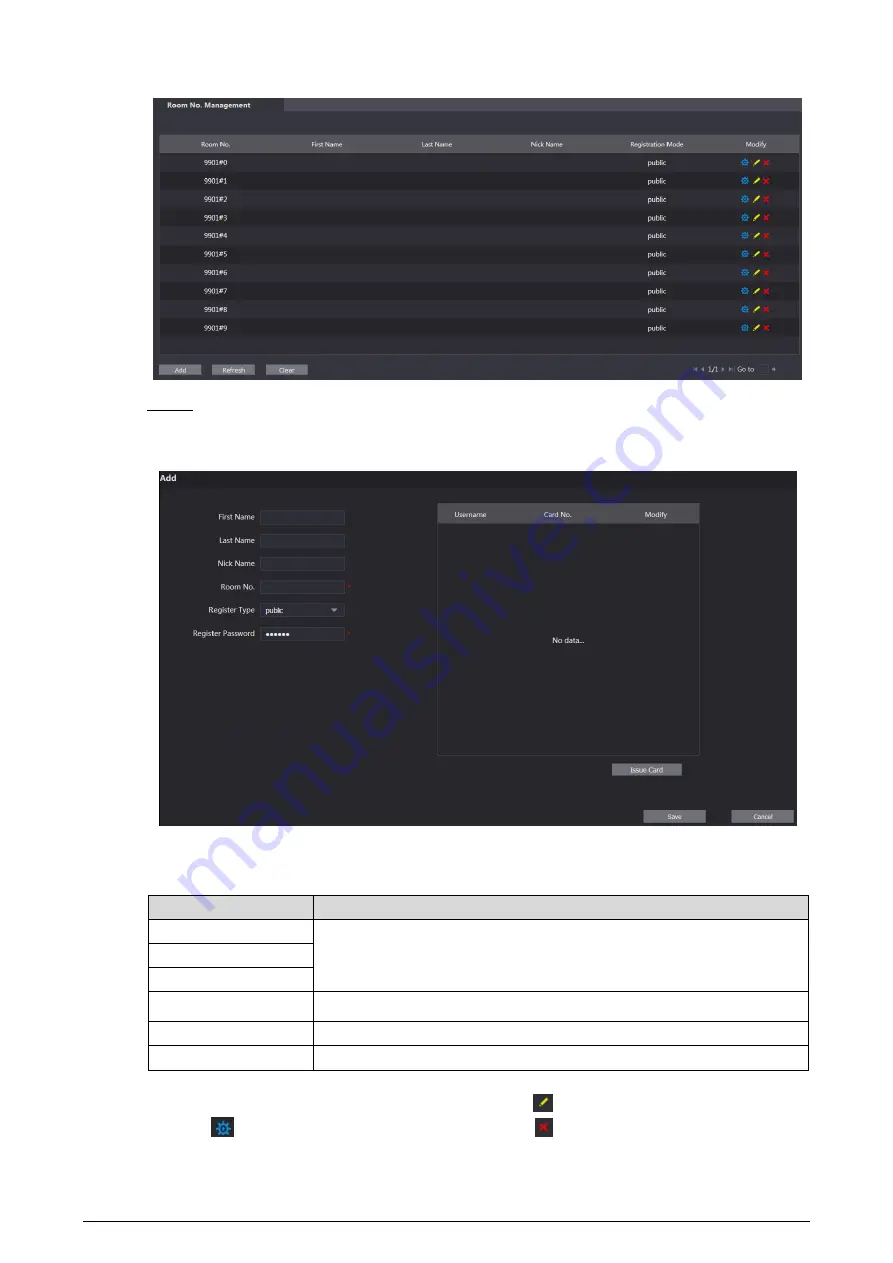
Figure 5-4


  Add room numbers. 

Step 2

1)  Click 

Add

 Add room numbers 

Figure 5-5


2)  Configure room information. 

Table 5-2 Room information 

Parameter 

Description 

First Name 

Enter the information that helps to differentiate each room. 

Last Name 

Nick Name 

Room No. 

The room number you planned. 

Register Type 

Select 

public

, and 

local

 is reserved for future use. 

Register Password 

Keep the default value. 

3)  Click 

Save

The room numbers added are displayed. Click 

  to modify room information, click 

to view the device serial number, and click 

  to delete a room. Click 

Refresh

 to 

view the latest status, and click 

Clear

 to delete all the room numbers. 

Содержание KTP02

Страница 1: ...Villa VTO User s Manual V1 0 0 ...

Страница 2: ...d regulations of related regions For detailed information see the paper manual CD ROM QR code or our official website If there is inconsistency between paper manual and the electronic version the electronic version shall prevail All the designs and software are subject to change without prior written notice The product updates might cause some differences between the actual product and the manual ...

Страница 3: ... do not put on the device anything filled with liquids in order to prevent liquids from flowing into the device Install the device at well ventilated places don t block its ventilation opening Use the device only within rated input and output range Do not dismantle the device arbitrarily Transport use and store the device within allowed humidity and temperature range Power Requirement The product ...

Страница 4: ... 4 Security 11 4 5 Onvif User 12 4 6 5 Household Setting 13 VTO No Management 13 5 1 5 1 1 Adding VTO 13 5 1 2 Modifying VTO Information 14 5 1 3 Deleting VTO 15 Room No Management 15 5 2 5 2 1 Adding Room Number 15 5 2 2 Modifying Room Number 17 5 2 3 Issuing Access Card 17 VTS Management 18 5 3 Status 19 5 4 6 Network Setting 20 Basic 20 6 1 6 1 1 TCP IP 20 6 1 2 Port 20 6 1 3 HTTPS 21 6 1 4 P2P...

Страница 5: ...Step 1 Open the internet browser on the PC then enter the default IP address of the VTO in Step 2 the address bar and then press Enter Device initialization Figure 1 1 Enter and confirm the password and then click Next Step 3 The email setting interface is displayed Select the Email check box and then enter your email address This email address Step 4 can be used to reset the password Click Next T...

Страница 6: ...dress in the browser address bar and then press Enter Step 1 Login interface Figure 2 1 Enter admin as username then the password you set during initialization and then Step 2 click Login Resetting Password 2 2 On the login interface Figure 2 1 click Forgot Password Step 1 Reset the password 1 3 Figure 2 2 Click Next Step 2 ...

Страница 7: ...t the supplier or customer service for help To obtain security code again refresh QR code interface Use the security code within 24 hours after receiving it Otherwise it will become invalid If wrong security code is entered for 5 times continuously this account will be locked for 5 min Click Next and then the Reset the password 3 3 dialog box is displayed Step 4 Set and confirm the new password as...

Страница 8: ...ck to log out reboot the VTO or restore the VTO to factory settings 2 VTO information You can view the general information of the VTO including building No unit No device type and VTO No 3 System information You can view the software version MCU version and security baseline version 4 Config manager Select Device Info or User Info and then you can export the VTO configuration or user information t...

Страница 9: ...uld be restored to the default and you need to click Confirm to save Basic 4 1 4 1 1 Device Properties Events This section introduces the configuration of VTO device type VTO number and auto storage On the main interface Figure 3 1 select Local Setting Basic Step 1 Basic Figure 4 1 Configure parameters Step 2 Table 4 1 Basic parameter description Parameter Description Device Type Keep the default ...

Страница 10: ...t ON to enable this function and then the system takes snapshot every time when the door is unlocked Auto Snapshot talking Select ON to enable this function and then the system takes snapshot every time when VTH user answers a call from the VTO Messages Select ON to enable this function and then the system uploads the messages from visitors to the SD card automatically If there is an SD card in th...

Страница 11: ... select Local Setting Video Audio Step 1 Video audio Figure 4 3 Configure parameters and these configurations will take effect immediately Step 2 Table 4 2 Video parameter description Parameter Description Main Stream Video Format Select the video resolution from 720P WVGA and D1 Format Rate Configure the number of frames in 1 second You can select from 1 to 25 under PAL and 1 to 30 under NTSC vid...

Страница 12: ...he system dims bright areas and compensates dark areas to ensure the clarity of all the area HLC The system constrains bright areas and reduces halo size to dim the overall brightness Light Mode There are four light modes NO NC Auto and Scheduled Select as needed Video Standard Select from PAL or NTSC according to your display device Image Brightness Changes the value to adjust the picture brightn...

Страница 13: ...interval open door command door sensor check time first unlock command and door contact type 4 3 1 Local On the main interface Figure 3 1 select Local Setting Access Control Local Step 1 Local Figure 4 4 Configure parameters Step 2 Table 4 3 Local access control parameter description Parameter Description Unlock Responding Interval The time interval to unlock again after the previous unlock and th...

Страница 14: ...k you use Door Contact Enable After door contact is enabled if doors are not locked at certain period alarms will be triggered and alarm messages will be pushed to the indoor monitor VTH Fire Alarm Select as needed Click Save Step 3 4 3 2 RS 485 You can set unlock responding interval unlock period and second unlock command RS 485 Figure 4 5 System 4 4 This section introduces how to configure the d...

Страница 15: ...ime and the PC system time DST Select ON to enable DST DST Type Select Date to define a specific date for DST or select Week for it Start Time Configure the begin time and end time for DST End Time NTP Enable Select the check box to enable NTP timing NTP Server Enter the domain name of the NTP server Port The port number of the NTP server Update Cycle The time interval that the VTO syncs time with...

Страница 16: ...n the door station web interface RTSP Over TLS RTSP is the abbreviation of real time streaming protocol it s a network control protocol designed for use in entertainment and communications systems to control streaming media servers The protocol is used for establishing and controlling media sessions between end points Outbound Service Information After it is enabled service password information ca...

Страница 17: ...her VTO and VTH devices If you are using other servers as SIP server see the corresponding manual for the detailed configuration VTO No Management 5 1 5 1 1 Adding VTO You can add VTO to the SIP server and then you can make video calls among video door phones that are connected to the same SIP server Log in to the web interface of the SIP server and then select Household Setting Step 1 VTO No Mana...

Страница 18: ...er Password Keep default value Build No Available only when other servers work as SIP server Unit No IP Address The IP address of the target VTO Username The user name and password for the WEB interface of the target VTO Password Click Save Step 4 5 1 2 Modifying VTO Information The VTO that is currently at use cannot be modified or deleted On the VTO No Management interface Figure 5 1 click Step ...

Страница 19: ...ent interface Figure 5 1 click to delete VTO one by one and click Clear to delete all the VTO Room No Management 5 2 5 2 1 Adding Room Number You can add the planned room numbers to the SIP server and then configure room numbers on VTH devices so that you can connect them to the network Log in to the web interface of the SIP server and then select Household Setting Step 1 Room No Management ...

Страница 20: ... differentiate each room Last Name Nick Name Room No The room number you planned Register Type Select public and local is reserved for future use Register Password Keep the default value 3 Click Save The room numbers added are displayed Click to modify room information click to view the device serial number and click to delete a room Click Refresh to view the latest status and click Clear to delet...

Страница 21: ...an issue card to a room and can also set the card as the main card or set the card to the lost state Main cards are used to issue cards for other rooms On the Modify room number interface Figure 5 6 click Issue Card Step 1 The countdown notice is displayed Countdown notice Figure 5 7 Swipe the card that needs to be authorized on the VTO and then the Issue Card Step 2 dialogue box is displayed Issu...

Страница 22: ...te and then the icon turns to The card under lost state cannot be used to open the door Click again to resume Click to modify the user name Click to delete the card VTS Management 5 3 You can add VTS device to the SIP server and the VTS can be used as the management center It can manage all the video door phones in the network make or receive video calls and make basic configurations For details s...

Страница 23: ...e target VTS Register Password Keep default value IP Address The IP address of the target VTS Click Save and then the added VTS is displayed Click to modify IP address and Step 4 click to delete Status 5 4 You can view the working state and IP address of all the connected devices Log in to the web interface of the SIP server and then select Household Setting Status Status Figure 5 12 ...

Страница 24: ...Setting Basic Step 1 TCP IP and port Figure 6 1 Enter the network parameters and port number and then click Save Step 2 The VTO will restart and you need to modify the IP address of your PC to the same network segment as the VTO to log in again 6 1 2 Port 6 1 2 1 Creating Server Certificate Click Create Server Certificate enter needed information click Save and then the terminal will restart ...

Страница 25: ...and you can also modify the port number as needed When HTTPS Port is enabled you can enter https VTO IP address HTTPS port number Login to log in to the web interface or you can enter http VTO IP address port number and the address will be automatically changed to https VTO IP address HTTPS port number Login 6 1 4 P2P P2P network is one in which two or more PCs share files and access to devices su...

Страница 26: ...onnection will fail If other VTO works as SIP server Select VTO in the Server Type list and then configure the parameters Table 6 1 SIP server configuration Parameter Description IP Addr The IP address of the VTO which works as SIP server Port 5060 Username Keep the default value Password SIP Domain VDP SIP Server Username The user name and password for the web interface of the SIP server SIP Serv...

Страница 27: ...23 Firewall Figure 6 4 ...

Страница 28: ...uding call types room numbers start time talk time and end state Call Figure 7 1 Click Export Data to export the records to your PC Alarm 7 2 You can view and export alarm logs Alarm Figure 7 2 Unlock 7 3 You can view and export unlocking records including access card unlock password unlock remote unlock and press button unlock ...

Страница 29: ...25 Unlock Figure 7 3 Click Export Data to export the records to your PC Log 7 4 You can search view and view logs of events in specific periods Log Figure 7 4 ...

Страница 30: ...es function to obtain timely information of firmware updates released by the manufacturer We suggest that you download and use the latest version of client software Nice to have recommendations to improve your equipment network security 1 Physical Protection We suggest that you perform physical protection to equipment especially storage devices For example place the equipment in a special computer...

Страница 31: ... TLS to access mailbox server FTP Choose SFTP and set up strong passwords AP hotspot Choose WPA2 PSK encryption mode and set up strong passwords 11 Audio and Video Encrypted Transmission If your audio and video data contents are very important or sensitive we recommend that you use encrypted transmission function to reduce the risk of audio and video data being stolen during transmission Reminder ...

Страница 32: ... achieve the network isolation effect Establish the 802 1x access authentication system to reduce the risk of unauthorized access to private networks It is recommended that you enable your device s firewall or blacklist and whitelist feature to reduce the risk that your device might be attacked ...

Отзывы: