Dahua ITC237-PW1A-IRZ Скачать руководство пользователя страница 18


13 

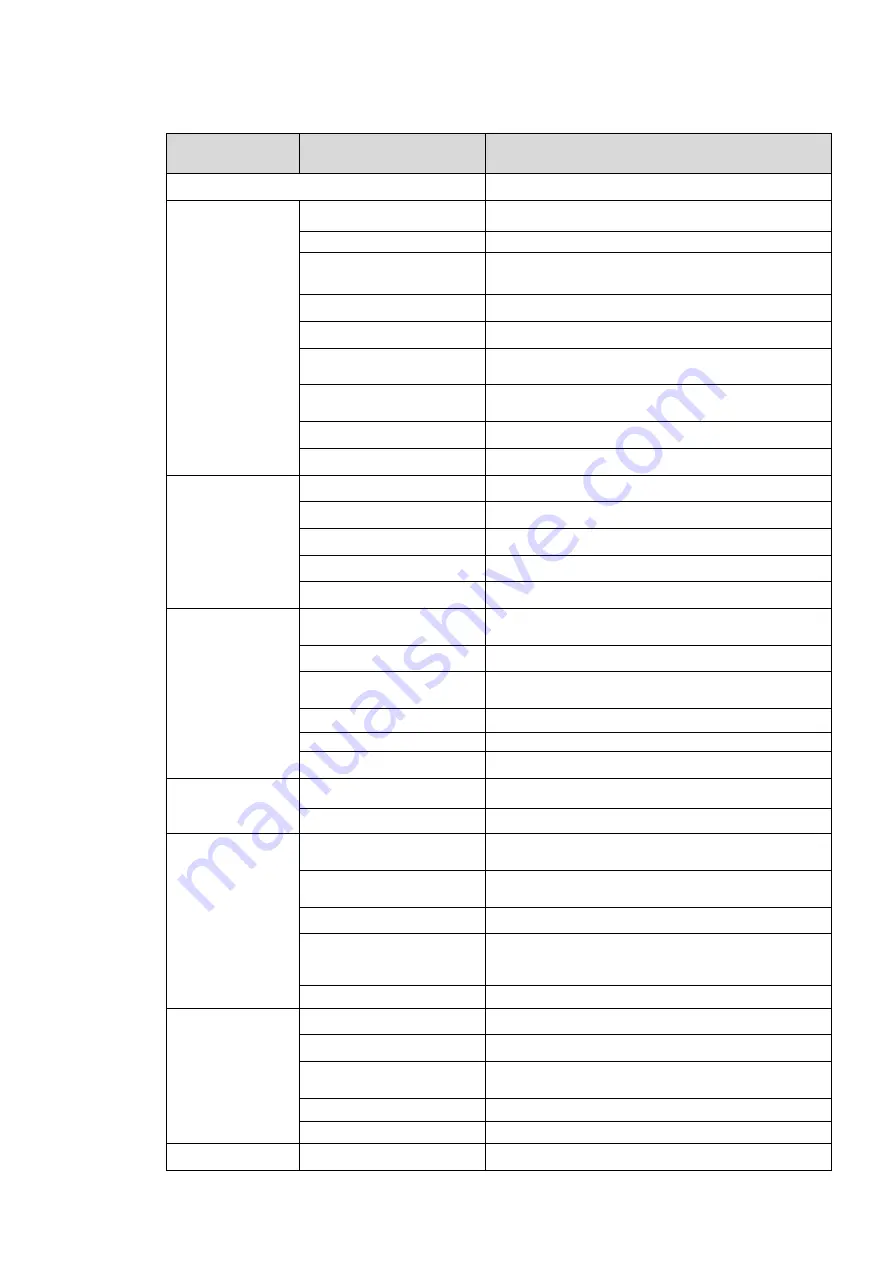
7  Technical Specification 

Parameter Type 

Parameter Name 

Value 

Model 

ITC237-PW1A-IRZ 

Camera 

Sensor 

1/1.9 inch CMOS 

Shutter 

1/12.5

1/10000

manual or auto 

Min Illumination 

0.002Lux/F1.2

color mode

,0.0002Lux/F1.2

black white mode


Scan 

Progressive 

Day/Night Mode Switch 

IR-CUT motorized cut 

Exposure Mode 

Support full auto, customized range auto and 
customized 

White Blance 

Support full auto, HUE range auto, and 

customized HUE 

HLC 

Support 

Edge Enhance 

Support 

Lens 

Lens Port 

φ14 

Lens Focus 

4mm~8mm 

Lens Iris 

F1.8 

Iris Control 

DC drive 

Focal Type 

Motorized 

Image 

Image Compression 
Standard 

JPEG 

Image Resolution 

1920×1080 

Video Compression 
Standard 

H.264/H.264H/ 

Bit Stream 

H.264 stream adjustable 

Video Frame Rate 

50s 

Video Resolution 

1920×1080 

Trigger Mode 

I/O Coil Trigger 

Support 

Video Detection 

Support 

Function 

White-list 

Max support 10000 vehicles on white-list, may 
directly link gateway to output 

Intelligent Recognition 

Plate recognition, vehicle color recognition, 

LOGO recognition 

Remote Control 

Remote config, control via Web 

OSD Info Overlay 

Support, may define time, location, direction, 

lane no. And etc.  

Water-proof 

Support, video/picture with water-proof function 

Port 

Built-in IR 

Built-in 2 LED IR lights 

Network Port 

1, 100/1000M Ethernet port 

Alarm Input Port 

2-ch, opt coupler input (switch), may used in 

coil input 

Alarm Output 

1-ch, relay output, may used to link gateway 

Audio Port 

N/A 

General 

Power 

AC 24V 

Содержание ITC237-PW1A-IRZ

Страница 1: ...i ITC237 PW1A IRZ User s Manual Version 1 0 0...

Страница 2: ...telligent traffic camera This user s manual is designed to be a reference tool for your system Please read the following safeguard and warnings carefully before you use this series product Please keep...

Страница 3: ...lways follow the instruction guide the manufacturer recommended 4 Qualified engineers needed Do not replace the button cell on the internal circuit of the main board without the prior authorization Im...

Страница 4: ...te the mild detergent first and then use it to clean the device Finally use the dry cloth to clean the device 8 Accessories Be sure to use all the accessories recommended by manufacturer Before instal...

Страница 5: ...k 3 2 1 Appearance 3 2 2 Cable Structure 3 2 2 1 Combination Cable 3 3 Cable Installation 5 4 System Network 6 5 Web Operation 7 5 1 Network Connection 7 5 2 Login and Main Interface 7 6 Quick Configu...

Страница 6: ...storage damage Real time respond to external alarm input within 200MS as user pre defined activation setup and exert corresponding message in screen and audio prompt allow user to pre record audio fil...

Страница 7: ...o output the standard video signal in the different illumination environments the amplifier needs to adjust in a wide range The system can enhance the camera sensitivity in low illumination and enhanc...

Страница 8: ...3 2 Framework 2 1 Appearance Figure 2 1 Figure 2 2 2 2 Cable Structure 2 2 1 Combination Cable See Figure 2 3...

Страница 9: ...dio signal not available Network port Connect to Ethernet ALARM_NO Alarm output port Output alarm signal ALARM_COM ALARM_IN1 Alarm input port 1 Connect to 1 ch as signal coil IO snapshot connect to 1...

Страница 10: ...screwdriver to unfasten the screw on cable slot by counterclockwise rotation Step 2 Insert cable to corresponding slot Step 3 Fasten the screw with straight screwdriver by clockwise rotation Note If y...

Страница 11: ...6 4 System Network Please refer to Figure 4 1 for system connection Figure 4 1...

Страница 12: ...r ping HD intelligent traffic camera address to check connection is OK or not 5 2 Login and Main Interface Step 1 Open IE and input HD intelligent traffic camera address in the address bar For example...

Страница 13: ...ation the interface is shown as below See Figure 5 3 Step 3 Please input your user name and password Default factory name is admin and password is admin Figure 5 3 After you logged in you can see the...

Страница 14: ...9 Figure 5 4 Please refer to the Web Operation Manual included in the resource CD for detailed operation instruction...

Страница 15: ...gure 6 1 Step 2 Select one IP address and then right click mouse you can see an interface is shown as in Figure 6 2 Note You can set the IP address subnet mask and gateway for the network camera and P...

Страница 16: ...IP address and then double click it to open the login interface Or you can select an IP address and then click the Login button to go to the login interface See Figure 6 4 In Figure 6 4 you can view d...

Страница 17: ...guration tool main interface is shown as below See Figure 6 5 Figure 6 5 For detailed information and operation instruction of the quick configuration tool please refer to the Quick Configuration Tool...

Страница 18: ...on 1920 1080 Video Compression Standard H 264 H 264H Bit Stream H 264 stream adjustable Video Frame Rate 50s Video Resolution 1920 1080 Trigger Mode I O Coil Trigger Support Video Detection Support Fu...

Страница 19: ...14 Parameter Type Parameter Name Value Power Sync Support Consumption 15W Temperature 30 60 Protection Level IP66 Humidity 95 Dimension mm 94 92mmX94 92mmX272 90mm Weight 1 4kg...

Страница 20: ...not pop up Please set IE security level to low and enable ActiveX plug in Note This manual is for reference only Slight difference may be found in the user interface All the designs and software here...

Отзывы: