Quick Start Guide
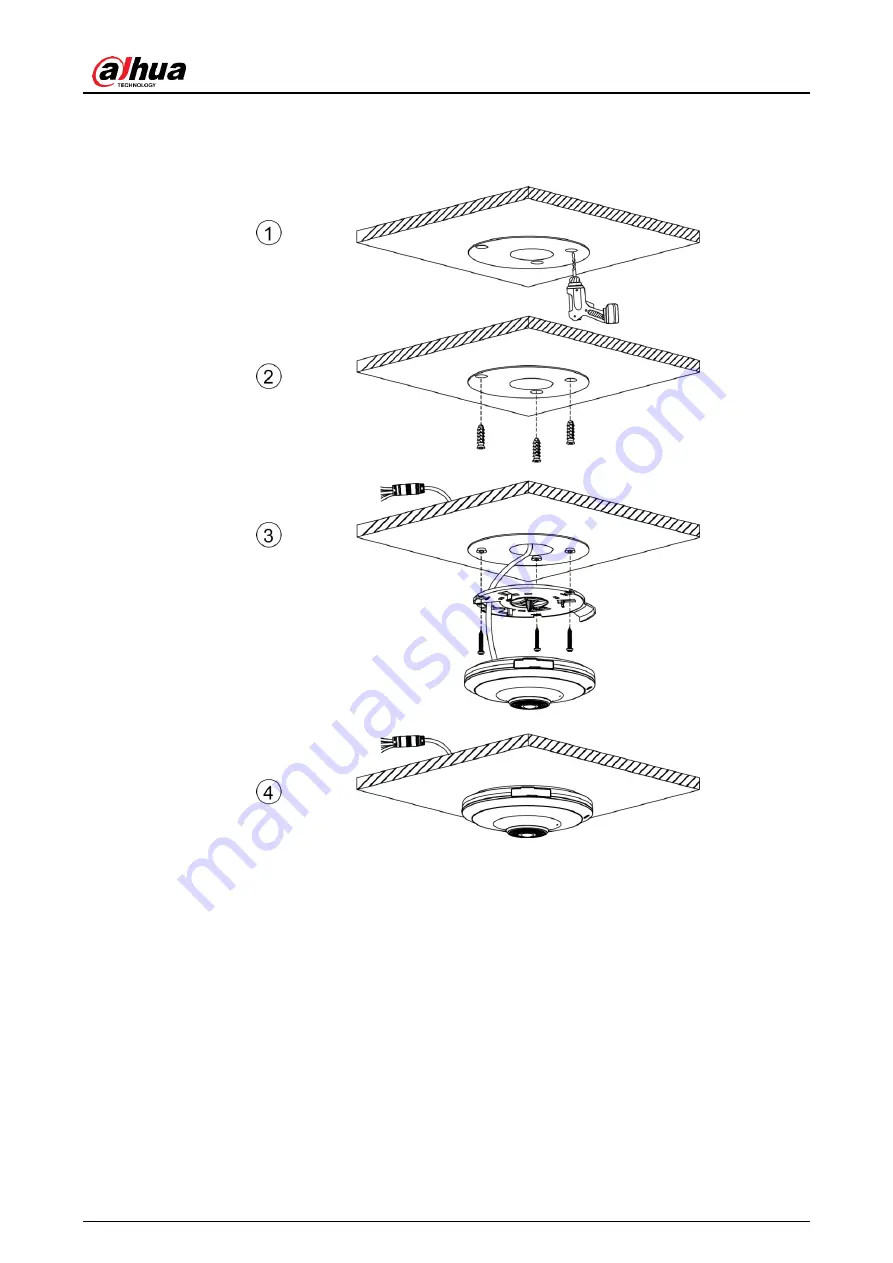
12
Fixing Device
Cable going through the mounting surface
Страница 1: ...IR Fisheye Network Camera Quick Start Guide V1 0 1 V1 0 0 ZHEJIANG DAHUA VISION TECHNOLOGY CO LTD ZHEJIANG DAHUA VISION TECHNOLOGY CO LTD ...
Страница 2: ...revail We are not liable for any loss caused by the operations that do not comply with the manual The manual would be updated according to the latest laws and regulations of related regions For detailed information see the paper manual CD ROM QR code or our official website If there is inconsistency between paper manual and the electronic version the electronic version shall prevail All the design...
Страница 3: ...t Guide II Please visit our website contact the supplier or customer service if there is any problem occurred when using the device If there is any uncertainty or controversy please refer to our final explanation ...
Страница 4: ...any liquid to avoid damage to the internal components Keep the indoor device away from rain or damp to avoid fire or lightning Keep sound ventilation to avoid heat accumulation Transport use and store the device within the range of allowed humidity and temperature Heavy stress violent vibration or water splash are not allowed during transportation storage and installation Pack the device with stan...
Страница 5: ...thyl or moisten soft cloth You can also remove dust with an air blower WARNING Strengthen the protection of network device data and personal information by adopting measures which include but not limited to using strong password modifying password regularly upgrading firmware to the latest version and isolating computer network For some devices with old firmware versions the ONVIF password will no...
Страница 6: ...ts 1 1 2 Connecting Alarm Input output 2 1 3 2 Network Configuration 4 Initializing Device 4 2 1 Modifying Device IP Address 5 2 2 Logging in to Web Interface 6 2 3 3 Installation 8 Packing List 8 3 1 Dimensions 8 3 2 Installing Device 9 3 3 3 3 1 Installation Type 9 3 3 2 Installing SD Card Optional 9 3 3 3 Attaching Device 10 ...
Страница 7: ...ating tape and waterproof tape to avoid short circuit and water damage For the detailed operations see the FAQ Manual Cable list Figure 1 1 For more information about cable ports see Table 1 1and Table 1 2 Table 1 1 Cable information No Port Name Function 1 12V DC power input Inputs 12V DC power Be sure to supply power as instructed in the manual Device abnormity or damage could occur if power is ...
Страница 8: ...larm input Figure 1 2 Connect alarm output device to the alarm output end of the I O port The alarm output Step 2 is open drain output which works in the following modes Mode A Level application Alarm outputs high and low level and the alarm outlet is OD which requires external pull up resistance 10K Ohm typical to work The maximum external pull up level is 12V maximum port current is 300mA and th...
Страница 9: ...larm input end of the I O port There will be high level and low level alarm signal generated by the alarm input device when alarm occurs set the input mode to NO default if the alarm input signal is logic 0 and to NC if the alarm input signal is logic 1 The alarm output on the web interface is corresponding to the alarm output end of the device which is also alarm output end of the I O port ...
Страница 10: ...usable network segment properly to connect the device to the network The following figures and interfaces are for reference only and the actual product shall prevail Initializing Device 2 1 Double click ConfigTool exe to open the tool Step 1 Click Step 2 The Modify IP interface is displayed See Figure 2 1 Modify IP Figure 2 1 Click Search setting Step 3 The Setting interface is displayed Enter the...
Страница 11: ...ons according to your needs and then click OK Step 8 The Initialization interface is displayed after initialization is completed Click the success icon or the failure icon for the details Click Finish Step 9 The device status in the Modify IP interface Figure 2 1 turns to Initialized Modifying Device IP Address 2 2 You can modify IP address of one or multiple devices in one time This section is ba...
Страница 12: ...iple devices will be set to the same if you select the Same IP check box If DHCP server is available in the network devices will automatically obtain IP addresses from DHCP server when you select DHCP Click OK Step 4 Logging in to Web Interface 2 3 Open IE browser enter the IP address of the device in the address bar and then press Step 1 Enter If the setup wizard is displayed finish the settings ...
Страница 13: ...Quick Start Guide 7 Main interface Figure 2 4 ...
Страница 14: ... such as electric drill is not provided in the packing The operation manual and related tool information are contained in the disk or the QR code and the actual packing shall prevail Dimensions 3 2 The following figures are for reference only and the actual product shall prevail Unit mm inch ...
Страница 15: ...Quick Start Guide 9 Installing Device 3 3 3 3 1 Installation Type 3 3 2 Installing SD Card Optional Disconnect the power before installing or removing the SD card ...
Страница 16: ... camera would be reset to factory settings 3 3 3 Attaching Device Make sure that the mounting surface is strong enough to hold at least three times of the weight of the device and bracket To improve device stability grounding the device The grounding hole is near the cable outlet hole at the bottom of the device and the grounding screw size is M3 Mounting Plate Fixing mounting plate When installin...
Страница 17: ...y default make sure it stays open when installing the camera and adjust it to the close state after installation When the mounting plate is at the open state you can install adjust or remove the camera and when it is at the close state the camera is fixed Mounting plate Positioning map ...
Страница 18: ...Quick Start Guide 12 Fixing Device Cable going through the mounting surface ...
Страница 19: ...Quick Start Guide 13 Cable going through the side cable tray ...
Страница 20: ...Quick Start Guide ...