background image

  I 


  Cybersecurity Recommendations 

Mandatory actions to be taken towards cybersecurity


1. Change Passwords and Use Strong Passwords:


The  number  one  reason  systems  get  “hacked”  is  due  to  having  weak  or  default  passwords.  It  is 

recommended  to  change  default  passwords  immediately  and  choose  a  strong  password  whenever 

possible. A strong password should be made up of at least 8 characters and a combination of special 

characters, numbers, and upper and lower case letters. 

2. Update Firmware


As  is  standard  procedure  in  the  tech-industry,  we  recommend  keeping  NVR,  DVR,  and  IP  camera 

firmware up-to-date to ensure the system is current with the latest security patches and fixes. 

“Nice to have” recommendations to improve your network security


1. Change Passwords Regularly


Regularly change the credentials to your devices to help ensure that only authorized users are able to 

access the system. 

2. Change Default HTTP and TCP Ports:


● Change default HTTP and TCP ports for systems. These are the two ports used to communicate and 

to view video feeds remotely. 
● These ports can be changed to any set of numbers between 1025-65535. Avoiding the default ports 

reduces the risk of outsiders being able to guess which ports you are using. 

3. Enable HTTPS/SSL:


Set up an SSL Certificate to enable HTTPS. This will encrypt all communication between your devices 

and recorder. 

4. Enable IP Filter:


Enabling your IP filter will prevent everyone, except those with specified IP addresses, from accessing 

the system. 

5. Change ONVIF Password:


On  older  IP Camera firmware, 

the ONVIF password does not change when you change the system’s 

credentials.  You  will  need  to  either  update  the  camera’s  firmware  to  the  latest  revision  or  manually 

change the ONVIF password. 

6. Forward Only Ports You Need:


● Only forward the HTTP and TCP ports that you need to use. Do not forward a huge range of numbers 

to the device. Do not DMZ the device's IP address. 
● You do not need to forward any ports for individual cameras if they are all connected to a recorder on 

site; just the NVR is needed. 

7. Disable Auto-Login on SmartPSS:


Those using SmartPSS to view their system and on a computer that is used by multiple people should 

disable auto-login. This adds a layer of security to prevent users without the appropriate credentials from 

accessing the system. 

8. Use a Different Username and Password for SmartPSS:


In  the  event  that  your  social  media,  bank,  email,  etc.  account  is  compromised,  you  would  not  want 

Содержание DHI-ASM202

Страница 1: ...Fingerprint Enrollment Reader User s Manual V1 0 0...

Страница 2: ...he default ports reduces the risk of outsiders being able to guess which ports you are using 3 Enable HTTPS SSL Set up an SSL Certificate to enable HTTPS This will encrypt all communication between yo...

Страница 3: ...ng purposes only 12 Multicast Multicast is used to share video streams between two recorders Currently there are no known issues involving Multicast but if you are not using this feature deactivation...

Страница 4: ...data controller you might collect personal data of others such as face fingerprints car plate number Email address phone number GPS and so on You need to be in compliance with the local privacy prote...

Страница 5: ...s description or errors in print If there is any doubt or dispute please refer to our final explanation Upgrade the reader software or try other mainstream reader software if the Guide in PDF format c...

Страница 6: ...se don t dismantle the device arbitrarily Please transport use and store the device within allowed humidity and temperature range Power Requirement Please make sure to use batteries according to requi...

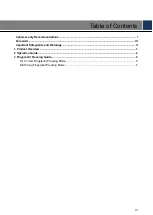
Страница 7: ...security Recommendations I Foreword III Important Safeguards and Warnings V 1 Product Overview 1 2 Operation Guide 2 3 Fingerprint Pressing Guide 5 3 1 Correct Fingerprint Pressing Mode 5 3 2 Wrong Fi...

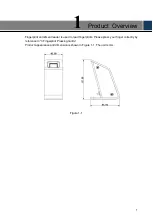
Страница 8: ...Fingerprint enrollment reader is used to read fingerprints Please press your finger correctly by reference to 3 Fingerprint Pressing Guide Product appearance and dimension is shown in Figure 1 1 The u...

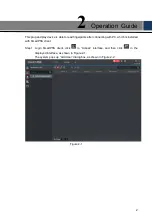
Страница 9: ...erprints after connecting with PC which is installed with SmartPSS client Login SmartPSS client click in Access interface and then click in the Step 1 displayed interface as shown in Figure 2 1 The sy...

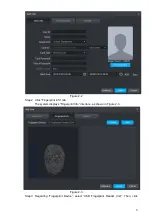
Страница 10: ...gure 2 2 Click Fingerprint Info tab Step 2 The system displays Fingerprint Info interface as shown in Figure 2 3 Figure 2 3 Regarding Fingerprint Device select USB Fingerprint Reader V2 Then click Ste...

Страница 11: ...4 Collect and enroll the fingerprint according to voice prompt Figure 2 4 Click Finish to save fingerprint info Step 4...

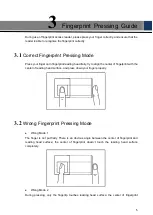
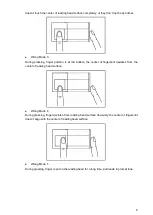
Страница 12: ...flatly try to align the center of fingerprint with the center of reading head surface and press down your finger properly 3 2 Wrong Fingerprint Pressing Mode Wrong Mode 1 The finger is not put flatly...

Страница 13: ...bottom the center of fingerprint deviates from the center of reading head surface Wrong Mode 4 During pressing finger deviates from reading head surface obviously the center of fingerprint doesn t al...

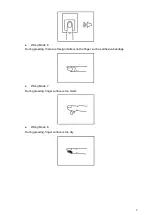
Страница 14: ...ong Mode 6 During pressing there are foreign matters on the finger such as adhesive bandage Wrong Mode 7 During pressing finger surface is too moist Wrong Mode 8 During pressing finger surface is too...

Отзывы: